A bauble is an original bracelet made of threads, woven by hand. Throughout their history, such accessories have been not only exclusive decorations, but also symbols of friendship, mutual love and fidelity. There are two main techniques for weaving bracelets - oblique and straight. The first method is simpler, but the variety of patterns for it is limited. Straight weave baubles, on the contrary, can be made with designs of any complexity, including inscriptions and even portraits.
How to properly secure threads
Weaving a bracelet from threads begins with the fact that these same threads are secured using one of the existing methods.
For the first method, you will need a clamp attached, for example, to a book. The floss threads are arranged in accordance with the future pattern and are clamped with a paper clip so that they cannot jump out of the clamp.
The second method assumes that all the threads of the woven bauble are tied on one side into a knot, which is secured to a pin attached to some fabric.
According to the third method, the threads are attached to the surface, for example, of a table with tape, due to which they slip out of the general bundle.
The fourth method can be called the most modern: the threads are held using tablets - special boards with a clamp, on which, during the weaving process, you can make notes and notes on the technique of making the bracelet.
Square bracelet
This master class tells how to make square baubles. To do this, you will need four colored ribbons at least two meters long. You need to leave about fifteen centimeters at the edges and tie tight knots on each ribbon. Straighten the resulting bundle to the sides. Take one ribbon and fold it over to make a loop.
This process is demonstrated in the photo. Material of a different color is placed on it, starting from right to left. Next, take a ribbon from the bottom of the bundle and adjust it to the previous one. Pull the ribbon located on the left side to the right side, and then insert it into the loop of the first ribbon.
Interesting read: How to weave braids of any complexity.
When you pull the product together, a square should form, as shown in the photo. The base material should be constantly aligned to prevent it from curling. If this is not done, the bracelet may lose its shape. In this case, square baubles will not work and will become deformed. During the weaving process, do not forget to take measurements from the bracelet. Adjust it to your hand to control the required length.
Ribbon baubles.
The photo shows a bauble made of regular square ribbons. It looks even more interesting if you twist it in a circle. There is one condition that must be observed. The bauble cannot be extended in length. In the case of such weaving, the bracelet turns into a simple bandage. And you won't be able to return it to its original shape. In general, a bauble made from square-shaped ribbons is woven quickly. By following all the rules and patterns, you can weave an interesting accessory. The video below demonstrates the detailed process.
Methods of weaving baubles
There are two most common ways to weave baubles from threads: a simpler one is oblique weaving, and a little more complicated is weaving for creating patterns, which is called straight weaving.
Oblique weaving of baubles
In order to start a bauble, the easiest way is to use the oblique weaving method. To do this you will need 12 threads divided in pairs by color. In a bundle, the threads are arranged symmetrically in color, mirroring each other, for example: two red at the edges, then orange, and so on until there are two threads of the same color in the middle. Each thread should be approximately 0.8-1 m.
It is most correct to choose the length of the threads as follows: the desired length of the bauble is increased by 4 times.
The bundle is fastened using one of the above methods, while the knot connecting the threads should be approximately 8-9 cm from the edge. Weaving a floss bauble starts from the leftmost thread.
Thread No. 1 is intertwined with thread No. 2, forming a “four”. The end of the first thread is threaded through the resulting window - the result should be a knot.
It is tightened, after which a similar procedure occurs a second time with the same threads.
After the first and second threads are intertwined with each other twice, you need to repeat the action with threads No. 12 and No. 11 (in this case, the “four” turns out to be mirrored).
The process must be carried out twice with each thread so that the inner colors are on the outside and the outer colors are on the inside. Then two knots are tied on the original outer threads and the first stage of weaving is completed.
The second stage and subsequent ones are done similarly to the first, until the bauble reaches the desired size. At the very beginning, it is worth keeping an eye on the order of the threads in the weaving; after several stages they will fall into place on their own in the correct sequence. With the correct pattern for weaving a floss bauble for beginners, you should get a herringbone pattern.
If the knot is not tied correctly, it should be carefully undone using either a thin crochet hook, a needle, or a pin.
Having finished the bauble, you need to tie all the threads into a knot so that the work does not unravel, and for beauty, finish the thread with a simple braid.
Straight weaving of baubles
Baubles woven using this method, as a rule, are much more varied than those made with oblique weaving. The patterns for them are much more complicated, since the design woven into the bracelet is taken into account: hearts, rhombuses, letters, portraits.
In order to understand how to weave baubles from floss using this method, you need to use threads of several colors, while clearly separating the threads for the background and the threads for the bracelet design itself. If the drawing is supposed to be large-scale, then the thread for it should be much longer than all the others, since the picture will be formed only from it.
When starting to weave, you need to use the leading thread, that is, the leftmost thread, to tie all the other threads. When it reaches the opposite edge, weaving continues in the opposite direction. Thus, the leading thread should make a kind of zigzags. Weaving a pattern begins with the thread for it braiding the leading thread, and then going in the opposite direction, leaving the leading thread free.
Mastering this technique is easier if you observe it in real life or by watching a video. Once this technique is learned, creating your own drawings will not be as difficult a process as it might seem at the very beginning.
What materials will you need
To work, you need to purchase certain tools and materials: it will be difficult for you to do without them. But a video or step-by-step tutorial will tell you how to weave beaded baubles for beginners.
The work requires:
- Beads. This material must be calibrated and of proper quality. After all, in such a miniature product as a bracelet, small flaws will be immediately visible. Therefore, buy material of proper quality made in the Czech Republic or Japan.
- Beads, pebbles, glass beads - everything that is provided for in the diagram or your imagination.
- Fishing line, waxed thread, floss - what you will string the beads on.
- Beading needle with a thin eye.
- Scissors.
- Clasps or rings for fixing the product on the hand.
Fastenings can be very different. The designs for beaded baubles are varied. If you are just starting your journey into the world of needlework, choose simpler items and weaving techniques. You can start weaving on specialized machines. If you don’t have one, you can make a homemade one. To do this, you will need a hardcover book or cardboard box.
Various baubles.
What to do if the thread runs out
It is not always possible to correctly calculate the required thread length. However, there is no need to despair. "Cross" will tell you how to make a bauble, even if the thread is broken. Process photos taken here
The easiest way is to push the finished thread onto the wrong side of the product, leaving enough thread to later tie a knot.
We apply a thread of the same color to the tear site from the wrong side
And then we tie this thread with standard two knots.
From the wrong side, we tie the ended thread with the one that was just inserted.
The place where the threads join is hidden, and weaving can continue further.
Ribbon baubles with names
Everyone knows that baubles with names are woven from floss threads using straight weaving, but for lovers of ribbon needlework we can give advice. The thing is that by replacing the floss with thin ribbons made of soft fabric, such as silk or chiffon, you can also make such bracelets with names. In this video you will see how this work is done with threads, but we will prepare thin strips of satin for it from a fabric that does not fray when cut. This fabric can be natural or synthetic, but it must meet all the requirements of our needlework.
We will choose one ribbon pink, and seven orange. We secure our ribbons to the table surface with pins. We will place the pink one on the left side, and all other ribbons of a different color on the right. We start weaving from the first row, for which we need to make knots with a pink ribbon around each orange one. When all the knots are tied, the first row is completed, and after that we move on to the second row. To do this, we knit the knots in reverse order, from right to left.
Ribbon baubles with names.
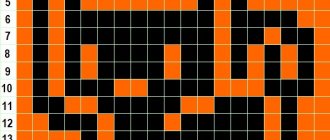
This pattern consists of small circles, each of which represents one weaving knot. There are arrows on each circle. Those that point to the left indicate a left node. An arrow that points to the right side represents the right node. The down arrow indicates the third knot, which is performed by pulling the tape upward.
Material on the topic: How to learn to weave a beautiful spikelet on your hair.
After the diagram, the site gives a detailed description of each node, and this will help us in our work. In the diagram that such a site will provide you, the knots of the letters are indicated in a different color, which is very convenient for needlework. In the row where the first letter knots are made, you must first weave the first left knot, and then five knots for the letter follow according to the pattern.
These letter knots need to be made not with pink, but with orange ribbon, because our letters will be exactly like that. The difference between such a knot is that it is directed upward, and not left or right. The orange tape should be wrapped around the working pink strip and then pulled up. In this row of such knots, make five pieces, as required by our diagram. But the last knot in this row will be the usual one, a pink thread around an orange one, and to the right, not up. Following all the icons of the diagram, we continue weaving baubles with names and bring it to the finish line.
How to make a bauble with your name.
Patterns for weaving baubles
You can learn how to weave this or that bauble from the weaving diagram. To do this, you should learn to read them. First of all, you should understand that a bauble can weave both in a full cycle and in an incomplete one. This can be determined using the arrangement of threads: a complete cycle is characterized by the correct sequence of colors on both sides of the bracelet
In an incomplete cycle, the threads on the left and right will not match each other in color.
An example of a complete cycle is the very first version of weaving a bauble described above, in which, at the end of the pattern, its weaving begins again from the very beginning. In partial cycle patterns, you need to keep track of the sequence of the cycle, but ending the weave map will also mean returning to the beginning of the cycle.
In addition to different weaving cycles, there are patterns with paired and unpaired numbers of threads in the bundle.
Paired number of threads (6 gray and 6 yellow)
Paired number of threads (4 red and 4 white)
Unpaired number of threads (6 blue and 5 yellow)
Unpaired number of threads (5 white, 3 gray and 2 yellow)
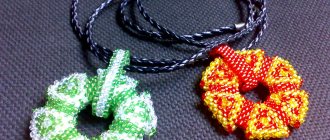
Bauble "Thorn"
The “PIRBLE” bauble must be woven on a nylon thread. At the end of the work, place a lock on the ends of the baubles. You can weave such a bauble with a thin elastic band. Then you won't need a lock. Connect the ends as you weave and, moving away from the junction, tie at least 3 double knots.
- Before you start weaving, take a blank sheet of checkered paper and draw a drawing of the future bauble. Next, get to work, selecting beads of the desired color according to the drawn diagram.
- Place 6 beads on the thread, pass it through the 5th of them
- Pick up three beads and thread the thread through the very first one. Tighten the weave. The first clove turned out.
- Collect three beads and pull the thread through the second one
- Cast on three more beads and thread through.
Bauble made of threads.
How to further decorate baubles
The stores sell a lot of little things that can give your new bauble an original look. For example, you can decorate your product with rhinestones. To do this, you need to weave a bauble from about a dozen threads, and then attach a strip of chain with rhinestones to it.
The fastening is done as follows: a double thread with a knot at the end is inserted from the inside out and brought out to the outside of the bracelet. Holding the chain with your thumb, grab the link and bring the thread back to the wrong side. The procedure is repeated step by step until the chain is attached to the entire bauble. Inside there should be a regular row of stitches along the product. The remaining thread is secured and carefully cut off.
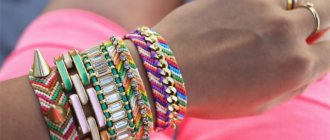
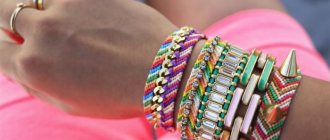
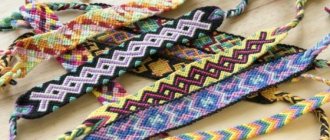
In addition to the external decor, they can be beautifully combined with each other, alternating on the wrist, for example, bracelets of cold and warm shades or placing baubles of the same color but different tones from top to bottom. Rainbow baubles or those that originally characterize their owner look beautiful on the hand, reminding everyone of the hippie times and the original meaning of this decoration.
You can give baubles to friends on their birthdays: it will not be just a gift, but a beautiful thing made with your own hands and, undoubtedly, such a bracelet will seal the bonds of friendship for a long time.
SHARE! "Cross" will not give bad advice! 
Flat bauble made of two satin ribbons
You will need two colors of narrow satin strips (blue and green) of the same width, sharp scissors, and you can start weaving baubles from ribbons. The first master class contains step-by-step photos and video materials. At the beginning of the work, take the first strip and retreat about ten centimeters from its edge, and then fold it in half, forming a loop. Repeat the same steps with the second segment. As a result, we will get two loops on two different ribbons. After this, we place the blue loop on the green one and go around it, bringing it out from above.
Flat bauble made of two satin ribbons.
Then we insert the green loop inside the blue one and secure the weaving. To do this, pull the green loop and tip to one side, and the blue ones to the other. We get two long and two short ends, as well as a green loop. Continuing to weave the baubles from ribbons, take the long edge of the blue strip, and make the next loop, insert it into the green one, and tighten the long green end. As a result of these actions, we are left with one blue loop, into which we need to insert a new green loop and tighten the long edge.
You can’t delay it too much, because the work will be ruined. We should get squares of ribbon, and this will be the correct weave. We weave using this technique until we reach the required length of the ribbon baubles. For a medium-sized bauble you will need about eighty centimeters of satin. When the bracelet is completed, we are left with one open loop, into which we push the end of a strip of a different color, and stretch the two long edges in different directions, forming a knot. To put our ribbon bauble on your hand, simply tie a bow. The master class is completed and our bauble is ready.
Macrame knots in baubles
Weaving baubles using square macrame knots is quite common. Bracelets can be decorated by adding metal rings, stones, etc. For weaving you will need 4 m of thread, metal rings or other decorations, scissors and a needle.
Bracelet with metal insert
Bracelet with woven chain
Let's look at how to weave a macrame bauble step by step:
- We cut the original thread: two pieces of 75 cm, two of 50 cm and one of 25 cm.
- We fold the 50 cm pieces in half with the loop up, thread them into the ring on both sides and tighten the resulting knots.
- We place one of the 75 cm long pieces under the warp threads next to the ring so that the ends of the thread on both sides are the same.
- We tie square knots as described above, alternating left-handed and right-handed.
- Repeat weaving to the required length.
- We hide the ends of the working thread by threading them into the needle and passing the last 4-5 knots in the middle.
- We weave the second part of the bracelet in the same way.
- Temporarily tie the ends of the bracelet together with a small piece of thread.
- Fold the last piece in half and tie similar knots around all 4 warp threads. You should get a “lock” of knots about 1.5 cm in length. We also hide the ends and trim off the excess.
- Choose the appropriate length of the bracelet, trim off the excess and tie knots at the ends of the main threads.
Methods for securing a thread
First, secure the threads in any of 4 ways:
- Use a wide clip on cardboard, book or notebook.
- Using a regular pin, tying knots on it, and then attaching it to a pillow or any fabric.
- Tape it to a table or other hard surface.
- Using a special tablet with a clip (sold in stores).
It should be remembered that when fastening, the threads must be positioned according to the color scheme of the weave. When the floss is securely fixed, we begin to study the main knots.
A little about the history of baubles
The tradition of making such accessories dates back to the Indians of North America. For them, the bauble had more of a symbolic meaning than an aesthetic one. First of all, thread bracelets symbolized friendship and love relationships. The jewelry given by a friend was not removed from the wrist until the thread broke on its own. If a person decided to remove such a bracelet, it could mean the end of the friendship and was a serious insult.
Bauble with a Slavic sign
DIY bauble
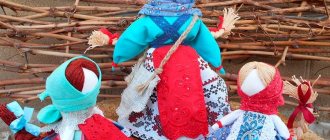
Ukrainian traditional bauble with ornament
In the 20th century, the tradition of weaving baubles from threads was adopted by hippies, and soon the whole world learned about these original decorations. Young people also used bracelets as symbols of friendship and fidelity. They were exchanged during fraternization and were even worn instead of wedding rings. Over time, the function of decoration began to come to the fore, but exchange always implied friendship.
Technique for performing the main components
When weaving baubles, only four basic knots are used:
- main left;
- main right;
- half (left and right);
- flat (straight).
Baubles are very easy to make if you follow the weaving technique.
How to make a clasp
There are several options for fastening baubles.
Option 1 - braided fastener:
- Thin braids are braided from both edges of the baubles.
- After 1 cm, the braids are connected, the fibers are divided into 3 bundles and the braid is braided.
- At the end the braid is tied with a knot. Get a noose.
- The braid of the other end of the bauble will be inserted into the finished loop and serve as a clasp.
Option 2 - tying the two ends of the braids with a separate thread:
- The braids of both ends of the baubles are temporarily secured together.
- These braids are tied in a square knot with a separate thread.
- Finish weaving the thread with a double knot.
- Remove the temporary fastening.
- To prevent the ends of the threads from unraveling, they are treated with transparent nail polish.
Option 3 - Velcro, button, button:
- After finishing weaving the bauble pattern, cut off the excess threads, leaving a small end.
- Glue it to the wrong side and sew on the selected fastener.
- Velcro and buttons sew one half to the front side and the other to the back side of the bauble.
Once the necessary basics have been mastered, it will not be difficult for beginners to weave simple baubles from floss, and you can also draw your own patterns of designs yourself. On the Internet you can find complex designs of baubles on various topics: emoticons, New Year, sweets, plants, Halloween, flags, etc.