On the Internet you can find many patterns for weaving baubles. How to learn to understand them and how to create the bauble of your dreams based on them? To begin with, let us clarify that there are two main ways to knit baubles from floss: straight and oblique weaving. Direct is when the knots in the pattern are located one above the other. Oblique (sometimes also called mosaic) - when the knots of the next row are arranged as if with a shift, and the knot of the bottom row is between two knots of the top. Today we will learn how to weave baubles with straight weaving in two colors. For example, let's take this diagram.
How to weave baubles from floss threads
Creating handmade bracelets is no less exciting than cross-stitching. Anyone can master this type of needlework. The main thing is to learn the basic weaving methods and you can start doing the work.
Basic weaving knots
Needlewomen who are starting to learn how to weave jewelry should initially study the basic knots with which they can create real masterpieces.
The main nodes are left and right. These methods differ only in the location of the working thread. In the first case, it is to the left in relation to the background, and in the second, to the right.
1
Straight
Knitting knots in this case is quite simple. Briefly explained, this is a combination of a pair of left nodes. In the diagram it is represented as an arrow pointing to the lower right corner. Straight knots are the same shade as the working thread.
2
Back
You need to tie a knot according to the same principle as in the case of straight weaving, but in the opposite direction, creating a combination of a pair of right ones. Even for beginner needlewomen, mastering this method is not difficult. In the weaving diagram it represents an arrow directed to the lower left corner.
3
Left tatting
This option can be classified as a type of macrame, but there is nothing complicated about it. The process of creating such a knot consists of combining the right with the left and comes down to performing the following actions:
- Initially, the left regular knot is tied.
- Bring the working thread to the right side.
- This thread is used to tighten the knot, but this time on the right side, and at the same time swap the threads.
4
Right tatting
A diagram will help you tie this type of knot. This is a simple option, similar in technique to the previous one. In this case, all actions when creating baubles are simply performed in a different direction.
5
Where to start
To begin with, you just need to decide what you want to weave and put the diagram in front of your nose. Ready? Then let's move on to the next step. 2. Selection of threads. It depends on them what kind of “friendship bracelet” will come out as a result. Threads should be natural, bright, and not dyed when wet. Otherwise, your entire accessory will fade very quickly.
Don't forget to choose compatible colors that create a bright contrast, due to which the design will be visible.
It is necessary to secure the threads firmly, otherwise they will spin and stretch. The result will be a loose and crooked creation. Believe it or not, there are several proven methods. using an alligator clip.
This is a paper clip that is plas. The strings are laid out “according to the tickets purchased,” and more seriously, in the order indicated on the diagram. And the “beginning” of the bauble is clamped by this “crocodile”. tablet with clip. No, no, a tablet is not an electronic gadget, but one on which sheets of paper are attached.
Well, presenters stand with these at all sorts of conferences or speeches; you can buy them in the most ordinary stationery department. It is convenient because the strings are firmly held under the clamp, and the “masterpiece” itself is before your eyes. Yes, and the diagram can be attached to it.
Scheme for weaving a bauble.
And then nothing will be lost. tie all the threads either in one knot or each in a separate one. And then “put them on” the needle from a pin. Attach the pin itself to what is more convenient and closer to you. The simplest way is to use adhesive tape or tape to the table, for example.
Now let's start learning how to weave a bauble from floss. The simplest and most basic option is a simple braid. It's a rare girl who doesn't know how to weave them. Make knots on both sides (at the end of weaving after the end of the process) so that the braid does not unravel. It will be more difficult with 4 threads. But nothing is impossible.
The principle of this weaving is suitable for patterns with an even number of threads. It consists in the fact that the “workers” are 2 central threads. The left one is transferred to the right side, the right central one is transferred to the left. As a result, they become extreme, and other threads appear in the center. They do the same with them.
So the bauble is woven like a braid from an even number of threads. from 5 threads (and simply from an odd number) the weaving turns out to be very interesting. Especially if the threads are multi-colored and bright. The principle is completely simple. Let's say you took 5 threads.
Take the far left one, but there are still 4 left. So divide them in half: 2 in one direction, 2 in the other. And now you shift this working “extreme left” one exactly between these “2 and 2” - to the center. Then take the thread on the right, from the very edge. And in the same way, divide the threads in half, and place this right one between them.
That's all weaving. Nothing complicated. With oblique weaving it’s a little more difficult. But if you understand the basics, then everything will fall into place. To begin with, the length of the threads depends on the complexity. Over time, learn to determine “by eye”. For the first training “braids”, start with one and a half meters. Let's say we weave from 2 colors.
Scheme for weaving baubles with letters.
Fold in half to create a loop at the top (horseshoe shape). Secure the strings to this “top” using any of the methods. And then we make knots according to the diagram. How to understand where and what is going? But look. The base of the arrow indicates which thread is being taken.
“Tip” is the direction where to send the working thread. The color of the circle in the diagram is the color of the resulting knot. So, the curved arrow is woven in this way: we bend the working thread so that we get something similar to 4. Where the working thread is <. Then we bring its tail under the second thread, lift it up and tighten it tightly. Half the work is done. Now we finish the knot, but everything is in a mirror state. Those. 4 must be mirrored. But the principle is the same.
We bring it under the second thread, its tip up and tighten. We send the rest of the thread in the direction where the “tip” of the arrow points. A straight knot is almost the same as a “curved” one, only weaving with a “four” is always in one direction. That is, if an arrow is drawn from left to right, then make the working thread at an angle to the left, like a < sign. And if the knot is straight from right to left, then a mirror one is made 4. The angle of the working thread is like >. And the same is done twice. Thus, with a straight arrow in the diagram, the thread does not change its position in relation to the secondary thread. Both times it is either clearly to the left or to the right of this thread. In turn, with a curved arrow - first on one side, then on the other side.
For weaving baubles, 2 main knots are used. Right and left node. Right node. This knot moves the working thread from left to right.
- Grab the working thread with the index finger of your left hand. Grab the warp thread with the little finger of your left hand.
- With your right hand, twist the free end of the working thread around the warp thread and pull it into the resulting loop from the inside out.
- Tighten the knot tightly.
- We repeat points 1 to 3 again. Our node is ready.
The left knot moves the working thread from right to left.
- Grab the working thread with the index finger of your right hand. Grab the warp thread with the little finger of your right hand.
- With your left hand, twist the free end of the working thread around the warp thread from right to left and pull it into the resulting loop from the inside out.
- Tighten the knot tightly.
- We repeat points 1 to 3 again. Our node is ready.
Basic knots for weaving baubles.
In this case, if we need to leave the working thread in the initial position, the following combinations of knots are used. You need to leave the working thread on the left, then weave 1 part of the knot with the right loop, and 2 parts of the knot with the left loop. If you need to leave the working thread on the right, weave the left loop then the right one. The diagram indicates
You need to get acquainted with the knots on which the weaving is built at the very beginning, so that later you can easily create masterpieces. Each node has its own designation on the diagram, therefore, in order to read the “technical specifications” and understand it correctly, we suggest studying different types of nodes and learning how to work with them.
The main nodes are right and left. These are the simplest loop elements, the difference between which lies in the location of the working thread. In the left one it is to the left of the background, in the right one it is on the right. The paired combination of these elements gives several types of nodes:
- left/right;
- right left;
- left/left;
- right/right.
We will have to work with these four types in the future to weave floss baubles for beginners.
Types of knots for weaving baubles.
Straight knot
In short, it is a combination of two left nodes. Pay attention to the fashionable patterns of baubles: a straight knot is indicated by an arrow, the tip of which points to the lower right corner. This is where the working thread will go. The finished knot will be the same color as the working thread.
Straight knot.
Reverse knot
It is tied in the same way as a straight knot, but in the opposite direction, combining two right knots. In the diagram it is indicated by an arrow that points down and to the left, and shows the direction of travel of the working thread.
Left tatting
Don't let the name of this macramé knot scare you away: there's nothing complicated here. Under the left tatting lies a combination of left and right basic knots. It is tied as follows - the first is a simple left knot, after which the working thread will be on the right, we tie a simple right knot with the same thread, swapping the threads. It is thanks to the direction of the working thread that such a symbolic designation of the knot appeared: the arrow goes down, to the right, but then changes direction in the opposite direction.
Product made using tatting technique.
Right tatting
The technique of execution of this knot is absolutely mirror of the previous one. First we knit the right loop with the working thread on the right, and then the left one. The thread eventually returns to the original side. This can also be seen on the symbolic icon that is used to indicate the right tatting in the diagram. Try tying the knots listed above: practice will help you choose the appropriate thread tension and weave a smooth, beautiful fabric. In addition, having mastered these knots, you will read the product diagram and can learn how to weave baubles easily and quickly, even from ordinary threads.
Tatting scheme.
Methods for securing a thread
At the beginning of weaving, it is extremely important to correctly secure the floss threads. This must be done so that they do not crumble and the knots do not move out. There are options that are suitable for the process of making jewelry at home and while traveling.
For example, the threads can be placed on a flat surface and secured with tape so that a few centimeters remain from the free edge. If the floss threads are excessively slippery, they are additionally tied in a knot.
6
It is also possible to throw the free edge of the main threads over a board or notebook and fix them with a simple stationery clip.
7
Also among the simple ways of securing a needlewoman is tying each thread of floss around a pin. The pin itself can be attached to clothes, a tablecloth, or a seat in a car.
8
You can also tie the threads in a knot and hook it with a pin.
9
The symbolism of flowers in weaving baubles from floss
When choosing colors for your future work, do not forget that each of them, both individually and in combination, has its own meaning.
So, red symbolizes love, fire, energy, passion, affection, joy.
Orange is also energy, affection, fire, and also sexuality and pacifism.
Yellow is abundance (after all, it is the color of money, gold), summer and sun, as well as envy, jealousy, insincerity. But it is also a symbol of faith, fate, beauty, melancholy.
Green – life, hope, harmony, nature; youth, faith, eternity.
Blue - the color of the sky and water - symbolizes peace and limitlessness, intelligence and peace, friendship, hope and harmony.
Blue is also peace and tranquility, harmony, as well as purity, infinity, openness to new things, long memory, spirit, love of God, friendliness.
Purple – friendship, originality, as well as wisdom, mysticism, dreams.
White is Chinese Yang energy. This color is a symbol of sophistication, innocence, truth, independence, purity, beginning, path, faith, light, freedom, life, goodness.
Black - its opposite - is Yin energy, independence, loneliness, sadness, strong energy, closedness to communication, magic, fearlessness, detachment, purification.
Gray – sadness, modesty, old age, insensitivity, punctuality.
Color combinations in weaving floss baubles:
Two colors each:
Green and red – love for nature.
Red and yellow - crazy love.
Red and blue – pacifism.
White and red - free love.
Black and red - unhappy love, anarchy.
Yellow and green - Greenpeace.
Blue and yellow – sky and sun.
Purple and yellow - insanity, madness, paranoia.
Black and yellow - evil, black magic.
Green and white – faith in God, white magic.
Blue and white – inner light, harmony in detachment from the world.
White and blue - hope.
White and pink – variability.
Purple and black – black magic.
Black and white - pride, loneliness, the cycle of birth and death, Yin and Yang.
Three colors each:
White, orange and green - hippies.
White, red and black symbolize the path of life (birth, life and death).
Blue, white and black - hope.
Green, blue and yellow - nature, pacifism, naturalness, brotherhood, harmony.
Yellow, green and red – reggae music, Rastafarianism.
Yellow, blue and orange - a passion for esotericism, the culture of the East.
Orange, green and white - passion for the culture of Ireland, Celts, Druids.
Black, brown and yellow are black magic.
Black, red and white are symbols of anarchy.
And finally, a color compatibility table that will help you determine which colors should be used together and which are strictly contraindicated.
How to learn to understand bias weaving patterns
The methods of oblique and straight weaving are different and are designated differently. At the very beginning, you should learn to understand the diagrams. In the case of oblique weaving, the knots are arranged in a checkerboard pattern, between the working threads of the floss, and each element in the second row is placed between the threads of the first.
10
The figure shows the most common version of the scheme, where each of the circles represents knots based on their type, and the lines represent threads of different colors.
Weaving begins by arranging the threads in the following order:
- orange and then gray;
- a pair of yellow ones;
- gray and orange again.
The decoding when using this technique of weaving baubles will be as follows:
- In the first row, a straight knot is tied with an orange floss thread on a gray one. The same manipulations are performed with yellow threads and the reverse version is performed with orange on gray.
- In the second row, only the forward and reverse versions are performed, and the gray threads located at the edges are completely unused.
- In the third row, the presence of double tatting knots is already noted.
- Each new row continues to be performed according to the scheme, and upon completion of the report, all actions are performed from the very beginning.
Even with the help of simple patterns you can create incredibly beautiful patterns on baubles.
How to determine the length of threads for a bauble?
Of course, when you gain experience, you can easily determine the required length of thread for a particular pattern by eye. But if you are just starting to get acquainted with the fascinating world of fennel weaving, then you should know that when weaving a lot of threads go into knots, and the finished fennel is several times shorter than the original thread. Only one double knot takes up approximately 8 millimeters of thread. Moreover, on both sides, 5-8 centimeters should be left for making ties.
If the fringe you have chosen is woven with oblique weaving, and the pattern is simple (it is a symmetrical pattern, not a complex pattern), the pattern is based on 1-2 knots and no more than 8 threads, you can take threads 80 centimeters long. If the scheme is more complex, then the length should be about 1 meter. No more is needed - because the longer they are, the more tangled they will become and the more difficult it will be to untangle them, especially if you are weaving a bauble somewhere outside the home, for example, in transport or while waiting in line.
If the thread runs out early, you can always take it to the wrong side and add a new one in its place. However, if you do not want such difficulties, then the length can be measured to be more than 1 meter, but each thread will need to be wound into a separate skein and secured with something, for example, with an elastic band.
On one of the sites on the Internet, a formula was discovered that can be used to calculate the length of the thread:
Length = wrist circumference x 4.3 + tie length x 2
For reliability, you can add about 10 more centimeters to the resulting figure.
With straight weaving, everything is usually more complicated, because these are more complex knots and patterns. Therefore, if you immediately take on it, then be prepared for the fact that you will have to lengthen the threads (in one of our articles we already wrote about how to add thread, so we will not repeat ourselves now). Most often, the length is determined by how many knots will be woven with this particular thread. For example, the background (leading) thread should be made the longest, and the outer ones, as a rule, turn out to be the shortest, and their length can be calculated by adding the estimated length of the fennel and ties.
You can determine the length of the bauble using the formula: number of rows x 2.3.
We take the length of the remaining threads at the rate of 0.8 mm (or preferably 1 cm) for each node in the pattern.
However, if you don’t want all these mathematical complexities, then it’s better to just take 1 meter of thread, master their lengthening perfectly so that there are no extra knots left, and add the required length every time it’s needed.
Straight weave
Friendship bracelets with inscriptions or designs are most often made using this simple method. When using the direct method, all elements are located one above the other, folding into horizontal rows. Initially, you should start making simple patterns using floss threads of only one color. The first of the shades becomes working, and the second is only background and invisible on the finished product.
The warp thread should be long. It forms the future canvas, moving along the background from right to left and then in the opposite direction.
11
In the first row, the needlewoman knits knots from left to right. In the second, all actions should be turned in the opposite direction. This way you can quickly increase the desired length.
What are baubles?
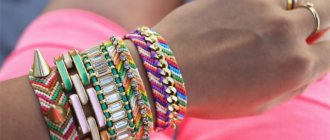
Baubles (fennecs, or, as they are also called, friendship bracelets) are jewelry whose name speaks for itself.
Usually one of the friends weaves such a decoration for another, and the second wears it until the thread breaks or frays. They are usually made from threads, but there are other varieties, for example, from beads, ribbons, and laces. At one time, this tradition was popular among American hippies, who, after exchanging baubles, were considered sworn brothers. Well, today fennies are used simply as decoration, although if you want to say something with this gift, you can do that too: after all, each of the colors used in such decoration or their combinations has its own symbolism, which we will talk about a little further.
We weave a bauble with a name in a direct way
When creating personalized baubles, the direct method is used. The first step is to start creating your own scheme, made in two shades. According to your drawing, you will need to knit the product, following the following recommendations from experienced needlewomen:
- The first step is to choose multi-colored floss threads in contrasting tones.
- Trim the yarn so that all elements are the same length.
- The resulting structure is fixed in any convenient way and weaving begins.
- By making straight knots, several rows of the same color are made.
- Then they continue to weave according to the same principle, but the elements of the inscription are done in the reverse way so that they are clearly visible against the main background.
- At the end of weaving, the same number of rows is performed as at the beginning of the work, in one color.
All that remains is to make the bracelet ties and trim off all the excess.
12
13
14
15
Weaving oblique baubles
Baubles made using the direct method are distinguished by a much greater variety of designs. These can be hearts, letters, geometric shapes and even portraits, but the patterns for such baubles are much more complicated.
To weave such bracelets from floss, you need to use several colored threads, distinguishing between the pattern thread and the background thread. If the design on the bauble is large, then the thread for the design should be taken much longer than all the others, since the image will be formed from this thread.
The leading thread should be on the left edge and when starting weaving, you need to tie the remaining threads to the right edge, and then continue weaving in the opposite direction. That is, the leading thread will constantly zigzag along the fabric of the bauble. The thread for the pattern first weaves around the leading thread and then goes back.
Of course, it won’t hurt to watch a video of such weaving, then it will be easier for you to master it. In the future, having studied the basics of such weaving, you will even be able to create your own designs using this technique, which is not as difficult as it seems at the beginning.
If you suddenly run out of thread, don’t worry, bring the rest of it to the wrong side, and there, with two standard knots, tie an additional thread of the same color. And weave calmly further, the junction will not be noticeable.
If you are planning to make a bauble with an already developed pattern, you need to be able to read the weaving patterns of these bracelets. Among the main factors that need to be taken into account: what cycle is weaving in, complete or incomplete. This can be recognized by the arrangement of the threads; with a full cycle, the colors are located on both sides in the correct sequence. And if the color of the threads on the right and left does not match, then the cycle is incomplete.
The weaving technique described above, when, having completed a row, its weaving is repeated from the beginning, is a typical example of a full cycle pattern. In an incomplete cycle, you will need to carefully monitor the sequence, since the end of the card means a return to the beginning. In addition to differences in cycles, patterns can differ in the even or odd number of threads in the bundles.
Oblique weaving lesson (eternal classics and arrow)
There are many different ways to create baubles, but only the two simplest options are especially popular. Even a novice needlewoman can master them.
Two-color weave
As a rule, such baubles are woven using bright, contrasting shades. For example, you can do the work with black, red and white threads. Embroidery floss can be done using a bobbin. Before starting work, you need to prepare a pair of threads of each shade. The creation of decoration is carried out according to the following principle:
- The prepared material is collected into a bundle, tied in a knot and placed on the work surface. For convenience, secure the resulting structure with tape.
- Now you need to weave a braid, but a small one.
- The thread on the far left goes into work first. In this case it is red. Start tying with its help on the adjacent pair of straight stitches, avoiding twisting of the fabric.
- The same working thread is passed through all the remaining ones, creating double knots.
- The next row must also begin with the leftmost element. The second red thread will act as it. Now try to repeat all the actions that were performed in the first row.
- On the left is white yarn. With its help, they reach the right side and perform all other rows according to this pattern.
- When the required length is reached, the threads are separated. All that remains is to weave a regular braid, which was done at the initial stage. Its length should be a maximum of 5 - 7 centimeters.
All that remains is to tie the ends with a regular knot and trim off all excess. With the help of our online master class, even novice needlewomen can easily master this technique.
16
17
18
19
Arrow (braid)
An organizer for floss threads and other materials, a color map and a conversion table may be useful in your work, but in principle, the palette can be selected without them. To weave modern baubles, it is enough to master the simple technique of forward and reverse stitching. For example, needlewomen can complete the work using four satin ribbons in bright colors, which should be folded in half and tied into a bun.
Step 1. Initially, weave a regular braid and fix it on the surface.
20
Step 2. Work begins from the left edge (tape K1). In this case, you need to tie simple straight stitches, reaching Z1 (inclusive) and stop.
21
Step 3. After this, knit the right half using the reverse method, using K2 ribbon, reaching Z2. Then tie satin ribbons K1 and K2 together using a straight stitch.
22
Step 4. Now start knitting again on the left, using ribbon G1, reaching the center. After this, the right edge (G2) is used and in the same way as in the previous stage, the tapes are connected to each other.
23
Step 5. Continue weaving in this way until the desired length is achieved. Then braid the braid again and finally just tighten the knot.
24
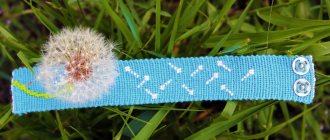
Simple baubles
For this bracelet and bookmark we used floss. For a blue and white bauble bracelet you will need 4 white threads and 4 blue threads, approximately 90 cm each. For the bookmark, take 7 threads of rainbow colors: red, orange, yellow, green, blue, indigo, violet. The length of these threads is slightly larger - 100 cm (depending on the desired length of the bookmark). One thread in our description is a weave of 8 threads of floss (they are collected like this in a skein of floss).
You will also need a safety pin, scissors and a small pillow to which you will pin your project while working. Progress:
- Tie the threads in a knot, leaving approximately 10-12 cm of free ends. Thread a pin through the knot and pin it to the pillow. Place the pillow comfortably between your knees.
- Arrange the threads in the following order. For a blue-blue bracelet: blue thread, blue thread, blue thread, blue thread, etc. (see photo below).
- That is, the colors should alternate. For the bookmark: red thread, orange, yellow, green, blue, indigo, violet (that is, in the order of the colors of the rainbow).
To weave this bracelet you need to know only one knot - the right loop knot. Of the arbitrary number of threads, some are working, others are knotted. Using a working thread, an even number of knots are tied on the knotted threads, while the knotted thread is pulled tight.
Simple baubles.
During work, the knotted and working threads constantly change places and working functions: the working thread becomes knotted and vice versa. F1 - working thread, F2 - knot thread. Pull knotted thread F2 with your left hand. With your right hand, place working thread F1 from left to right around thread F2, pull the end through the resulting loop and move the knot up. Make the second knot in the same way and move it tightly to the first. The double knot is ready. Now the threads have changed their working functions.
Using thread 1 (far left), tie two right knots on threads 2, 3, 4, 5, 6, 7 and 8. That is, first you tie two knots on thread 2 with thread 1 (blue in the photo), then with the same thread 1 tie two knots on thread 3 and so on until the 8th. Thus, thread 1 moved to the right and became the far right. Again, take the leftmost thread (in the photo it is blue), the one that was number 2, and tie it in the same order all the threads in turn until it is in the extreme right position.
The entire bracelet is woven in this way. When the bracelet is the desired length, stop. Braid the loose ends and tie a knot at the very end. If necessary, trim the threads with scissors. Take out the pin and braid the same braid at the other end of the bracelet and make a knot. A bookmark for a book is woven in the same way, only we made one of the braids shorter (the one that is sewn into the cover).
Wide bauble.
Types of ties
Weaving a bauble is only half the battle for any needlewoman. Neither a narrow nor a wide bracelet can be used unless a clasp is provided. There are many simple and complex options for designing the ends of the accessory.
Pigtail
When you weave the bauble, there is no need to cut off the remaining threads. Divide them into three parts and braid them with a regular braid. After this, you need to tie a simple knot and trim with scissors.
25
Tourniquet
You can make the fastener in the form of a kind of tourniquet. Coping with the job when using this method is a little more difficult, but quite possible. Follow the instructions and weave a tourniquet:
- Divide the bundle into 2 parts.
- We twist both elements in the same direction. For example, to the right.
- We twist the resulting bundles in front of us in the opposite direction.
- We fix a kind of rope on the bauble with a simple but strong knot.
26
27
Additional decoration for the bauble
Among modern jewelry and in handicraft stores there are many things that will decorate a future bracelet. One example: having made a bauble of twelve threads, you can attach rhinestones to the top of it, which will add originality to the product.
Attach the decoration with a double thread, which is held in a knot from the inside, bring it to the front side. Grasp a link in the chain with rhinestones and bring the thread back and repeat for each link, making a knot at the end and cutting off the remaining thread. On the inside of the bauble you will get a series of neat stitches.
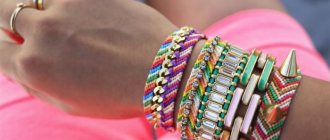
In principle, you can not only decorate one bauble, but also combine several bracelets of different colors or patterns. This way you can achieve very interesting, beautiful combinations that, by their very appearance, lift the mood of the owner.
So, we hope now you understand how to weave a bauble from threads. This cute little thing can be used as a universal gift for your friends for a birthday or other occasion. A hand-made bauble is much more valuable than a factory craft and will make your friendship much stronger.
The beginning and end of the “candy”
When creating bracelets, the ends can be decorated in the form of a kind of candy. If the baubles are woven obliquely, you will have to work a little. In this case, triangles are highlighted that will act as the last link. Oblique weaving patterns will help with this.
28
It is necessary to take and select the central node. At the same time, try to make a diagonal line from it in one and the other direction, with the help of which you indicate the part of the stencil that will not be used.
29
In this way, needlewomen also complete the process of creating baubles. In this case, similar actions are performed.
Choose threads of different colors and their length
Since you are still learning, you should not immediately try to weave complex bracelets
. It is better for beginners to try their hand at simpler options. When buying threads, remember that bracelets should be bright and noticeable; choose floss in contrasting colors. Threads of the same color, but in different shades will turn your bracelet into a dull, unremarkable ribbon on your hand. Look at the diagram, decide on the width of the bracelet and the color scheme of the future product.
To determine the length of the thread, take the length of the future product and multiply it by four
. But if you cut with a margin, I think nothing bad will happen. Having finished the product, you can tie a knot from the remaining floss threads and complete the bracelet.
During operation, a thread may accidentally break or be insufficient. It's not scary. Substitute a new one and continue working. Then tie the old and new thread on the wrong side. Secure the knot and cut off the excess with scissors. And keep working.
How to make a bauble with rhinestones, spikes, chain or beads
Multi-colored bracelets look attractive on their own, but they can be additionally decorated with other elements. For example, these could be simple chain links, rhinestones, beads or spikes, which are sold in specialized stores for needlewomen.
Using beads or beads as decoration, they are simply strung on floss or sewn into a ready-made accessory using a needle. Most often, products are decorated with rhinestones. Among the easiest ways to accomplish this task is to glue them onto a finished bracelet. However, in this case, traces of glue may remain on the product. It’s better to immediately buy a thread with small rhinestones on it and weave an accessory with it.
Macrame baubles
The macrame style is more openwork because denser nylon threads are used. Weaving is distinguished by square knots typical of the macrame technique.
Macrame lace bracelet Macrame bracelet with beads
For one bauble you need four meters of nylon thread. We will also need a ring on which the first knots are tied, and which will serve as decoration for the entire bracelet. Therefore, this element can be as varied as you like - a heart, a stone, a keychain, a pentagram, a square, a triangular, etc.
Adjustable clasp
It is worth noting that the macrame style makes the ideal adjustable clasp for any bauble.
How to weave baubles with names
To make a personalized bauble, simply take a piece of paper and draw a diagram on it. It's good to use a computer program. There are special scheme generators where you just need to enter the desired name, click on the “create scheme” button and you can safely begin manual work.
All actions are performed quite simply. One shade will serve as the main background, and a different color will be used for the inscription. When determining the length of the floss, the size of your wrist is taken into account. Regardless of the width of the product, the threads should be approximately three turns.
What is needed for weaving bracelets
For knitting all kinds of crafts, craftswomen have adapted a variety of materials: bracelets and boxes, a vase and a stand for office supplies, and many other necessary and useful things they can weave from floss, jute cord, woolen threads, soutache, various yarns and even newspaper tubes.
Every teenager now knows how to weave bracelets from floss threads. And there are, of course, those who do not know how to do this, but really want to learn. Beginners learning how to weave fashion jewelry from threads must first decide what kind of bracelet they want to make before getting started. For yourself or for a gift? What colors do they see it in? You can draw a sketch of the future product. Once you have decided, start preparing your workplace.
Methods for securing threads
- You can use a paper clip and a book or piece of cardboard.
- You can attach the threads with a pin to a piece of thick, tightly stretched fabric. And, if the pattern is not very complex, some craftswomen attach the threads directly to their jeans.
- Scotch tape is often used to attach threads to a surface (usually a table).
- To weave these bracelets, it is very convenient to use a tablet (a special board with a clamp on top). The tablet is also convenient because you can attach on it the diagram of the pattern you have chosen for weaving a bracelet. You can also take notes on it, write down ideas that arise during the work process.
These are the main ways to prepare for work
. You can use any. The main thing is that you feel comfortable and that nothing interferes with your creativity.
Bauble made of 2 threads
In this case, there is no need to use complex circuits. First, try weaving a bracelet using just two threads of different colors. For example, blue and red ribbons can be used. The principle of performing a simple technique is as follows:
- The elements must be connected to each other using a regular knot.
- The structure is fixed on the work surface with a large pin.
- Using a red thread, make the left knot, placing its corner over the blue one, bring it inside and tighten it.
- Now perform the right knot using a blue element, performing the same actions, but in the opposite direction.
- Tie knots in this manner until the desired length is achieved.
- All that remains is to tie a double knot, connecting the ends of the resulting accessory and cutting off the excess.
30
After mastering this simple technique of weaving baubles, you can begin to create more complex patterns.
For now, let’s look at what types of baubles there are and what they are made of.
Made from beads , this is perhaps the most difficult type of baubles to make, because it requires perseverance, the ability to choose colors wisely, and great patience. Moreover, beads, unlike threads, do not lie in a calm heap, but constantly crumble... But the decoration that turns out in the end is no worse than the works of art that were made, say, by bead embroiderers in the 19th century.
Thread baubles - most often they are woven from iris and floss, however, options are possible, for example, acrylic or wool. You can create different types of designs using a variety of knots. Most often they talk about baubles with oblique weaving or straight weaving.
Ribbon baubles are made easier and faster than their “brothers” from other materials. Most often, they use satin ribbons of the same color or two that match each other.
Other options are possible, such as baubles made of leather or leatherette, hemp (material made from the stem of hemp), colored synthetic laces . In general, such decorations are woven from anything that can be woven into something, there are no limits to imagination