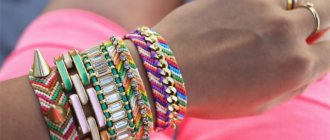
Today we suggest making you fashionable bracelets with your own hands.
Thread bracelets have become mega popular today. This bracelet is worn not one at a time, but in rows of several copies. On your hands, such bracelets look very stylish and fashionable. Well, today we propose to make such a bracelet with your own hands. Look at the photos and videos, choose the bracelet you like and start learning. All you may need (depending on the type): floss, beads, chain, button, gold nuts, ring, scissors and duct tape. Good luck!
Interesting: DIY necklace, making fur earmuffs.
You will need: floss or lacing threads, large beads, scissors and a button.
Measure the required number of threads so that we get a piece that, folded in half, will be equal to: 1st side 66 cm, 2nd 48 cm. Then we fold it in half (see photo). You should end up with 3 identical threads and 1 short one.
At the very top, retreating about 1.5 cm, we make a knot. Cut off the short 4th thread.
Start weaving. We braid 2.5 cm and thread the beads into the left strand.
We weave further and thread the beads onto the right strand.
Again, left-empty-right. This is what you should get.
We weave along our wrist. At the end we also simply weave about 2.5 cm (as at the beginning). Let's make a knot.
We thread a button through one end, two threads into each hole. We tie a knot.
Cut off the excess threads. We made such a beautiful bracelet from threads and beads with our own hands.
Oh, here's what they look like in different colors.
And on the hand. Very stylish. Is not it?
To weave a bracelet in macrame style you need: 3.5 m of thin colored lacing, a flat ring, an embroidery needle, scissors, and tape.
Cut the lacing into sections: 2 x 70 cm, 2 x 50 cm and one 25 cm. Fold the 50 cm piece in half and pull out the loop on the ring. Also repeat on the other side of the ring (see photo).
We take a 70 cm piece, fold it in half and make an air loop, wrapping it around our 50 cm piece. We throw the left side of the 70 cm cut over the right and thread it inward as shown in the figure on the right.
Pull it all the way and push the resulting knot tightly, all the way to the top.
Now we make an air loop on the other side. This time we throw the right side on top.
Make a tight knot again. Continue weaving macrame: left, right, left, right, etc., until you reach the desired wrist length.
Upon completion of weaving, insert the needle in turn from one side and the other and pull through 2-3 knots as shown in the photo.
Trim off any excess threads.
Now take the remaining 25 cm piece and pass it through the outer strands on both sides, tie it as shown in the photo.
We begin to weave macrame as in the beginning: left, right, left, etc.
Having made 5-6 rows, we also sew them up using a needle.
We make knots on both sides and cut off. If the last steps seem difficult for you, you can simply weave macrame around the entire perimeter of the bracelet.
Your original macrame bracelet is ready.
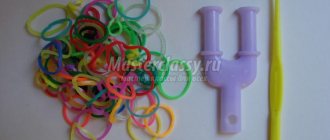
What you need to get started
Preparing for the creative process is not difficult. To do this, you need to have a minimum of tools : scissors, a pin, a small fastener and a variety of floss threads for every taste.
Before starting work, determine how many colors will be involved in weaving. For minimal beauty, even two colors are enough. This choice is recommended for those who are just starting to master the method of creating baubles.
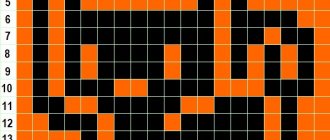
Having mastered two colors, you can move on to more complex and multi-color combinations. The beauty of a thread bracelet lies in the pattern, so you need to come up with it in advance, transfer it to a piece of paper and turn it into a diagram, later using it as a guide.
The choice of thread thickness is of little importance. The difference in beauty will be noticeable only in the nodules. When the threads are thin, the knots will hide, but if they are thicker, they will be visible. It is important to start practicing with regular threads. After a little training, you can use other, more exotic materials for weaving.
Design and style selection
The main detail of the future bracelet will be the central pattern. Each master puts a certain meaning into his creation, so the pattern should symbolize something important. If the bracelet is woven as a gift, it is advisable to make the pattern in such a way that its meaning is clear to a loved one.
Today it is possible to apply absolutely any design. With increasing experience, you will be able to weave real beauty. It is important to choose the right threads to create the background. This thread should be noticeably longer than others, because it will be spent the most.
The choice of method depends on the purpose. There are only two of them: straight and oblique weaving. It is recommended to start with the oblique method, because mastering the direct method requires some experience.
With the oblique method, the pattern is created by weaving threads at key points, which consistently form the pattern.
Weaving can be done in straight stripes or in a diamond pattern; a more complex technique is a zigzag in the shape of a Christmas tree. Oblique weaving visually appears to be a limited texture, while straight weaving allows your creative imagination to truly unfold. Ornaments of any complexity are already created here. Straight weaving allows you to add a name or a few important words to the design, which is especially appreciated if the bracelet is intended as a gift.
Straight weaving method
When you get tired of creating simple angular patterns, you can move on to real creativity using the direct weaving method. In this method, the correct beginning plays a key role:
- The threads folded in half should form a loop of the correct shape.
- A “working” thread is selected, with the help of which the loop is encircled along its entire length.
- When the entire length is intertwined with knots, it's time to change direction and go in the opposite direction.
- To create a pattern, a thread of a different color must be braided around the “working” thread.
After the entire distance has been covered, it is time to open the diagram and orient the further process according to it. The “working” thread should be longer than the others in the set. The process begins with the leftmost thread and proceeds further in order. When the left has reached the middle, it is left and the extreme right begins to move to the middle. Oblique planes of two colors already create the first pattern.
From yarn
Necessary materials:
- thick yarn of contrasting colors - 5 ropes of 55 cm;
- glue;
- thick cardboard or board;
- stationery binder.
Step-by-step instruction:
- Fold each rope in half.
- Gather the threads into a bundle and secure the ends with glue or tie them in a knot.
- Secure the yarn to a dense surface with a binder.
- Place the loops on the fingers: the index and middle fingers of both hands and the ring finger of the right. You will get two threads on one side and three on the other.
- Drop the loop from the right index finger to the left ring finger. Move the remaining threads to the free space on the hand.
- Cross the loop from the left index finger to the right ring finger. Move the remaining threads towards the freed finger.
- Repeat weaving one by one until the end of the ropes.
- When finishing the bracelet, tie a knot.
- Decorate the sealed edge by tying it with thread. Connect the bracelet.
Video: weaving a bauble from woolen threads
Important notes in work
If a thread suddenly breaks in the creative process, this is not a problem, because the break point can always be left on the wrong side. If you carefully begin to weave a continuation of the thread of the same color, the break will not be noticeable.
While working, the threads accidentally form unnecessary knots, so you should always have knitting needles or a regular pin on hand to untangle the mistake. Going back takes time and nerves, so it is better to make bracelets from threads according to the pattern. A visual reference is a better support than self-activity.
It is important to know that there is already a computer program that can generate a weaving pattern, laying out any pattern at will. The user chooses how his bracelet made from floss threads will look. Weaving patterns selected on a computer expand creative horizons. This way you can transfer any creative idea into a new scheme, and not just use templates.
Additional decor for the bauble
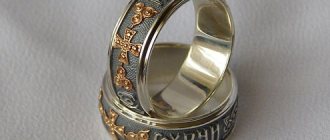
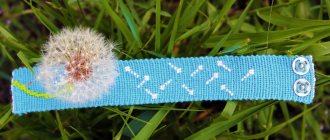
In conclusion, let’s talk about how you can further decorate the bracelet we made. The classic option is to string beads or beads onto threads. But other, more unusual options are not excluded. For example, buttons, pendants or rings.
Jewelry with bolts or nuts looks extraordinary. Just to make it all look harmonious, gold-plated parts are selected for the warm tones of the threads, and silver-plated ones for the cold ones.
Baubles made of threads attract with their variety of bright colors, which are sometimes lacking in everyday life. This decoration is practical: it does not deteriorate in the sun or in water. And completely uninteresting for thieves.
Creating such jewelry can be a great hobby for children, as it activates finger motor skills, develops imagination and a sense of beauty.
Additional decorations
To give your bracelet originality, you can weave various elements into its structure. Among the dozen threads, rhinestones are intricately sewn, which can be evenly distributed over the pattern or connected in a chain.
To secure the rhinestone strip to the outside of the bracelet, you can use double thread. It is first brought to the wrong side, a rhinestone is caught, and then brought to the surface. To do this, it will be enough to take a thread twice as long as the surface of the bracelet itself.
How to fasten a bracelet yourself?
For fans of bracelets, they came up with a device that helps you quickly put on the jewelry yourself. You need to put your hand in the recess, place the clasp ring in the groove and fasten the bracelet.
There is also a more budget-friendly way. To do this you need a small strip of tape. Use it to glue the edge of the jewelry to your wrist. This fixes the product and is now very easy to put on.
The most common way to fasten jewelry yourself is to use a paper clip. Unbend it and secure one end next to the carabiner ring. The free edge will no longer fall off, and putting on the bracelet will be much easier.
You can also use a simple thread by analogy.
In this article, you learned how to tie bracelets and how to choose the right bracelet length. Good luck and creative mood! We wish you the most beautiful and reliable bracelets!
Bauble with beads
To secure a pattern of small beads, the thread should be divided into two unequal fragments: long and short in a ratio of two to one. When we bend the long part in half, it should coincide with the short piece.
All three parts are connected to each other so that the ends are the same length. To attach the bead, you need to form a loop that will fit the size of the bead itself.
The bead is put on through the right side, then intertwined with the middle thread. You can give freedom to your imagination and try options with a variety of colors and sizes. The main thing is that the bead decoration fits correctly on the weaving pattern.
From floss
Necessary materials:
- floss in rainbow colors;
- cardboard;
- binders;
- scissors.
Step-by-step instruction:
- Cut a circle out of cardboard with a small hole in the center. Divide it into 8 equal segments and make cuts along the edges approximately 0.5 cm deep.
- Measure 7 threads of the same length and fold them in half.
- Secure the floss with a stationery binder at the bend and braid it into a braid approximately 4 cm long. This will be the loop of the bracelet.
- Bend the braid and secure with a binder.
- Insert the threads into the center of the circle and distribute them among the holes.
- Leave one cut empty. Pass two threads on the right, and throw the third into it.
- Turn the circle and repeat the action through a couple of ropes. This way the desired length is woven.
- Remove the floss from the circle and tie a knot. The bracelet is ready.
Bracelet clasps
Floss bracelets are designed so that a loved one will not take them off for a long time as a reminder of friendship. Therefore, many bracelets are created without the use of clasps. They are attached to the hand using a tied knot.
Of course, romance sooner or later gives way to practical life, so convenient clasps appear so that such a bracelet can be removed without breaking the threads. If a person believes in symbols, then the bracelet of a loved one cannot be damaged.
The simplest fastening is done using a loop. A miniature button is sewn on the reverse side. Velcro is also attached to both edges. If you have an idea to make a metal buckle, you need to take this into account before starting work. The buckle needs to be braided with threads from the first minutes. Only when it is secured can you begin to work on the main part of the bracelet.
Buttons are used as fastening less often than other methods, but it may seem even more convenient to use. You can practice with different fasteners and eventually choose the one that suits your taste.
Thus, making various bracelets from floss can be turned into your hobby, revealing the facets of your creative inclinations. Anyone can learn to weave with enough effort. To do this, it is enough to have the desire to study the schemes and implement them in the finished product. Making a bracelet as a gift is a good way to express your feelings to your close friends and loved ones.
How to properly tie a knot on a bracelet so that it is adjustable?
To tie an adjustable knot on such jewelry, you can use one of the methods below.
weaving knot
This is the most basic way to make an accessory with adjustable length. Using such a fastening will allow you to make a bracelet with only a bead (pendant) and waxed cord.
Technique:
- you need to take 2 ends of the lace and put on the pendant, placing the cords parallel;
- then you need to tie a knot with each end in turn.
As a result, both tips should point down, diving into the loop. Now you can lengthen the structure by moving both one knot and the second.
Using waxed cord it will look like this. The knots must be tightened tightly. The ends should be cut short. After this, they can be scorched with a lighter (if the cord is dark in color) and coated with colorless varnish.
Chinese slip knot
This method is quite easy to implement. it will take a few minutes at most . This is a great option for making a bracelet with adjustable length.
Technique:
- The lace must be bent in the shape of the Latin letter U, bringing the opposite ends closer.
- Now you should form a loose loop. One end of the cord should be pulled over the other so that they overlap by approximately 10 cm, and they should be placed parallel to each other.
- The outer end of the cord must be bent in half. You need to grab the top end of the lace and pull it back along the outer edge of the loop. There is no need to touch the inner end of the cord parallel to it.
- The ends of the cord must be brought together to form a small loop. The inner end of the lace should be brought to the outer end, bent in the shape of a small loop. There should be 3 parallel layers of cord in the area where the ends intersect. You need to leave a free long end on the outer edge. It will help complete tying the knot. Hold the overlapping sections with one hand and pull the free end with the other hand.
- The outer (free) end of the lace must be wrapped around three parallel layers. The free end should be passed first over three parallel sections, and then under them, pulling it up.
- Now you need to tie the cord around the loop. The free end must be wound around three parallel pieces of cord. You need to make at least 2-3 turns until the entire free end is used or until 3 overlapping sections are completely wrapped. It is advisable to ensure that the loose end does not overlap itself, as this may cause the cord to become tangled.
- The free end (it should be long enough) must be threaded into the loop at the end of the cord.
- Now the knot should be secured. To do this, you need to tighten the “ring” around the loop as tightly as possible, holding the right end of the large loop with your ring and little fingers in the process. If the knot is tied correctly, it will slide freely along the cord.
Adviсe
To make it easier to master tying such a cord, it is advisable to use the following recommendations:
- for training it is better to use a longer lace ;
- to learn how to make such knots, it may take several trial attempts;
- if the knot stubbornly fails , you need to continue training and they will definitely be crowned with success.
The Chinese slip knot is in some cases also called a triple connecting knot.
Sliding knot for clasp
Such a knot can be made on a thin cotton cord, the length of which does not exceed 90 cm.
To do this you will need to do the following:
- The ends of the lace should be taken so that there is a margin of 14 cm on each side, and directed towards each other.
- Now the right tip of the lace needs to be bent so that it is outside and located at the edge (as shown in the photo). The resulting loop must be fixed. Its length should not exceed 10 cm. You need to continue working with the right end; the knot will move along the left in the future.
- The first end must be placed from left to right, circle the loop and part of the cord several times. Then you need to carefully lay the rings formed after entwining in the direction opposite to yourself. Then you should make 3 more such turns, holding the knot with your finger and adjusting the tension of the cord. After this, both ends must be passed through the resulting loop so that they can be pulled into a knot. There is no need to tighten it too much.
- The next knot must be tied similarly to the previous one. This will be a passive node. Then you should make a loop at the second end of the cord. To do this, you need to wrap the free end around it about 5 times and tighten the knot. You need to thread the remaining tip of the lace into the loop formed. The remainder can be trimmed with scissors.
An adjustable knot is an indispensable item when making simple jewelry. The ability to tie such knots will help you easily turn any available cord or thin rope into a bracelet. And no special fittings are required for this.