Needlework
07/28/2018 Anastasia Prozheva
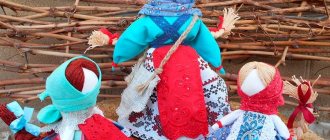
The character of Baba Yaga has been known to everyone since childhood, because this heroine is present in every Russian folk tale. Flying on a broom in a mortar, she scares everyone around her, her friends are evil spirits from the forest, she loves to do dirty tricks. And many children are very afraid of this grandmother. But in vain, because this is just a character in fairy tales. It has long been fashionable to use such interesting characters in the decor of your own home. In addition, children really like to have such dolls in their arsenal of toys. And that’s why many craftswomen are happy to do the craft. Do-it-yourself Baba Yaga is highly valued among lovers of curiosities and, in general, everything that brings mysticism into our lives.
Such dolls can be made from any materials: natural, fabric, plastic, knitted - it is important to use your imagination, and inspiration will come on its own.
How to sew a Baba Yaga doll
To make the body (height 28 cm) the following was used:
- a piece of stretch gabardine measuring approximately 50 x 20 cm,
- filler (sintepon, holofiber, etc.),
- for hair - wool for felting (or ready-made tresses or threads),
- fabric for clothing,
- white knitted sock,
- lace, ribbons,
- jute twine,
- broom stick and twigs.
The pattern can be printed or translated from the monitor screen. There should be 2 pieces of each body part.
Master Class
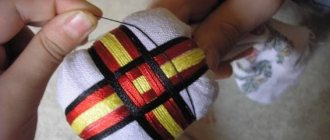
Fold the fabric in half, lay out the pattern pieces along the grain, and trace them along the outline.
You can cut out the blanks, adding 5 mm to the allowance, and then stitch them. But it’s more convenient to stitch first and only then cut. At the same time, do not forget to leave open spaces for turning parts and stuffing inside out.
To fill the “body parts” you can use padding polyester, holofiber, padding polyester, etc. The stuffing of parts should be very dense, without lumps. We stuff the top of the arms and legs, as well as the bottom of the body, a little looser. Thanks to this, it will be convenient to sew them to each other in the future.
We sew the head filled with filler to the neck with a hidden seam. Before this, you can lightly drip Moment glue so that the head does not “fidget” on the neck when sewing. We insert the legs into the bottom of the body, the edge of which we bend inward. We sew with a hidden seam. We do not fix the arms on the body yet.
At the next stage we begin to dress Baba Yaga. This Granny Hedgehog's shirt is not removable. Cut out a rectangle from the fabric, fold it in half, sew down the vertical seam, it will be on the back. We also process the top and bottom.
We put this “cylinder” on the doll and tighten the top edge at the neck.
We cut out the sleeves by placing the handles on the fabric and tracing the outline. We grind the blanks, turn them inside out, and put them on the handles. We sew them together with the sleeves to the body using the button-thread method. That is, we pass through the body with a long needle and thread.
Next, we sew pantaloons. We use a regular white sock for this. We cut a rectangle out of it, make a cut for the legs, and sew down the side seams. We decorate the bottom of the pantaloons with lace. We tighten the top with a satin ribbon or insert a hat elastic.
The skirt is sewn in the same way as the shirt. We decorate the hem with lace or braid, you can make a torn edge, sew on patches. Baba Yaga should have an apron; its appearance also depends on your imagination.
We put socks on the doll, which we sew from the remaining part of the same white sock from which the pantaloons were sewn.
Crafts from pine cones
A lot of interesting crafts can be made using natural materials. Basically, such toys are made from cones, twigs, acorns and other things.
To make an interesting Baba Yaga toy, you will need:
- bump, preferably with a tail;
- light yarn for hair;
- a small piece of fabric;
- disposable plastic cup;
- branches;
- Super glue;
- tow rope;
- scissors, paper and marker.
The threads must be collected in several rows to make it look as shown in the photo. Then you need to fold the resulting material in half, and tie it in the middle, moving a little away from the outskirts.
The produced hair must be attached to the bump using glue. But the tail on the bump will be the nose of our Baba Yaga.
It is necessary to cut out a square from the material, which we will use in the form of a scarf. Afterwards, you need to put the headdress on the doll’s head so that the ties are in front. Then the head needs to be attached to a long cone, usually a spruce one, which will serve as the body.
Related article: Beaded hearts for beginners with photo patterns
Use branches to make hands. Then cut out a mouth and eyes from paper and use a felt-tip pen to draw on these details. And we also need to take more twigs, from which we need to make a broom and attach it to the handles of our craft.
Any Baba Yaga must be in a mortar, so it is necessary to make it. To do this, take a plastic glass, cover it with paper, prepare branches that should be slightly higher than the glass itself. Next, we cover the entire container with twigs in a circle and get a mortar. Stepping back a little from the boundaries, you need to wrap the product with ropes, both from below and from above. We put our Baba in the mortar, and the product is ready.
You can also make Baba Yaga from tights, from burlap, and at the same time, to maintain shape, you can make dolls from a plastic bottle.
Making Baba Yaga for order in the house
Do you love Baba Yaga as much as I love her?!
A familiar character from Russian fairy tales since childhood. Without it, a fairy tale is not a fairy tale.
And she’s not evil at all, just a little bit - who does Ivan turn to for help? And Baba Yaga - you're always welcome - never spared any guidance or good advice. And he will feed you, and give you something to drink, and soothe you in the bathhouse.
How many babies did grandma bake?! In Rus' there was a ritual of “after-baking” or “over-baking” of premature or sick babies. The baby was wrapped in dough and placed on a shovel in a warm oven, where the baby warmed up. Of course - not into the fire! Fear has big eyes - someone ignorant saw it and spread terrible rumors. This ritual was usually performed by the eldest woman in the family or a local witch.
Do you know that in Rus' only a woman who gave birth to at least one daughter was called a woman? Those who had only sons until old age were called young women. Baba Yaga, according to various sources, has from 7 to 40! daughters! Wow! Not for nothing - woman!
And she never ate anyone, never harmed anyone!
It's scary - yes! Well, what about our people without severity?!
Master class “Baba Yaga” with your own hands
Zvantseva Lidiya
Master class “Baba Yaga” with your own hands
Master class “Baba Yaga”
nylon sock, cotton wool, thread and needle (for the head)
beads (for eyes)
woolen threads and black fabric (for hair and scarves)
colored fabric and wire (for the dress and body base)
plastic bucket for mortar and tinsel for decoration
a pencil and some twigs from a broom (for a broom)
Stocking technique
Baba Yaga in the stocking technique is used to protect living quarters; in addition, she will serve as a very interesting decoration for the home.
This master class will help even novice needlewomen make such a kind Baba Yaga with their own hands. In addition, such crafts can be done with children, which will not only delight them, but also teach them the correct technique for working with various materials.
What you need to have to make such a doll:
- nylon fabric;
- padding polyester material;
- some wire;
- small fabric materials;
- thick gray threads to make hair;
- eyes.
All products that are sewn using the hosiery technique use a tie; it is possible to make a doll of different sizes.
We start making our doll from the head. To do this, you need to take a padding polyester and put it in one piece of fabric. And use a piece of wire to make a nose with nostrils. Afterwards, this part must be wrapped using padding polyester.
Next, the nose blank must be attached to the head with needles and threads. Then we take nylon tights and fit them around the resulting head and nose. Next, using padding polyester material you need to make the cheeks and chin. It is best to start the workflow from the spout. In this work, it is important to choose the right thread color to match the nylon material. We tighten the thread on the right side and head to the left. You need to stitch it a few times, then draw the needle diagonally from the bottom of the nose - this will help make the nostrils.
Related article: New Year's paper toys: video tutorials with photos and diagrams
Once the nostrils are done, we move on to shaping the nose itself. To do this, the needle must be inserted under the wing of the nose, but removed from the formed nostril. These parts should be stitched in turn to make it symmetrical. When the nose already has clear outlines, cut the thread and begin making the cheeks. We take a needle and insert it into the cheek area from top to bottom. We do such stitches more than once in one place, this is necessary to give the desired shape. We leave the thread and cut it off near the base of the needle. And now we form the second cheek. We do the same as in the previous part. When a certain number of stitches have been made, we tie long pieces of thread together - we perform a tie.
Now let's make our grandmother's mouth. Baba Yaga's lower lip protrudes slightly, and the second one falls in. To do this, you need to take the doll by the chin and do the work of forming the lower lip. When the bottom is finished, the work process is done from the top. To make recesses for the eyes, you need to pull the needle out from the back of the head. Then we do the eyelids and wrinkles - everything is done using a screed.
Now you need to take not very large strips of nylon and then you need to wrap it around the eyes. This is done to create wrinkles. Afterwards, the resulting eyes must be glued to the place that is prepared for the eyes. Next, we take gray threads, from which we need to make the hair of our Baba Yaga. Many craftswomen use fur strips or even artificial hair instead of threads.
The head work is finished. Next we need to complete all the other details of our grandmother.
To make the handles, you need to use wire, which will be the main skeletal material, then we wrap all the fingers and the hand as a whole with padding polyester - then we cover them with tights and make ties and sew them together.
Related article: Master class “DIY New Year’s topiary” with photos and videos
But the body can be made from a plastic bottle if Baba Yaga is small in size. In the event that the doll should turn out to be large, you need to take tights or knee socks from nylon and fill it with padding polyester. And with the help of a thread and a needle make a chest, a hump on the back. The legs are made in the same way as the torso, of course, without the plastic bottle. Sew and tighten each piece, as when making dolls using the hosiery technique.
Afterwards we need to connect everything together and dress our Grandmother. Clothes can be sewn yourself or taken from dolls. Don't forget about the headdress and broom, which is very important for Baba Yaga.
By following the patterns that are often presented when making such dolls, anyone can sew a similar grandmother. The main thing is effort and attentiveness, and everything will work out.