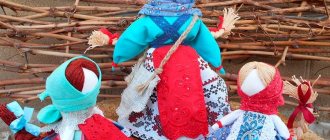
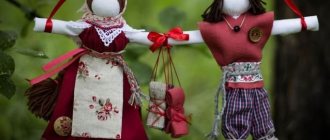
The Russian folk rag doll Round Dancer is a very cheerful and amusing toy. And it’s not difficult to do it yourself. Children 7-8 years old can handle it quite well. You can make such a craft not only at home, but also in technology lessons in grades 1-4. And it will be interesting for older children too. It is better to make a pair of dolls at once - one for the left and the other for the right hand. If your child is still too young to take part in the creation of this doll, then you can make it for your baby yourself, as a toy. This rag doll was and remains not only fun, but also a kind of exercise machine. In order for the Round Dancer to straighten her skirts and spin around in the dance, she needs to be “revived.” To do this, quickly rotate the stick on which the doll is attached with your fingers. This movement prepared the girl’s hands for the work of a spinner. Of course, today no one spins wool by hand. But the development of fine motor skills of the fingers, coordination and arbitrariness of their movements is an important and useful task. After all, then “obedient” fingers will be able to cope with writing more easily. And, in addition, the development of the hands contributes to the development of speech. A child may not be able to spin two Round Dancer dolls simultaneously with his left and right hand (you may not be able to do it right away either). Then start with one doll. Rotate it first with your right hand (if the child is right-handed), and when it starts to turn out right, try with your left. If you can’t rotate it with one hand at all, then let your child spin the Round Dancer by placing the stick between the two frets. In this case, you need to make a movement as if you were rubbing your hands. The folk rag doll Round Dancer can be used as a decorative element when decorating any folklore events. Or you can even make her a participant in the game by using the doll as a “stick” in the old Russian game “Kalechina-Malechina”.
How to make a folk rag doll Round Dancer with your own hands.
We take a fairly even and long stick as the basis of the doll. We used skewers. Making the head of the Round Dancer doll. We wrap cotton wool, flax tow, rags or padding polyester around the end of the stick. Since the skewers are sharp at one end, we cut off the sharp edge with scissors and it is from this side that we make the head of the rag doll.
To prevent the head from slipping off the end of the stick, you can use a little glue. We made the base for the head from linen rope and wrapped it with a layer of cotton wool on top.
To prevent the cotton from opening, we wrap regular sewing threads on top again. You can make a ball head in another convenient way.
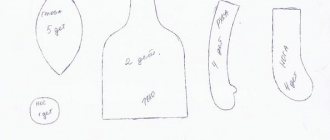
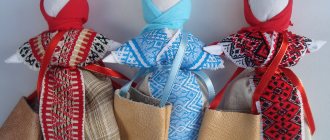
For the skirt of the Round Dancer doll, we cut out two circles of different diameters. Our circle diameters are 19 and 21 cm. It is best to use light cotton fabric for a skirt - chintz. Calico is heavier and the skirt is difficult to lift when you play with the doll. Find the middle of the top circle (which has a smaller diameter) and mark it with a pen or pencil. Place two circles together.
Place the circles on the head of the Round Dancer doll, aligning the marked center of the circle with the center of the head. Make pleats at the edges and tie with thread at the bottom. For a blouse, take a rectangle of white fabric (10x20cm).
Fold up the edges and make handles.
Put the shirt on the Round Dancer’s head, tuck the fabric so that the doll’s face is straight, and there are two sleeves on the side. Tie with thread under the neck.
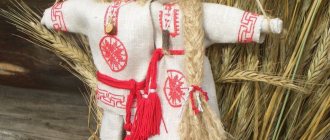
We put a bandage on the Round Dancer's head to imitate a warrior.
We put a scarf (Rectangular triangle 17x17cm) on top of the head and tie it at the back. Lift the doll's arms up, thereby freeing the skirt, straighten it a little and you can play.
How to play with a rag doll Round Dancer.
Our ancestors made two dolls for the game. The girl spun the doll in both hands at the same time, thereby preparing for future work (spinning) and developing the necessary skills. I’m an adult, but it’s difficult for me to twirl the doll with both hands. It’s good if you can twist one doll with both hands, so that the doll spins quickly enough and the Round Dancer’s skirt rises up. You can put a stick between your palms and “rub” them, as it were. In any case, the stick should spin and the Round Dancer should spin with it. This exercise is very useful for children: both girls and boys, as it makes the hands work and develops the child’s speech centers.
Polymer clay doll master class
If you are already familiar with polymer clay and know all its intricacies, then you can try making a doll. But get ready for the fact that such an activity will take a lot of time and effort.
Don't forget to think through all the details, from what color your character's skin will be, to small details on clothing or additional attributes to complete the look.
Preparation for production
Making a doll based on polymer clay is a lengthy process. Sometimes it can take several months to create this sweet masterpiece. Before you make a doll from polymer clay, you need to understand that this is not easy work.
Before you start you need:
- carefully consider the image of the doll;
- choose the type of product (dolls can be static or articulated);
- draw a drawing (exact parameters are indicated on it and details are drawn);
- prepare all the necessary materials for manufacturing based on well-thought-out details.
It is appropriate to say that there are few people who make dolls based on polymer clay. Thanks to hard work, almost every one of them becomes famous. The works of such people can be found in special magazines.
It is impossible to make completely identical dolls; each one differs in small details. It is this nuance that makes the finished products attractive.
Let's move on to a more detailed look at the topic of how to sculpt a doll from polymer clay.
Step-by-step production of a polymer doll
Before sculpting a doll from polymer clay, carefully think through all the details, decide on the color of the skin, the shade of the eyes and even the small components of future clothing. Come up with additional attributes for the perfect image.
All this preliminary preparation will help you get inspired before starting the creative process.
We select materials for work
Before you start manufacturing, prepare a number of necessary materials:
- main material – polymer clay;
- special knives with different designs;
- foil;
- sanding paper;
- pliers;
- hard wire;
- tassels;
- glue;
- dye;
- primer.
You can start preparing material for the clothes of the future doll in advance. Don't forget about your hair. For them it is better to use wool, which is used for felting. In the future, everything will depend on the course of your thoughts and imagination.
When you have all the materials ready, make a choice towards a specific model of the doll.
They can be:
- Articulated. This is the most difficult manufacturing option. It requires experience and more time.
- From several types of materials. This is the simplest type of pupa. In this case, the body is made of fabric, and the head, arms and legs are made of clay.
- Static. There are no complicated elements here and making such a doll is not that difficult.
We will focus on the last variety. Make a drawing of the doll, draw the expected image of the future product. Here you need to pay attention to its size and features. Check if you have all the materials. Let's start work.
Frame making
The frame in the product plays one of the most important roles. Thanks to him, the finished doll will be durable. Before making dolls from polymer clay, prepare a skein of strong wire and a second skein of thin wire.
In the future, work will be carried out in the following order:
- take a thick wire and give it the shape of the “skeleton” of the future doll;
- use thin wire to wrap the “skeleton” to give it density;
- Seal the resulting frame with foil;
- smooth out all the folds, press and compare the result with the drawing.
The frame preparation stage is over. Let's proceed to the basic steps that will tell you how to make a doll from polymer clay.
Head decoration
It's time to start preparing the blank. To ensure that the process does not cause difficulties, the clay must be kneaded well and heated to a plastic state. Perform the following actions based on the instructions:
When the clay becomes plastic, shape the part of the head that is covered with foil. The resulting result should be baked in the microwave or oven. If you used clay that hardens on its own, this is not necessary. It is necessary to bake the material so that in further work it does not lose its shape.
Important! If foil was used and it is not covered with polymer clay, then it cannot be placed in the microwave oven. Is it dangerous! It can only be heated in the oven.
- We take out the blank of our doll. Using a knife, carefully add volume to the head. Select the nose, cheeks and lips. We smooth out the unevenness so that the face becomes realistic and resembles a living one.
- We make recesses for the eyes. Watch for symmetry, so the work will turn out neat.
- We've finished the head work. It can be decorated with pastel or aerosol paints to give the face a lively tint. We send the doll to bake again and finish the ears on the head.
Body sculpting
- We continue to work. Now we will start sculpting the arms and legs. Try to do this work carefully so that there are no unevenness. When the base of the arms and legs is ready, start cutting out the fingers.
- If the small elements are ready, sculpt the torso, back and tummy. If you want to. To give the doll a more sophisticated look, we recommend adding small elements such as collarbones and ribs. But here it’s up to you, each doll is individual. The finished product is sent to bake.
It may take longer to bake than was required when making the head. It is important that the product becomes very durable.
- When the material has completely hardened, you can begin grinding. To make the doll without any roughness, use sandpaper with different grain sizes. While sanding, leave a parting on your head.
Now you know how to make a doll from polymer clay. The work is not finished yet. It's time to start styling your face.
The following materials can be used here:
- pastel;
- acrylic;
- watercolor pencil.
Pencil is the perfect choice if you need to add freckles to your doll.
When you are finished applying makeup, coat the product with varnish. He will record the result.
Hairstyle for a doll
We figured out how to make the base of a doll from polymer clay. Now she definitely needs to get her hair done. It has already been said that for this purpose it is better to use wool for felting.
But you can use:
- silk threads;
- doll wig;
- big wig.
A wig for dolls is not always beneficial, as you can make a mistake with the size. It is better to use a large wig, from which you can make a separate doll hairstyle.
- To attach the hair you will need glue. Separate each strand separately and attach it to the head. To make your work more convenient, you can use an awl, hook or other thin metal object.
Lastly, we insert the finished hair into the previously prepared parting. This will give your doll a neat crown.
The doll is ready, give it the desired hairstyle, decorate it with additional elements and be sure to dress it. The work is long, painstaking, but exciting.
How to make a doll on a stick
A doll on a stick is the simplest type of puppet: basic production and easy manipulation in play.
What you need to make a doll on a stick:
- wand _ Wooden ice cream sticks are most often used - they are rounded, therefore safe, and paper easily sticks to them. You can also use sushi chopsticks - but they are pointed, which is a minus. You can even take twigs found in the park while walking!
- doll . I suggest using paper dolls. Below you will find templates for printing dolls and options for playing with them. But in fact, you can use anything: illustrations from magazines or old books, children's drawings, coloring books. It is convenient to use covers from used educational notebooks - they usually contain cute children's images, and the cover is strong enough - it does not need to be strengthened.
- glue or tape, plasticine, salt dough - what will be used to attach the doll to the stick.