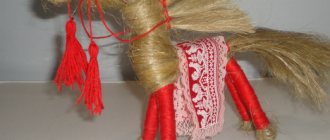
In this master class I will show you how to make a rowan tree from beads. The tree turns out very realistic. Weaving rowan berries with beads is a simple process that even a novice beadworker can handle.
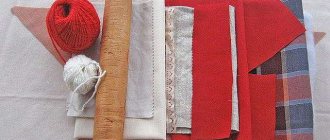
For weaving you will need the following materials:
- Beads in two colors: green, orange-red. Size No. 10 (Czech) or No. 12 (Chinese).
- Wire with a diameter of 0.3 mm or thicker (for forming a trunk).
- Molar tape or thread - this will need to be wrapped around the barrel.
- Brown acrylic paints.
- Alabaster.
We will start weaving rowan from bunches. One bunch consists of five small bunches.
Take 33 cm of wire and string 3 red beads onto it. We place them 5 cm from the edge and twist both ends under the beads by about 1 cm.
Next, we again collect 3 red beads on the long end of the wire and make the same twist.
In total you need to make 10 such twists. Then we twist the ends together. It turned out to be a small bunch.
We make 5 bunches of these.
Now you need to make a bunch from these five small bunches. To do this, you need to twist 5 pieces of bundles together. You will get a bunch of rowan berries. There are only 11 pieces that need to be woven.
Features of bead weaving
Beaded trees are the perfect object to start working with this material.
The simplest techniques are used to make them:
- parallel weaving (for leaves);
- air loop (for flowers and branches).
It is precisely because of its simplicity and ease of mastery that the ranks of lovers of this ancient art are replenished every year. The main task of a beginner is to select the materials and tools necessary for the job.
What you need for work
To create a rowan tree from colored beads, you don’t need to buy the entire craft store.
To work you will need:
- beads, a different type and number is recommended for each master class;
- wire 0.3 mm, 0.4 mm, 1 mm and 2 mm;
- green threads or floral ribbon;
- paints;
- alabaster or plaster;
- PVA glue;
- brushes;
- stand;
- decor (figurines, stones, moss, sand);
- foil;
- scissors;
- pliers, round nose pliers.
Thin wire is used for weaving branches, and branches are attached to thick wire, and trunks are made from it. If you use a metal thread of different diameters, then the product looks more natural.
DIY making
A miniature tree with bright, juice-filled berries and green twigs will make the birds outside the window envy. It will bring a touch of good mood to the interior.
To make a rowan with green leaves approximately 25 cm high you will need:
- small green beads (preferably No. 10);
- large orange beads, preferably matte;
- wire 0.3 mm brown and green;
- 2 mm wire for trunks and branches;
- satengypsum;
- PVA glue;
- clear nail polish.
To decorate the platform, you can use beads, various decorative ornaments (birds, benches, mushrooms), stones, and moss.
green twig
To make green leaves you don't need any special skill, just patience. The crown of the mountain ash will be made using the loop weaving method.
Scheme for making rowan tree leaves:
- 8 green beads are placed on a thin green wire, and a loop is made at a distance of 5 cm from the edge. It is secured with 4-5 twists.
- An indent of half a centimeter is made from the first loop and exactly the same small leaf is made. In total, according to this pattern, you need to make 9 bead loops.
- Then the resulting workpiece is folded in half so that 1 loop is at the top, and there are 4 loops on each side.
- The wires are twisted together. The sheet is ready.
In total, you need to weave 50-60 large leaves. The more there are, the more magnificent the future rowan will be.
red grapes
For this model you will need to make twenty rowan bunches from large orange beads.
Method of weaving a rowan brush:
- 1 bead is put on a brown wire, a loop is formed and twists are made to a length of 1 cm. One berry is ready.
- Next to it, another berry is made in exactly the same way. This is how 20 loops are made on the legs with beads on top.
- The two long ponytails are brought together and twisted. The berry brush is ready.
The remaining curled tail should be at least 7-8 cm long.
Formation of large branches and tree trunk
When all the clusters and leaves are completely ready, you can harvest the tree.
2 leaves and 1-2 bunches of rowan are attached to a thick wire. Branches with only two leaves without berries are prepared.
The prepared branches are twisted together. Small bushes are formed, which are also connected.
The tree is formed as your imagination dictates. But you can do it in a spiral, placing the next branches slightly lower than the previous ones.
In order to prepare a stand for a tree, you need to make a special mixture. It consists of satengypsum and PVA glue. Most of it is poured into a tray or pot, where the tree is placed and fixed until it dries.
Before decorating, branches and berries must be wrapped in cellophane or foil so as not to be smeared.
Rowan decoration:
- The remaining gypsum mixture is diluted to a thick sour cream.
- Gypsum is applied with a brush to the branches and trunk.
- While the mixture has not hardened, decor is installed that requires fixing: grass, figurines, benches.
- After drying, the gypsum base is covered with brown paint.
At the final stage, the foil is removed. Small decor (moss, pebbles, beads) is attached with glue, and the entire structure is covered with transparent nail polish.
Christmas decoration “Golden cones”
I like this decoration for its naturalness and extraordinary ease of manufacture. Pine cones will also ideally decorate wreaths, Christmas trees, and simply create a New Year's mood in the interior. I place larger cones on the fireplace , among shiny tinsel and candles. It turns out to be a very cozy composition. And small cones can be used to create beads, thematic compositions, etc.
How to make a golden cone with children
We need:
- pine cones;
- gold acrylic paint;
- gold dust (fine glitter).
We paint the cone with acrylic paint, but very, very quickly, because... the paint dries instantly. Therefore, we recommend applying paint in parts, and not on the entire pine cone at once.
And while the paint is still wet, sprinkle the cone with gold dust. When the decoration dries, turn it over and shake out any loose glitter.
Making such New Year's decorations with children is actually easier than ever! And they look very festive.
How to make a winter rowan under the snow
When winter comes, this bright tree acquires its own special beauty. The master class on making winter rowan from beads is a particular success among the craftsmen.
Required tools and materials (list)
To make the mountain ash look as close to the real thing as possible, you will have to purchase a variety of glass beads and other materials.
To weave a winter tree you will need:
- large beads - orange and red;
- white beads of different shapes;
- copper wire of different thicknesses;
- white wire 0.3 mm;
- self-hardening mass;
- threads;
- PVA glue;
- floral tape;
- acrylic paints or gouache;
- nylon thread;
- small flower pot;
- cement;
- alabaster or plaster;
- Styrofoam.
White beads need to be purchased matte white and transparent colorless. Also, to imitate snow you will need “cutting” - beads in the form of small tubes. Ideally, there will be glass beads with an iridescent iridescent coating - in this case, the imitation of snow will be even more realistic.
Self-hardening mass will be needed for sculpting a voluminous trunk and embossed branches. This material is quite expensive, but the consumption will be small.
Alabaster or gypsum with cement will be used to make the stand.
Weaving technology
Before weaving, you should prepare the materials. 25 metal threads 25 cm long are prepared from thin white wire.
50 pieces 45 cm long are cut from copper wire. The thicker one will be used for the frame of the product.
First, rowan bunches are made. It is possible using the technology described above. Approximately 18-20 blanks are made. The more there are, the more luxurious the tree.
Snow for the grapes. It is made using the loop weaving technique. White and transparent beads are strung on a white wire and a loop is made. The bottom is twisted two turns. The next loop is placed nearby. You need to calculate so that one piece of wire is enough for 6-7 loops.
The bunch blanks are inserted into the snow, the tails are twisted.
Branches are formed from thick wire and ready-made bunches of snow are screwed to them.
The branches are attached to the trunk and are well fixed. The future tree is given shape.
Next, a mixture of cement, water, alabaster (gypsum) is prepared and poured into the pot. A rowan tree is installed there and fixed in the required position. After the base has dried, the trunk and branches are finished with a self-hardening mass.
This is followed by painting and decorating the product with snow. The top of the bunches and part of the branches are covered with glue and sprinkled with foam crumbs and sparkling chopped beads. The same mixture is applied to the base.
If there is no self-hardening mixture, then the trunk and branches can be finished with plaster. But before planting, they need to be tightly wrapped with threads (twigs) and floral tape (thick branches and trunk). Gypsum is artistically processed to imitate the pattern of bark.
Making rowan bunches
Start by forming clusters, each consisting of five small bunches.
Rowan beads, weaving pattern (2):
- Cut a piece of wire 33 centimeters long.
- Place three red beads on it and place them at a distance of five centimeters from the edge.
- Twist the wire about one centimeter underneath them.
- Place three beads on the long end of the wire again and make a similar twist underneath them. A total of ten twists need to be made on the wire.
- Then twist the ends of the wire so that a bunch comes out.
- Five such bundles need to be made. Then make a bunch of rowan berries from them (twist the bunches together).
Creating an autumn tree from beads and beads
Autumn rowan is one of the most noticeable trees. It acquires bright colors, the clusters ripen and become like beads. Even the leaves are painted in an incredible range of shades.
Necessary materials
To make a beaded tree, elastic wire and beads of different shades are selected.
To make an autumn model you need:
- copper wire of different colors and thicknesses;
- beads No. 4 (red and orange, transparent and matte) for berries;
- small beads No. 8 for leaves.
For foliage, you can choose different shades of green, orange and yellow, and even a little red.
Step-by-step weaving instructions
Usually rowan weaving begins with making berry brushes. Then they move on to the leaves. This is followed by assembly of the product and decoration.
Such an elegant sprig of rowan, made with your own hands, can itself become a wonderful decorative element or a pleasant souvenir.
Berries
To make a bunch of berries you will need larger beads, slightly diluted with red beads of the same size.
A tail 7 cm long is left on one side of the piece of wire. One bead is strung, and twists are made under it (about 1-1.5 cm). The result was a berry on a stem.
After the first berry, the second one is done in the same way, and the operation is repeated until the wire runs out.
The beads of the workpiece are compressed, the tails are twisted together, the small bunch is ready.
To make a large bunch you will need at least 7 pieces of such blanks. They are twisted together. A tree will need 5-6 full bunches.
Leaves
Before weaving begins, beads for the leaves are poured into a separate container and mixed. Colors can be used randomly, or they can be selected, creating an individual design on a piece of paper. The parallel weaving technique is used for the leaves.
A piece of thin wire 35 cm long is cut. 1 bead is strung on it and placed in the middle. The ends of the wire intersect.
Take two beads and put them on one end of the wire. Take the second end of the metal thread in your hand and thread it through the holes of the beads in the opposite direction to the first. The threads are tightened.
Next, weaving is carried out using the same method, but with four beads. 6 beads are pulled into the third row.
The weaving of the middle begins. It requires 8 pieces of glass. Rows 6, 7, 8 and 9 will be exactly the same.
From the 10th row, the details are reduced, 6 beads are strung. There are already 4 pieces of glass in the 11th row. In the penultimate 12th row there are only two.
There is 1 bead in the last row. The two remaining pieces of wire (tails) are twisted together.
For a large sheet it is necessary to make 7 such parts. Then he gets ready. One leaf is located in the middle and two on the side. The rest are screwed a little lower.
To make a tree you will need 30-35 pieces of these large leaves.
Wood assembly:
- First you need to collect the branches. The leaves and clusters curl together and large branches are formed. They are wrapped with floral tape.
- Then the parts are screwed to thick wire, and the barrel is shaped. The base is also wrapped with floral tape.
- Then a platform is made from plaster. After it dries, the product is painted and decorated.
Let's move on to the leaves
To create leaves you need to string several rows of beads.
Cut a wire 25 cm long and place one bead on it. Thread the end of the wire back into the bead and tighten the knot.
Go ahead. We put two more beads on the wire. Now we pass the second end through these two beads. Tighten it into the second knot.
And then three rows of three beads each. We string three pieces, thread the end through all three and tighten.
We made five rows in total. From the next row we weave one less bead in the row, that is, two pieces.
And the final row is again with one bead.
It turned out to be one leaf. You need to knit a lot of such sheets - up to 100 pieces, then the tree will be picturesque.
Now we will weave the main sheets from these mini-leaves. First, twist three leaves together.
Then we will screw two more in parallel and two more below. In total, the large leaf consists of nine leaves.