Master class “Folk doll Veduchka”
Veduchka is a mother, grandmother, godmother, sister, and possibly a stepmother or teacher, that is, the woman who leads the child by the hand.
The concept of leading by the hand or by the hands contains both direct and figurative meaning. On the one hand, the child needs bodily assistance in order to move through the physical densities of this world. On the other hand, the child needs help showing the way not over bumps and bumps, but on a straight path. And even if you ever have to take a detour or fall into a hole, then in order to know how to make this detour or how to get out of the hole. That is, the child needs to learn how to live in this world, which is what the wise witch teaches.
The leader passes on to the child her knowledge of how to get along with this world, explaining its laws - natural and social. It is a symbol of the continuity of generations. Once upon a time, a teacher-mentor also passed on vital knowledge to her, now she passes it on, and then her student will pass it on.
Veduchka is a knowledgeable caretaker who carefully and lovingly helps her student learn about herself and the world around her.
***
I suggest you make this wonderful doll!
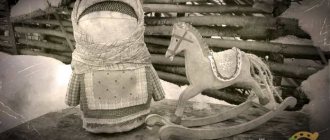
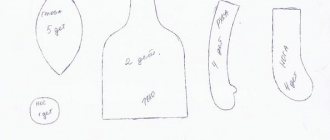
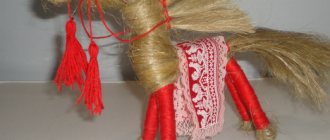
To create a Veduchka doll (size: approx. 19 cm Veduchka and 9 cm girl), you will need the following tools and materials:
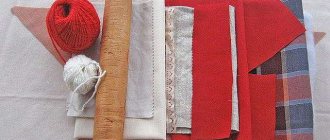
- Linen or cotton threads. For example, “iris” in natural and red colors. Fig.1;
- Sewing threads to match the color of the lace;
- Sewing needle;
- Scissors;
- A piece of linen fabric - a rectangle measuring 36x75 cm for twisting the body of the leader. (The twist should be 3-4 cm in diameter. If you are using thinner or thicker fabric, you may need a longer or shorter length of the flap). Fig.1;
- A piece of linen fabric - a square measuring 18x18 cm to form the head of the leader. Fig.1;
- A piece of linen fabric - a rectangle measuring 6x50 cm to form the base of the ledger (for the stability of the doll);
- A piece of linen fabric is a rectangle measuring 6x30 cm to form one common arm of the doll. Fig.1;
- A piece of linen fabric - a rectangle measuring 16x20 cm for twisting the girl's body. Fig.1;
- A piece of linen fabric - a rectangle measuring 13x13 cm to form the girl's head. Fig.1;
- A piece of linen or cotton fabric - a rectangle measuring 20x20cm for a veduchka shirt. Fig.2;
- A piece of linen or cotton fabric - a rectangle measuring 14x20cm for the underskirt of the vedic. Fig.2;
- Three pieces of cotton fabric: a rectangle measuring 14x36 cm for the sundress skirt, and two rectangles measuring 3.5x16 cm for the straps of the sundress. Fig.2;
- Lace for finishing the bottom edge of a sundress 36 cm long;
- Two flaps of linen fabric measuring 5.5x13.5 cm and 5x12.5 cm and cotton lace 4.5x12 cm for the apron. Fig.2;
- A piece of cotton fabric is a triangle with a base of 36 cm and a height of 15 cm for a vedic scarf. Fig.2;
- A piece of linen or cotton fabric - a rectangle measuring 14x14 cm for a girl's shirt. Fig.2;
- Three pieces of cotton fabric: a rectangle measuring 7x19 cm for a girl’s sundress skirt and two rectangles measuring 3x8 cm for the straps of a girl’s sundress. Fig.2;
- Two pieces of cotton fabric - circles with a diameter of 4 cm for a girl’s shoes. Fig.2;
- Plumbing wood for creating hair. Fig.1;
- Comb with large teeth;
- Flax tow (from sanitary flax) for shaping the heads and chest;
- Belts are about 40 and 25 cm long. The belt can be knitted, twisted or woven, made from braid or yarn;
- Satin ribbons for braiding hair: 3 ribbons, 25 cm each;
- Beads, beads for making beads.
Fig.1
Fig.2
Important! No needle is used to create the doll's body and secure the clothes.
Bandage the doll and tie clothes to it as follows:
make several tight turns of the thread clockwise (away from you) and tie an even number of knots. Cut the ends of the threads at a distance of 2-3 mm from the knot. (This rule applies to the entire process of making a doll).
The needle is used minimally, only in the manufacture of the clothing itself.
Sequence of making a doll:
1. Make the body of the Veduchka: take a piece of linen fabric (36x75 cm) and fold it in half lengthwise; then twist it tightly clockwise, away from you; at the very end of the twist, fold the edge inward approx. 2-3 cm. The result is a twist - a cylinder with a diameter of approx. 3 cm and height approx. 18 cm.
2. Tie the twist in 3 places with several turns of thread and tie an even number of knots at the waist, neck and legs. Tie knots at the back in the center of the twist.
Pre-comb the sanitary linen with a large-toothed comb. Use the flax itself to create the hair of the doll, and the resulting tow to form the head. Wind the tow around the top of the twist clockwise.
3. Take a square piece of flap (18 x 18 cm), fold it in half diagonally and wrap it around the frayed twist.
4. Tie a twist with thread at neck level with a few turns of thread and tie an even number of knots at the back in the middle of the back.
5. Form the veduchka's chest from the fringe: place the flock under the central end of the flap forming the head, fold the edges of the flap inward, tie the thread under the breast with several turns clockwise and secure with an even number of knots at the back in the middle of the back.
6. Using red thread, make a protective cross on the doll’s chest. Tie the thread with an even number of knots on the left side at waist level.
7. Make a common hand for the leader and the girl: take a flap of linen (6 x 30 cm), fold it six times with the edges inward. Bandage your hand at the wrist level in 4 places.
8. Place your hand on the body of the leader and tie it at neck level. Then bend your arm down.
9. Take a piece of fabric (16 x 20 cm) and twist the girl’s body. Secure the ends of the twist, forming the legs with a few turns of the thread.
10. Bend the twist in half, tie it at neck level, forming a head, “put it on” in the center of the common arm, and secure it on the arm, wrapping the twist at waist level.
11. Shape the girl's head: wrap the tow around the top of the twist.
12. Take a square flap (13 x 13 cm), wrap it around your head and secure it at neck and waist level, folding the lower edges inward. Make a protective cross with red thread.
13. Take a square flap for the Veduchka shirt (20 x 20 cm), fold it in half diagonally and in half again. Make a cutout for the head. Use a needle to gather the edges of the cutout onto the thread, leaving long ends of the threads.
14. Put the flap over your head, pull the edges of the neckline around the neck and tie it so that the edges are inside, that is, under the shirt. Secure the threads at the back.
15. Wrap your arms in the sleeves and secure the sleeves at wrist level with a few turns of thread.
16. Fold the lower edges of the flap forming the shirt inward, tie at waist level with several turns of thread and secure with an even number of knots.
17. We dress the girl’s shirt in the same way.
18. Make the straps of the Veduchka and girls sundresses: take 4 rectangular pieces (3.5 x 16 and 3 x 8 cm), fold them 4 times, with the edges inward, each.
19. Place the straps crosswise at chest and back level. Secure under the breast with a few turns of thread and an even number of knots.
20. Put on the underskirt of the veduchka: take a rectangular flap (14 x 20 cm), fold it approx. 2 cm top edge, wrap it around the body of the doll so that the smell is at the back center of the back. Secure at waist level.
21. Make shoes for the girl: take two round pieces (D=4cm), gather the edges with a thread, pull them together, put them on her feet and secure them with a few turns of the thread.
22. Put the sarafan skirt on the veduchka: take a rectangular flap (14 x 36 cm), sew a lace needle back with a seam along the bottom edge, attach the skirt to the body of the veduchka and fold the upper edge of the flap to the wrong side, so that the skirt fits in length, that is was right up to the “floor”. Gather the folded upper edge onto a thread at a distance of 1 cm from the edge. Tie the skirt to the body at waist level, wrapping it in the back center of the back.
23. Take a piece of fabric (7 x 19 cm) and dress the girl’s sundress skirt in the same way.
24. Dress the leader in an apron: make a three-layer apron, layering scraps on top of each other and lace on top; tie the apron at waist level, securing it with a few turns of thread and an even number of knots, bending it over. Tie knots in the center under the apron itself.
25. Fold the apron right side out. Twist or weave a belt approx. 40 cm for Veduchka and approx. 25 cm for girls. Wrap it 2 times around the dolls' waist and tie 2 knots on the left side.
26. If your doll is unsteady, increase its base. Take a flap of linen (6 x 50 cm), fold it 3 times and wind it clockwise onto the bottom of the twist of the leader, secure it with a few turns of thread and tie it with an even number of knots.
27. Make a hairstyle for the lady: take already combed flax and tie the fibers in the middle with a thin strand of flax, forming a parting for the future hairstyle; distribute the flax according to the shape of your head, then place it on your head and secure it at neck level with a few turns of thread, tying an even number of knots on the back side.
28. Select a small strand on the right side and braid it. Wrap the braid around your head. Secure on the opposite side by wrapping threads around the neck.
29. Divide your hair into 2 parts and braid 2 braids. Secure the braids at the ends with ribbons or tie with flax fibers from the braid itself. Trim any excess flaxen tails.
30. Do the girl’s hair in the same way. Braid one braid.
31. Put a scarf on the leader’s head: take a triangular piece (15 x 36 cm), fold its long edge inward and tie it on the leader’s head, tying the ends of the scarf from the back.
32. Make beaded beads, tie them with the long ends of the threads from the back, under the hair. Tie a headband (bandage around the head) for the girl.
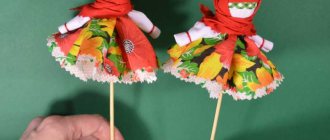
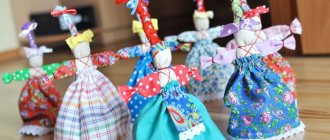
The Veduchka doll is ready!
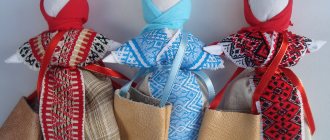
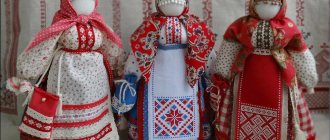
Amulet dolls and their meaning
Over time, amulet dolls began to be divided into types. They could be ritual and protective. Each of them had its own directed action.
When you have to part with a talisman doll for any reason, you need to do it correctly. First of all, you need to thank her for what she did for you. Then you should leave it for several days in the red corner and place sweets in front of it. After this, you should unwind it and it is very important that during this process no pity arises in your heart. You need to understand that your gratitude is directed to higher powers, and not to the doll directly. Individual elements must be burned and the ashes thrown away.
Lovebirds
This doll was considered a symbol of family happiness, so it was always presented to newlyweds by close people, most often bridesmaids. In appearance, she represented two dolls, stylized as a man and a woman, fastened together. The amulet symbolized the desire of people to go through life together and preserve their feelings. It was placed in the red corner and protected the created family from the damage of envy. In addition, he helped young spouses remain faithful to each other. It was very important to ensure that the Lovebirds were not touched by strangers.
Desire
This amulet helped fulfill innermost desires. It was believed that male energy is a strong hindrance, so dolls of this type could only be created by women. At the same time, while working on the amulet, a woman could make not only her own wish, but also that of her husband or brother. The woman had to create the doll in a secluded place, and during the manufacturing process it was necessary to read spells that would attract good luck. After the work was completed, the innermost desire must be spoken out loud. The first night the doll had to lie under the craftswoman’s pillow. It is very important to decorate her outfit beautifully. For this, lace, beads and beads should be used.
Krupenichka
Krupenichka was considered a talisman that brings good luck. She helped the owners find financial well-being, and was connected with Mother Earth herself. The peculiarity of the doll was that a bag was used for the body, which was filled with buckwheat or wheat. The filler had to be changed every year. In this case, clothes should be bright and the scraps should be taken from high-quality fabrics. Krupenichka was placed in a prominent place in the house.
Bell
This doll has roots from Valdai. It was in those parts that the tradition was born of bringing such a talisman to friends and family, wishing them good luck. The doll was always dressed up in a three-tiered skirt, which symbolized the bells. It was believed that if such a talisman is kept in the house, it fills it with positive energy.
Well-being
The prosperous woman attracted wealth to the house and protected from various troubles. It was often made by mothers, wishing well-being in life for their children. It is believed that the doll should be quite large in size - at least 8 cm. In addition, when making it, you need to remember that all actions should be carried out on your own lap, and not on the table.
Herbalist
The herbalist was used for medicinal purposes. Since herbs were used in its manufacture, it had the ability to purify the air in the home. In order for the fragrant herbs to release their aroma, the doll had to be kneaded with your hands as often as possible. In addition, it was believed that such a talisman protected against misfortunes.
Motanka dolls
Motanka dolls are made from threads. They are wound on a frame in the form of a cross. Subsequently, clothing made from scraps is put on the created body. It is believed that such amulets have powerful positive energy. The direction of action of such a doll, created with your own hands, is determined in the process of winding the threads.
Rag dolls
Rag dolls, used as amulets, were in almost every home. They protected the owners from failures and helped attract wealth to the house.
Pelenashka
The ancient Slavs had a custom of tightly swaddling babies. It was believed that in this way one could protect the child from evil spirits. For additional protection, loving parents always placed a talisman doll, tightly wrapped in rags, in the baby’s crib.
plantain
The plantain is a doll-amulet for travelers. It was created before a long journey. The peculiarity of the amulet is its small size. It should not take up much space, because it had to be worn in clothes. Several grains of wheat were placed in the bag, which acted as a body, so that the traveler would not go hungry on the road. They could also add some native land, which ensured safety in a foreign land.
Successful
A successful woman is a talisman that attracts good luck into a person’s life. It was made only in cases where a person could not cope with the problems that arose on his own. It was often impossible to disturb higher powers. It was believed that the amulet doll was capable of eliminating all undesirable outcomes of any complex matter.
Ten-handle
The ten-handed pen was considered a women's amulet. She gave me the strength to run the household competently. Very often brides made such a doll for themselves. She set them up for a future family and helped prepare a dowry. The amulet helped to acquire skills in needlework. The amulet doll was usually placed above the workplace.
Bereginya
Bereginya is a talisman that reliably protected the hearth. This is one of the oldest dolls that were made by hand. It was believed that it provides reliable protection from evil spirits. It was always placed next to the front door. The appearance and size of the doll may vary. But almost always she has large breasts, which are a symbol of motherhood, prosperity and fertility. It is advisable to use as many red shreds, threads and beads as possible when making it. According to the ancient Slavs, it had strong protective properties. Bereginya also helped during childbirth. Therefore, midwives always asked the owners to place the amulet doll next to the woman in labor.
Stonefly
In the ancient Slavic world, the Vesnyanka doll was a talisman of youth and beauty. It was made by women and girls at the end of winter or in the first days of spring. It was believed that during this time period the life-giving forces of nature fed the amulet, which remained throughout the next year. It is very important that all materials used to make the doll are of natural origin. Tree branches should be used as a frame for the body, and all shreds should be made from natural fabrics. It was recommended to use pieces of fabric in bright colors to decorate the amulet and at the same time show imagination.
grain
The grain is a symbol of a woman who is a nurse and keeper of the hearth. The doll, whose body was filled with grain, was always placed in the kitchen or in the pantry where supplies were stored. It was believed that she protected the bins from evil spirits and from damage. These amulets were an appropriate gift for a housewarming or wedding.
Column
The pillar was a talisman for the entire house. It is created on the basis of a small wooden post, hence its name. It was believed that the pillar contributed to the development of sincere relationships between household members. She always became an assistant in cases where it was necessary to clarify relationships. Very often they told Stolbushka about their troubles and sorrows, after which mental relief came. This amulet doll is kept in a visible place in the house and helps to maintain peace and harmony in the family.
Maslenitsa
The Maslenitsa doll was always made during the Maslenitsa period. It was kept in the house for a whole year, protecting the house from evil spirits. The doll was kept in the most visible place. On the eve of Maslenitsa, an old doll was burned. It was believed that with this all troubles would go away and purification would begin.
Name for the doll
After the doll is made, it is given a name. To carry out the ceremony, the doll is placed in the middle of the table and repeated nine times: “I name you (name).” Next they read the plot.
It is believed that you need to talk to the doll, and then it will come to life. In order to establish a spiritual connection with the doll, you need to bring gifts to it. It could be sugar, bread. Only after these steps will the craft become useful, otherwise it will be just a toy.
Originally posted 2018-04-18 13:33:21.
Types of dolls in Rus'
For most modern residents, a doll is perceived as an ordinary toy, suitable for a one-year-old child. For other people, the twist acts as a developmental assistant. Many dolls are made with the aim of developing intellectual abilities in children. Few people know that in ancient times such a thing served as a powerful amulet against the evil eye and damage.
Slavic dolls are usually divided into 3 types:
- gaming;
- ritual;
- security.
Depending on the specific type, the nuances in the manufacture of the item changed.
Game variants are the easiest to create. They did not carry a sacred message, they only served to entertain the child. Any material for crafts is suitable, but it is preferable to choose wood. Toys were made in the shape of animals, birds and people.
Ritual things were made before major holidays and already had a sacred meaning for the Slavs. Traditional periods of creation are Maslenitsa, Kupala, before significant events (birth, death, wedding). Examples of names: Kuvadka, Lovebirds. The amulets were decorated with magical symbols that meant prosperity, family happiness and fertility.
Security dolls were prepared for the whole family or a specific person. Women were involved in creating amulets. Individual amulets were given to newborn children. If it was necessary to protect the house, then such amulets were hung near the front door. Needles and cutting objects were not used during the manufacture of amulets. Old Russian masters believed that if you resort to the help of improvised means, the talisman will not receive magical powers.
The history of the appearance of amulets dolls
Slavic doll amulets appeared a very long time ago. Our forefathers believed that the World consists not only of human lands, but also the habitats of light and dark gods. They worshiped the light gods, asked them for protection or fulfillment of desires, fearing the dark ones. They were afraid not only of Chernobog, but also of his minions: strong demons, weaker spirits, people serving him - witches, sorcerers.
Offering prayers and bringing gifts to pagan deities, the Slavs additionally made various protective items. This is how the first doll appeared.
The folk amulet doll served different purposes - it brought wealth to the house, attracted love, helped to conceive a child or protect loved ones from evil forces.
The history of the amulet doll in Rus' began with the simplest materials at hand - tree branches or vines. Gradually, fabric began to be added to them, and over time, some of the dolls were made only from fabric. During pagan times, many people studied herbs. With their help, the Slavs treated, drove out diseases and evil spirits, and extended youth. Therefore, such amulets were often filled with dried herbs, which enhanced its magical properties.
Experienced women who have seen a lot in their lifetime worked on them. Most often these were grandmothers and great-grandmothers, but sometimes the mothers of the family were involved in making amulets. It was strictly forbidden to interfere with them. The needlewoman had to fully concentrate on the process. It was necessary to make the doll at a time, without stretching the process over several stages.
Such amulets were treated with great respect and passed down from mother to daughter.
DIY amulet doll
Today, many people strive to emphasize their belonging to the Slavic family. One way to do this is to make your own amulet doll. This is absolutely easy to do if you follow certain rules.
Initially, you need to decide what kind of amulet doll you plan to make. You need to find out what purposes it can be used for. After this, you should draw a sketch and study the step-by-step recommendations of the available master classes. You need to prepare in advance all the materials that you plan to use, because during the process of the amulet it is forbidden to be distracted.
It is very important to maintain a positive attitude when creating a doll. Before starting to make a doll, it is necessary to carry out a cleaning ritual. To do this, just wash your face with clean, cool water and put on clean, loose clothes. It is important to understand that making a talisman cannot be entertainment; to fill a doll with power, you must believe in magic.
During work, you should maintain silence and calm. It is allowed to read conspiracies aimed at achieving special goals, for example, this is necessary to attract good luck. All work is carried out only by hand; scissors, needles and other metal objects cannot be used. The threads used to secure the flaps should be tied with three knots.
What are dolls made from?
Amulet dolls can be made from various materials. It is very important that they are of natural origin. The frame for the amulet is often made from a piece of wood or twigs fastened crosswise. It is wrapped with natural threads, creating a voluminous body, which is subsequently dressed up using shreds. It is also common to create a pouch for the body by folding a piece of fabric in a certain way. It was also allowed to be prepared in advance, but the seam should only be on one side. Various grains or cotton wool can be used for stuffing.
If you are making a talisman doll for yourself, it is better to use pieces of fabric from old clothes. They will enhance the positive energy of the amulet and make it stronger. If the doll is made as a gift, it is recommended to use scraps of new fabrics.
Why does the amulet have no face?
It is important to remember that the facial features of the amulet doll being created do not need to be highlighted. Moreover, it should be covered with white fabric. It is believed that in this case the reflectivity increases, and none of the evil people will be able to send a message of negativity to the owner through the doll. Another explanation is that white color symbolizes purity of thoughts. The facelessness of the amulet doll is explained by the fact that the ancient Slavs believed that an evil spirit could enter the eyes. Sometimes a cross was applied in place of the face, which in the pagan world had a sacred meaning long before Christianity. This symbol enhanced the protective properties of the amulet.
Place of the doll in the house
Different dolls-amulets had to be placed in different places of the home. Some of them were recommended to always be carried with you. To decide on the placement location, be sure to read the recommendations of specialists for specific amulets. In most cases, amulets were placed in a visible place.