More and more often you can see decorations in the form of a wreath on the entrance doors of houses. This tradition began with Christmas wreaths made of spruce branches and pine cones, but in the fall so many beautiful leaves disappear on the ground that you simply need to take advantage of this and make an autumn wreath of leaves with your own hands.
Making a wreath of autumn leaves is not difficult. The main thing is to decide what kind of wreath you want in the end. It can be double-sided - three-dimensional on both sides, or one-sided, in which the leaves are glued to a cardboard base.
The appearance of your wreath will depend most on the leaves you collect. You can make it from one type of leaf, or collect completely different types of leaves.
Autumn head wreath
Hello, dear guests. Today I want to share my experience of how I made an autumn wreath for an event at school.
I was given the task of making a head decoration for a photo shoot within a week, but at the same time, it was impossible to buy leaves at the market (no receipt, and everything in the store is too expensive) Of course, it would be easier to work with artificial material, but I have no options was.
I searched on the Internet for any master classes on making wreaths from natural autumn resources, but apparently they are hiding from me with special zeal. Therefore, through trial and error, I did it myself, as my intuition suggested. If you encounter a similar problem, I hope I can help)
So on Saturday we collected leaves with the whole family, especially my nephew. At the beginning of September, this turned out to be not so easy, all the trees were green, and it took a lot of work to collect the package. It’s good that we collected a lot, because later half of it was rejected.
Since there was a decent amount of leaves, I rejected the idea of canning in glycerin, and the parent committee would not have understood the amount from the receipt from the pharmacy. Preserved the leaves in paraffin.
I melted the paraffin and made a water bath to keep the heat longer.
There are detailed MKs and recordings and videos on how to do this. The process is not fast, although it all depends on the quantity.
LiveInternetLiveInternet
-Video
—Categories
- 1000. +1 tip (307)
- Tips for all occasions (104)
- Little tricks of big cooking (85)
- Note to the hostess (121)
- Self-development (88)
- Memory development (48)
- Life tips (18)
- Time management (11)
- Communication Skills (9)
- Speed reading (3)
- Dancing (83)
- Latina (29)
- Zumba, dancing for weight loss (16)
- Dance elements (7)
- Club dancing (5)
- Go-Go (5)
- Oriental dance (25)
- FAQ (83)
- FAQ video (20)
- Useful (1)
- LiRu (2)
- Decoration (6)
- Memo (27)
- Our smaller brothers (663)
- Dogs (35)
- “They live like a cat and a dog” (25)
- My beast (5)
- From the life of cats -1 (156)
- From the life of cats-2 (35)
- Interesting things about cats (64)
- Kittens (19)
- Cats (pictures) (234)
- For cat owners (38)
- These nice little animals (75)
- On the World Wide Web (328)
- MuzCollection (33)
- How far has the progress come? (8)
- I want to know everything (114)
- Creative (17)
- Myths and facts (37)
- You can't make it up on purpose (3)
- Passionate faces (43)
- Amazing things are nearby! (14)
- Showbiz (40)
- Everything about everything (39)
- Life is a joy (678)
- Live easy (188)
- Rituals, fortune telling, signs (132)
- Holidays, traditions (101)
- Money Magic (73)
- Man and Woman (50)
- Simoron (36)
- Numerology, horoscope (28)
- For the soul (25)
- Feng Shui (17)
- Esoterics (4)
- Palmistry (1)
- Shrines (5)
- ABC of Faith (108)
- Health (826)
- Help yourself (377)
- Self-massage according to all the rules (81)
- Diseases (71)
- Qigong, Tai Chi Quan, Tai Chi (66)
- Acupressure, reflexology (44)
- Is old age not a joy? (27)
- Vision correction (9)
- Traditional medicine (9)
- Oriental medicine (8)
- Live healthy (136)
- Traditional medicine (48)
- Cleansing the body (43)
- Last cigarette (24)
- Israel (146)
- Cities (33)
- Promised Land (11)
- Useful information (5)
- Izravideo (21)
- Photo reports (11)
- Yoga (213)
- Yoga complexes (126)
- Yoga solves problems (43)
- Exercises (30)
- Asanas (9)
- Yoga for fingers (mudras) (7)
- Tips (2)
- Beauty without magic (1245)
- Gymnastics for the face, exercises (261)
- Luxurious hair (138)
- Massage techniques (97)
- Japanese beauty, Asian techniques (87)
- Secrets of youth (61)
- Original manicure (22)
- The path to glowing skin (119)
- Cosmetic bag (56)
- Flawless Makeup (105)
- Problems (46)
- The art of being beautiful (37)
- Style (139)
- Care (285)
- Cooking (782)
- Baking (97)
- Side dishes (18)
- First course (13)
- National cuisine (9)
- Dessert (56)
- Snacks (119)
- Dough products (84)
- Food served (51)
- Meat (117)
- In a hurry (31)
- Drinks (76)
- Vegetables and Fruits (115)
- Recipes (25)
- Fish, seafood (34)
- Salads (62)
- Sauces (8)
- Terms (16)
- Useful sites (11)
- Photos (8)
- Photo editors (3)
- Food (7)
- Useful links (7)
- Programs (11)
- Through life, laughing. (138)
- Video jokes (33)
- Photo jokes (3)
- Toys (24)
- Rugrats. (thirty)
- Tricky stuff (31)
- Just great! (17)
- Needlewoman (211)
- Knitting (22)
- Handicrafts (11)
- Repair (3)
- DIY (81)
- Create comfort (37)
- Sewing (72)
- Poetry and prose (252)
- Lyrics (154)
- Proverbs (68)
- Aphorisms, quotes (25)
- Prose (4)
- Catchphrases (1)
- Perfect body (649)
- Bodyflex, oxysize (121)
- Pilates (42)
- Aerobics (26)
- Callanetics (22)
- Milena. Fitness (18)
- Gym (17)
- Bodytransforming (5)
- Anatomy (1)
- Tips (69)
- Fitness program (89)
- Stretching (41)
- Exercises (244)
- Photo world (63)
- Artists (5)
- Nature (5)
- Photos (16)
- Photographers and their works (31)
- Flowers (8)
- Photoshop (5)
- Let's challenge excess weight (563)
- Trapped by diets (66)
- Laws of nutrition (121)
- Eat to live. (76)
- Healthy lifestyle (16)
- Products (73)
- Losing weight the smart way (130)
- The path to ideal (106)
We recommend reading: Sunflower Oil Storage in Production
-Music
—Search by diary
—Subscription by e-mail
— Regular readers
DIY head wreaths
Flowers have always been considered a woman's adornment, so for centuries they have been woven into hair or used as an additional accessory for clothing. A headband with flowers is an excellent solution for a theme party, wedding or other special event. In this article we offer several ideas on how to make a wreath of artificial flowers with your own hands.
Materials: - wire; - artificial flowers; - scissors;
- ribbons.
Master class DIY headband
A crown-shaped wreath differs from the traditional one in that the floral elements occupy only ¾ of the frame. Before you start weaving a wreath, measure your head so that the finished accessory does not fall off. After that, take the wire and make a frame for the wreath.
Prepare artificial flowers from paper, which you can buy in the store. For large flowers, you need to trim the flower stems and insert floral wire under the sepals.
Now it can be secured to the frame. In addition, from small flowers you need to knit small flower arrangements consisting of 3-4 flowers.
All flowers should be on a wire that needs to be wrapped around the frame.
Advice
Now carefully attach the flowers to the frame, alternating them in size and color. You can make a full-fledged wreath or a crown wreath.
Adsense
To make a frame for the headband, it is best to take thick wire; if you don’t have it, then you can weave a braid from ordinary wire. The advantage of this braid is that flowers can be glued to it rather than wrapped around it.
Flowers, as in the previous case, need to be cut off from the stem and glued with a glue gun. You can glue leaves on the inside.
Watch a series of useful videos of master classes on making head wreaths
DIY head wreath
Kanzashi lessons: Flower headband. Kanzashi for beginners
Japanese Sakura Kanzashi headband
Flowers made from ribbons or foamiran, which you can make yourself, will look original in a wreath. Flower headbands will look original not only with sundresses, dresses or skirts, but will also harmonize with business or sports style.
Such an accessory will emphasize the naturalness of your image and make every girl even more feminine and attractive. Hair decorations from flower arrangements are quite easy to make, especially if you have a set of ready-made flowers.
Having mastered the principle of making a hair wreath, you can easily make one from fresh and artificial flowers.
Adsense
Source: https://www.svoimi-rukamy.com/venki-na-golovu-iz-tsvetov.html
Crown hat
Children simply adore this headdress.
It replaces summer wreaths with them. Even a child can make a crown for an autumn ball from maple leaves. We will tell you two methods for making it. The first method is similar to weaving dandelion wreaths. Only here, instead of flower stems, we will bend and add branches of leaves. The second method is more time-consuming. For such a crown you will have to make a cardboard base in the form of a circle. We will tie ribbons to its ends, which will make it easy to take off and put on the headdress. The maple leaves will need to be ironed and dried first. And then, using a glue gun, fix it on a paper rim. It is advisable to make the crown magnificent. Therefore, you need to glue the leaves not in one, but in at least two rows.
DIY autumn head wreaths made from natural material
When autumn comes and gives us a colossal variety of colors, we always want to join nature and decorate ourselves with its works. The background of yellow-orange leaves makes for very good photos.
And to look even more successful, it is best to use wreaths. Autumn head wreaths can be completely different.
Here are various options for creating wreaths, depending on the purpose of their use.
Precious berries
It is not without reason that women have been decorating themselves with flowers or leaves woven into their hair, especially on holidays. For each occasion, special wreaths were woven; each had its own meaning and at the same time served as decoration.
Before girls began wearing stones as jewelry, they wove bright berries – viburnum, rowan – into their hair. Nowadays we rarely think about what the flowers and herbs woven into a wreath mean.
Contemporaries wear wreaths mainly for events associated with folk holidays, or to emphasize the heritage of Slavic traditions.
Autumn wreaths are the brightest; they were usually made for holidays dedicated to the harvest, so not only flowers and leaves were woven into them, but also fruits and ears of wheat.
Therefore, the preparation for creating an autumn wreath will be different.
For a few photos during a casual walk through the park, it will be enough to intertwine stems of colorful leaves that you find along the way.
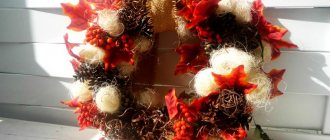
For performances by choral or dance groups, in schools or kindergartens, when everyone should have the same wreaths, it is important to decide what you will make them from - natural or artificial. The most common and affordable material for an autumn wreath is maple leaves. They are bright, voluminous and have a fairly long stem.
It is necessary to prepare these materials, as well as prepare the base - the rim on which the leaves and berries will be attached. This could be a piece of wire decorated with threads, or old newspapers twisted with tape and wrapped in nylon tights.
Wrap the leaves to the base with a strong thread and decorate with bunches of rowan berries. If there is a sufficient quantity of other natural decorative material, then you can use it.
If you are preparing for an autumn holiday, participating in a harvest festival, for example, or in a folk-style wedding, and you need a voluminous bright wreath, the step-by-step master class below will help you.
Nice gift
If you put in the effort and show creativity, you can create a masterpiece with your own hands.
To create a wreath you will need:
- A base made of any material (wicker, paper, wire) or a regular plastic hoop;
- Coarse thread;
- Pre-prepared leaves, bunches of berries, cones, physalis, fruits, etc.;
- Flowers (sunflowers, chrysanthemums, asters, dahlias) natural or artificial;
- Glue;
- Paraffin, container for it.
Wrap the base with thread or nylon tights to make it easier to attach decorative components to it.
Melt the paraffin, dip each leaf and berries into it, as in the photo. Dry. Materials prepared in this way will not break and will take on a more decorative appearance. Flowers and fruits do not need to be processed this way.
Apply the prepared materials to create a composition that most advantageously harmonizes with all the prepared materials.
note
Attach leaves, flowers and berries with thread or glue (small parts) to the base. The wreath is ready.
For a wedding you need to choose more delicate and lighter colors of decorative material.
Girls wearing wreaths at weddings look very touching and sweet. Therefore, bridesmaids use this decoration element very willingly. You can keep the wedding wreath as a keepsake and decorate the wall of the room with it. For the bride herself, elements of a wreath are usually used, decorating her hair with them.
The magical properties of rowan amulets
Red rowan, as a talisman for the home, involves the use of different parts of the plant. It is known that rowan leaves are put in pockets for good luck, powerful protective talismans are made from branches and sticks, and all kinds of beads are made from the fruits, decorating the wrists, neck and head.
Attention! When using rowan fruits for magical purposes, it is worth remembering one thing - an odd number of berries is required.
The most important magical property of rowan amulets is protective. It protects houses and people from damage and the evil eye, reflects witchcraft spells, and wards off enemies and ill-wishers. Moreover, at first, rowan amulets direct their protection to women. Having your own house with a plot, it is recommended to plant a rowan tree, and in apartments - to hang a rowan branch over the door. It is believed that the combination of half a liter of rowan infusion, which the damned should drink, with rowan branches (leaves and berries), which are placed around a person, will relieve mild to moderate periods. This is one of the fastest and most effective ways to cleanse the energy of a person who has suffered from the evil eye and damage.
Creative ways to make head wreaths
Wreaths made from natural materials are very attractive. Colorful compositions are placed on the front door or on the table during the Christmas and Easter holidays. In their likeness you can make wreaths for your head. They are perfect for seasonal photo shoots, children's parties and holiday costumes.
Headbands with decorations made of flowers, berries, and satin ribbons have long been sold in stores. But it’s better to make the clothes yourself. You can choose decorative items to suit your taste and invent your own Hand-Made. The topic of this article is: how to make a wreath on your head with your own hands.
We will look at several interesting options:
- leaf composition;
- rowan;
- paper;
- flower craft;
- fabric products.
Everyone chooses a method depending on their needs. For a bachelorette party, wedding or birthday, you can wear a berry or colorful headband under your dress. Autumn photo shoots and costume parties are best done in a leaf theme with the addition of branches and berries. If you have made your choice, then let's get to work.
The content of the article
First, we collect bright autumn leaves from the trees. Maple trees are used more often - they are lush and voluminous. They are convenient to attach to the headband thanks to the long branch. In addition, we will need jute twine or soft wire, pliers, and satin ribbon. For fastening we will use green electrical tape.
Measure the radius of the head, cut the wire to the required length. If the material is thin, fold it in several layers. Make ears on the ends on both sides. Wrap the workpiece in one layer of electrical tape.
Now attach the leaf to the beginning and secure it. So, we do it until we get to the end. Finally, cut off the protruding parts at the outermost ear and hide them under electrical tape. Bend the wreath in an arc and thread a satin ribbon of a suitable color through the loops. Place it on your head and tie it with a bow at the back.
To create a shimmery look, spritz the piece with glitter hairspray. You can coat it with glue and sprinkle with broth.
Weaving a berry decoration with rowan branches is not difficult.
Here we offer 3 options to choose from:
- berry composition;
- with the addition of branches;
- using purchased blanks.
To make a colorful autumn dress with real berries, they need to be collected and dried at room temperature for 2 days.
Now measure the circumference of your head. Cut the nylon threads 10 cm longer than the required length. Total 9 threads. Using a sewing needle, string the berries onto all the pieces. We secure the edges with a piece of electrical tape or glue so that the berry beads do not roll off.
We divide the blanks into 3 threads - weave a braid. Don't over-tighten. Connect the ends of the braid into a circle and secure.
The next option - an autumn wreath with living branches is made in the same way as making a leaf rim. The berries are collected in clusters, the branches with leaves are cut to the desired size. All ingredients, alternating, are attached to the wire using adhesive tape. If desired, the composition is decorated with sparkles, rhinestones, and colored sand.
Using purchased blanks, the rim is made lighter than the others. Buy artificial berries on branches, stamens, leaves. Cover the wire with colored tape and attach all the elements one by one. Make loops at the ends and thread an orange satin ribbon.
Making a children's paper headband with your own hands is as easy as shelling pears. Cleaning materials are inexpensive, and the work will only take 30 minutes.
Prepare the following elements for decoration:
- cardboard hoop around the circumference of the head;
- glue;
- thick colored paper;
- scissors;
- pencil.
Draw daisies, leaves and centers on the back of the paper. The volume of flowers should be larger than the hoop. Using glue, carefully attach all the elements to the cardboard. Decorate the centers with bright sparkles. Done - ready to wear!
Artificial flower crafts are long lasting. Therefore, for reusable use, we recommend using artificial material. You can purchase blanks in the store.
As a basis we use a plain hoop without unnecessary decorations. Wrap the plastic surface with green adhesive tape. We attach flowers, leaves, stamens in the same way. Tilt decorative items forward towards the front side. To make a headband from natural materials, use fresh flowers, twigs, grass, thorns (blue thorn).
Important
Based on the technique you have learned, shorten the length of the workpieces to normal and, using adhesive tape, attach them to the wire of the required size.
Fresh flowers do not last long without water, so this wreath is suitable for short-term wear.
If you want to make a “golden autumn” costume for your child’s matinee, but there are no natural leaves, use colored fabric. Suitable colors for this are: yellow, red, orange, green, brown. It's even better if you combine them.
Prepare the following decorative elements:
- colored fabric;
- scissors;
- wide elastic band;
- threads, sewing needle;
- pencil;
- glue;
- glitter;
- gelatin.
Let's get to work, starting with cutting out the petals. To do this, draw maple leaves on the material. Cut with scissors.
To make the leaves stable, dilute the gelatin in cold water and let it swell. Dissolve the particles in a water bath. Place the leaves in a bowl, pour in gelatin, stir so that all the preparations are saturated with the product.
Remove and dry naturally by placing on cellophane. When the fabric is dry, iron it through the towel to secure it. You will get hard petals.
Cut the elastic to the desired length and sew the edges. Sew all the petals in a circle onto the front side. Coat the edges of the leaves with glue and sprinkle with glitter.
All decoration options are attractive to look at and do not require much time to complete. However, they differ from each other in the amount of financial resources spent, as well as the durability of the material. If you don’t want to bother, you can buy a ready-made wreath. But the one you make yourself will bring you much more joy.
Source: https://mjusli.ru/hand_made/podelki/venok-iz-listev-na-golovu
How to properly use a rowan amulet
As already noted, the collection of resources for the amulet is approached with attention, caution and gratitude. You can use both fresh and dried parts of the rowan tree.
Attention! Rowan amulets have a shelf life - exactly until new leaves bloom in the new spring and the berries ripen.
Protective amulets made from rowan are one of those that are customary to “show” to potential ill-wishers, display bouquets, decorate yourself with homemade brooches, beads and bracelets, and hang talismans in a visible place.
Beautiful wreath of paper flowers - step-by-step master class with photos
We are surrounded by information about handmade flower workshops, which is why we know that you can build a serious business with paper flowers: using them at concerts, summer festivals, warm weather weddings, and the list goes on. Making a beautiful paper flower wreath is easier than you might think. We decided to prepare a complete beginner's guide to help our novice needlewomen.
This “Paper Flower Wreath” master class is best done with beginners. So grab a few friends and let us guide you into the creative world of paper flowers. We used the same method to create each flower and leaf on these wreaths.
Materials
- thick kraft paper;
- ribbons;
- wire;
- wire cutters.
Tools
- glue gun;
- glue gun pencil;
- scissors;
- pencil;
- disposable paper plate.
Instructions
- Wrap the wire around your head twice to create a loose-fitting wreath.
- Use a wire cutter to cut off the excess and twist the ends of the wire.
- Cut off 15 cm of wire with wire cutters, fold it in half and twist it.
- Wrap the tape tightly around this wire stem.
- Use scissors to cut out the flower petals.
- Roll the petals lengthwise very tightly around the pencil, creating a curved petal shape.
- Place a dot of hot glue on the stem and glue on the first petal.
- Continue gluing petals in a circle (no more than 5).
- Wrap the ribbon around the base of the flower in a circle, going down the stem.
- Curl the ends of the petals using a round pencil.
- Do the same with the rest of the flowers and leaves.
- Braid the flower stems around the wire to form a wreath.
- Wrap the ribbon around the entire wreath, covering any exposed wire.
Grab your basic materials and office supplies and let's get started.
Wire wreath with stems
To begin, unwind enough wire to wrap around the head twice and cut it off with wire cutters.
Twist the ends of the wire around the resulting circle very tightly so that it is reliable and safe. Double-check that the circle fits well and comfortably on your head, then set it aside.
Now that you have the base for your wreath, it's time to start creating the flowers! Cut 15 cm of wire using special wire cutters.
Advice
Fold in half and twist the ends together, forming a stem with a small loop at the end.
Wrap the small loop and the rest of the barrel tightly with kraft paper tape. Please note that the tape holds well if it is wound on the same tape, so make sure that it tightly covers the previous layer, and so work your way down the stem.
Tip: the process will go faster if you hold the tape diagonally to the stem and twist the stem itself with your fingers. Cut off the excess tape with scissors and wrap it around the end.
How to make paper flowers and leaves
Nobody wants to waste time cutting out each petal individually. Fold the kraft paper several times like an accordion, bend it 4 cm at a time, then fold it in half and cut out several layers at a time.
Cut out round petals with a small loop at the top. Make sure that you cut all layers evenly and that the petals do not move. We made petals 5 cm wide and 4 cm long, but you can also do this with other sizes.
While your petals are still in a neat pile, wrap them all tightly around the pencil, then twist each one individually. Make sure that the stripes on the kraft paper line up along the pencil.
Place a small drop of glue on the stem, about 2.5 cm from the top.
Let the glue cool for 2 seconds, then glue on your first petal. Press the bottom of the petal onto the stem and glue 5 more petals, wrapping them around the stem.
Once the 6 petals are glued on, wrap the ribbon around the base of your flower, working your way down the stem and wrap it all the way around. Press the tape well at the base of the flower, this will help it hold firmly enough.
At this stage your flower may look like a bump, so now is the time to shape those petals. Twist the petals outward, wrapping them around a pencil, and alternatively, twist one or two petals inward, which will give the flower more naturalness.
Look at this big beautiful flower! Once you master this, the rest will be easy.
note
For orange flowers, cut out the petals a little smaller than for pink ones, about 3 cm wide and 4 cm long, to give the wreath some variety and volume. But the creation process is absolutely the same!
And those green leaves? Exactly the same, but instead of 6 petals you need to take 2 or 3.
These bright green companions are simply smaller versions of their dark green friends. Simple enough!
Put on some good tunes and repeat the process until you have everything you need to create flowers and leaves. We believe that five flowers of each color is enough for a wreath, they cover 2/3 of the wreath in a circle, leaving a little space, which will give your image its own special style and naturalness.
Step-by-step instructions for making the “Rowanka” costume
If available, remove the white blouse from the closet. Glue or sew an applique onto the sleeves, and glue it onto the red ribbons. Scarlet rowan beads will become a bright accent of the image; you can collect real berries on a string, or you can replace it with jewelry made from round beads.
Skirt
There are 2 options:
And from snow-white linen material with scarlet polka dots, cut a circle with a radius similar to the length of the skirt with the addition of 16 cm. In the middle, cut a circle with a radius of 14 cm. Insert an elastic band and hem the hem. A petticoat made of starched cotton or creolin will help make the skirt much fuller. We cut it in the same way as a skirt.
A flared skirt made of red material looks no worse. Cut rowan leaves from malachite velvet. Make them quite large, about half the length of the flares. It is advisable to sew them to the belt. If you can get natural berries on the street, you should decorate your belt with them. Or replace natural richness with beads.