Children's craft straw doll
- >
- Children's crafts made from straw
#6_7_years
#Instructions
#Natural_material
#Made_straw
Immediately before starting work, soak the straw in cold water for five to six hours. This treatment will make it softer and more flexible. Then we will sort through the raw materials - we will clear each stem of leaves, throw away uneven, damaged straws. The work is long, but if you work with the whole family, it will go much faster and more fun.
Having prepared the raw materials and tools, we will try to make a doll, the design of which can become the basis for many crafts. 1. Having cleaned the blanks, take in your hands a bunch of 60-70 straws thick. At first, you will have to count the exact number of stems, but over time, the palm itself will grasp a bunch of the required thickness. 2. Fold the bundle in half. In this case, you must try to ensure that there are no thickened nodes in the middle of the beam. 3. Let's move the knees up and down, preparing a place for the future doll's head. The ends of the straw bundle will become uneven, but this does not matter - in the future they will still have to be trimmed. As you guys have already noticed, each straw consists of several smooth tubes connected by thickened elbows. If such a knee ends up at the bend in the harness, the straw will break and ruin the appearance of the doll. Now we face the most important operation - making the head and body of the doll. 1. We make a special thick tourniquet from the prepared raw materials. 2. Take the bun with both hands so that the intended location of the head (the area without knees) is between the palms. Let's stretch the bundle a little in different directions. Let's repeat the operation again, trying to make the tourniquet even and smooth. 3. Now we will clamp both ends of the twisted and bent tourniquet with our knees, freeing our hands for further work. 4. Step back from the fold 1-2 cm and tightly, so that the straws crunch, pull the tourniquet with a strong thread, shaping the doll’s neck (Fig. 16).
Rice. 16. Making the head and body of a straw doll.
The quality of the craft depends on how even and smooth this strand turns out to be, so at first it’s better for mom or dad to take care of it.
The most important part of the work is done - all that remains is to make hands for our doll and prepare elegant trim for the sundress.
1. We will make hands from a small bunch of 10-12 straws. 2. Cut a piece about 20 cm long from it and tie it in the middle with a strong thread. 3. Prepare a thin bundle of 8-10 straws, bend it over the part we just made and tie it tightly with thread just under the crossbar (Fig. 17). In this form, our doll’s hands most closely resemble the letter “T”. Do you know why we needed to attach an additional bundle of straw to the workpiece? It turns out that this part of the toy, invisible from the outside, is very important. It not only securely fastens the doll’s arms, but also slightly increases the thickness of the cord, that is, it gives the body a larger volume compared to the head and makes the hem of the sundress more magnificent.
Rice. 17. Making the hands of a straw doll.
Before we start assembling the toy, let’s think about how to decorate the doll’s “clothes”. What if you trim the hem of your sundress with an elegant border? The border will be replaced by a braid woven from three or four flattened straws. Let's close one of the braids into a ring and fasten it with a golden thread - it will represent the lower edge of the sundress.
Now it's time to collect the toy. First of all, let's attach the doll's arms to the body. To do this, separate the ends of the bundle in different directions and insert a blank similar to the letter “T” into the resulting gap. Let's try to push it as deep as possible towards the doll's neck - then our beauty will have a stately figure and a proudly set head (Fig. 18 a).
We again clamp the straw cord with our knees and pull it with strong threads, forming a waist. When performing this operation, do not forget to secure the upper end of the braid at the waist, placing the straw braid in the center of the doll's skirt (Fig. 18 b).
Rice. 18 a, b. Assembling a straw doll.
We have completed most of the work, but our product can still hardly be called a doll. Long and short straws stick out in all directions, and among them it is still difficult to distinguish the neat head and thin waist of a stately beauty. Let's put our beauty on the table. Let's see if she stands firmly on her “feet”? If necessary, we trim the protruding straws, giving the doll greater stability. Let's cut off the extra straws, leveling the hem of the sundress - for this we will need a “goat” prepared in advance.
The straw craft is almost ready - all we have to do is decorate its handles and complete the finishing of the sundress. 1. To make handles, bend a bunch of straw over a pencil, forming a shoulder. 2. Step back from the bend one and a half to two centimeters and tightly grab the stems with threads. 3. Cut off the excess raw materials at a distance of 1 cm from the waist (Fig. 19).
Rice. 19. Design of the hands of a straw doll.
So we designed one hand of the straw doll. In the same sequence we will perform her other hand. Let's make the skirt of our red maiden more magnificent and elegant. 1. Roll up a tight ball of cotton wool the size of a small walnut and, using a pencil, push it up to the doll’s waist. The straws will spread slightly in different directions, and the skirt will look like a bell. 2. We will put a braid sewn into a ring on it and sew the blank to the lower end of the braid decorating the hem (Fig. 20). Let one of the adult craftsmen forcefully insert a straw rope between the “horns” and cut off the excess raw material with a knife at a distance of about 25 cm from the doll’s head.
Rice. 20. Decorating the hem of a straw doll.
ps Don't be greedy, share the link to this craft with your friends!
◄ previous
next ►
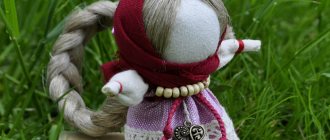
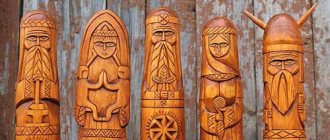
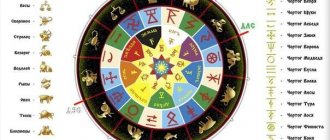
The most famous amulets dolls
The amulet doll was an important element of Slavic culture. They were placed in prominent places in the house, placed in a child's cradle, and sometimes carried with them. Having learned about what kind of Slavic doll amulets there are and what their meaning is, you can make one for yourself and your family, continuing the traditions of your ancestors.
Zolnaya
An ash doll helps protect the house from evil spirits and attracts prosperity to it. The name of the amulet comes from the word “ash”, because it was used as a filler. A handful of ash from the oven was placed in a piece of cloth, from which a ball was then made - this was the head.
A distinctive feature of Zolnaya is the complete absence of hair on her head. They didn’t even make her a headdress. And they passed it on to the next generations instead of burning it.
Herbalist-Kubishka
The Herbal Pot helped clean the air in the house. They placed it in places where energy stagnation was felt. If someone had trouble sleeping, they would leave them near that person overnight. The amulet spread a pleasant herbal aroma, helping to normalize sleep.
The Herbalist was also used to ward off diseases - they hooked it onto a child’s cradle. Unlike Zolnaya, she was filled with special contents not in her head, but in her torso.
Pelenashka
Children are more defenseless against evil than adults. To protect their descendants from darkness, the Slavs made Pelenashki dolls for children. Such amulets were placed directly in the cradle. They diverted illnesses and troubles from the children, taking them for themselves.
Lovebirds
The Lovebirds did not make the doll themselves. But they could be received as a wedding gift. It was given by close relatives - these could be mothers or grandmothers on the part of any of the newlyweds.
Lovebirds are easy to recognize by one striking sign - the hands with which they hold each other are intertwined into one, which symbolizes a strong union. The amulet was made from different materials - straw, fabric or thread.
Desire
The meaning put into the Zhelannitsa doll can be easily guessed by its name. But don’t rush to write down a dozen wishes on a piece of paper. She can only fulfill one request. Therefore, it is better to focus on what is most important.
For the Desire to understand what is required of her, talk to her after creating her. Tell us in detail what you want to receive. This needs to be done in front of a mirror. When the dream turns into reality, burn the amulet, and before destroying it, thank it for the good work.
Purifier
The purifier was used to heal physical diseases and illnesses caused by evil spirits. It never acted as a talisman for the family - it was made specifically for a sick person. He or his close relative must have mentally transferred all the bad things to the object during the creation of the doll.
Upon completion of work on it, they uttered a conspiracy: “Let all the bad things go from me to you, take away the evil, alien things for yourself.” Then all that remained was to burn it away from home and the disease would soon recede.
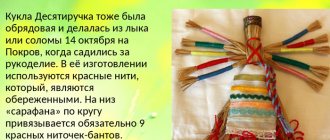
Ten-handle
According to tradition, the Ten Handle was given to young women who got married.
It's no coincidence that she has ten arms. It was believed that such a talisman would help the young housewife keep up with everything: look after the children, cook, eat, clean. The ten-handle was made only from straw. The doll's head was decorated with a scarf, and her body was decorated with an elegant apron. One of the main colors was red, symbolizing vitality and prosperity.
Doll Day Night
Day Night, like Lovebirds, is difficult to confuse with others. This is a double-sided amulet. You can make it in several ways: take two separate figures and fasten them back to back. Or make one figurine with two front sides.
One side symbolizes day, and the other - night. The main task of such a talisman is to keep track of the usual order of things. Day Night watches the change of day and night, making sure that the night is as calm and favorable for the inhabitants of the house as the day. In the daytime, the daytime appearance was turned to face the residents, and in the dark, the nighttime appearance was turned.
bbw
The fat woman will be a good amulet for every woman who dreams of creating a full-fledged family.
The image of Fat Girl is a girl growing up. Used it to help get pregnant. The Slavs believed that the doll's long braid helped attract the child's soul. If, after a year of married life, a woman could not conceive an heir, her relatives made such a talisman for her. Only female relatives could do it - mother, grandmother or great-grandmother, but not sister.
plantain
The Slavs made amulets not only to protect the home, but also tried to protect relatives located outside of it. This is how they made amulets for travelers.
The plantain protected the person on the way. This was ensured by a special ritual associated with a small bag of the Plantain. A handful of earth from their native lands was placed in it - it was believed that this gave a person strength. In addition to this, grains or bread crumbs were added to the bag - thanks to this, the traveler never went hungry.
Bird Joy
The Slavs believed that spring did not come on its own - it was brought on the wings of birds. In order to quickly summon the flowering season, they made a special ritual doll - the Bird of Joy. She was covered from head to bottom with birds, symbolizing spring, good luck and happiness.
You need to make an odd number of birds, and one of them must be attached to the doll’s head. They also tried to make the headdress, the scarf, in the shape of a bird - with wings on the sides and a beak on top.
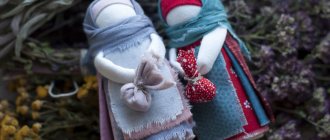
Veduchka, or leading to life
The veduchka was made by women who knew the joy of motherhood.
One of the most important women's tasks was considered to be the continuation of the Family. The woman had to not only feed the child, feeding him with her juices, but also raise him. Veduchka helped in this difficult task, supporting the mother and providing contact with the child. Externally, the amulet stood out among the rest - there was not one figurine, but two. Mother with child. The hands of the woman and the baby are united, which signified a strong spiritual connection between them.
Dolls Krupenichka and Man Rich
Krupenichka, also called Zernushka, helped feed the family. Not only figuratively, but also literally. It was made after the harvest, filling a hidden inner bag with grain. When the family had nothing to eat, the women took grains out of it and used it for lunch. They did this not only during periods of famine, but regularly, replacing old grain with new ones.
Krupenichka was considered the main one in the pair, but the Muzhik Bogach accompanying her was also important. He helped financially. In fact, this paired amulet is an image of a happy Slavic family - a skillful housewife and breadwinner of the family.
Baba Yaga
Many people associate Baba Yaga with an evil character, but in fact this is not entirely true. Even in folk tales that have come down to us, the old witch sometimes acts as an assistant, helping heroes out of all sorts of troubles.
Baba Yaga is not only a good adviser - she can become the keeper of the hearth. It was hung on the front door or on the windows of the house. So she swept away all sorts of nasty things - visible and invisible - from the house with her broom.
Pock
One of the most revered trees among the Slavs was the rowan. This influenced the emergence of such a talisman as the Rowan doll. It was made in the fall. The basis for the Rowan was a cross made of real rowan - this made the amulet more powerful.
Such a talisman protected from evil, protected family happiness and maintained an atmosphere of love in the house.
Well-being
The lucky one was given to friends and relatives in order to attract wealth and prosperity to their home. Prosperity in this case is understood as wealth. But they wanted not so much money as what they could buy with it - food that filled the entire table, clothes for each family member, useful household items.
Successful
The successful girl was a motanka with a mandatory attribute - a bag. This item symbolized success in business. What kind of business should be successful was decided by the owner of the doll himself.
To become successful, directly tell the amulet what you want to receive. For example, ask him about marriage or money. If you need financial support, put a bill in your purse.
Bell
The bell announced good news. She not only warned of good news, but also attracted it. The owner of such a talisman was more often in a good mood, had more fun and received many joyful events from life. The Bluebell is characterized by clothing consisting of three skirts resembling a herringbone.
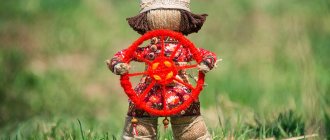
Spiridon Solstice
Spiridon Solstice belongs to a number of ritual dolls. It was made for the Solstice holiday. This amulet was made for a specific purpose - to attract changes in life. But not just any, but those that I would like to receive.
The wheel in the hands of Spiridon symbolized life. The Slavs believed that thanks to him it was possible to turn life in the right, necessary direction. Such an amulet will be equally useful to any gender and will bring happiness in any of the chosen areas.
Rules for making amulets dolls
Amulet dolls cannot be made like ordinary toys. This is a much more serious matter, requiring not only taking into account the well-being of the craftswoman, but also the selection of materials, tools, as well as the manufacturing method.
A protective doll should be made with positive thoughts and in a good mood.
Needlewomen who decide to try to create a talisman with their own hands must adhere to the following rules:
- Work on the amulet only when you are in a good mood and feeling well. Even a simple headache, not to mention chronic illnesses, is considered a good reason to put off work.
- During such sacred needlework, you need to think positively. Positive thoughts and emotions will help the amulet gain strength and quickly begin to complete its task.
- Keep an eye on the lunar cycle as you get down to business. Talismans should be made for the waxing moon.
- You've probably noticed that all the motans don't have a face. This, of course, is not due to laziness, but to superstition. Our ancestors believed that dolls with the characteristics of the owner could become a refuge for evil spirits. To protect themselves from it, they did not make faces on them, leaving them blank. This was done not only with protective and ritual dolls, but also with toys.
- When making rag dolls, do not use sharp objects. Today's needlewomen will find it incredible to give up needles and scissors, but these are the rules. Failure to comply with them will turn the amulet into an ordinary object, devoid of magical power.
- Nowadays natural fabrics are rarely used due to their impracticality. But the presence of synthetic materials in talismans is unacceptable.
A doll-amulet, made in accordance with all Old Slavic beliefs, will become a full-fledged protector and fill your life with all the benefits.
Delicious and original motanka doll made from pancakes
Do you want to surprise your guests? Then make a motanka of pancakes! Bake thin pancakes according to your favorite recipe. Take regular Barbie as a basis.
Cut each pancake to the middle and wrap them around your legs and waist, spreading the filling over the layers. The best filling for this is cottage cheese or cottage cheese. The pancakes will stick perfectly on it.
You can also do this. Make filled rolls from the pancakes and place them in a circle, one on top of the other, gradually narrowing the diameter. You will get a fluffy skirt. You can also decorate it with ruffles and put a pancake scarf on your head, as shown in the photo.
Advice! Instead of toothpicks, use strips of braided cheese or cooked long pasta to hold the elements together. Make holes in the pancakes and thread the pasta through, and then pull them off and tie them with a bow. It will turn out beautiful and safe.
You can make a Maslenitsa doll from thin pancakes without filling. Fold them into triangles one on one and build from them a fluffy skirt like the one shown in the photo.
Or you can not bother at all and make just such a pancake motanka doll.
In general, you can decorate it however you like. Your imagination will have plenty to run wild!
How to make a motanka doll with your own hands?
A Maslenitsa doll is not just a toy, but a talisman that protects against illness, hunger, failure, and the evil eye. It is believed that the doll attracts happiness, luck, and prosperity to the house. There is a belief that if you make a motanka doll with your own hands, then well-being will be ensured for all family members.
So let's make such a talisman for our family for the holiday. It's very easy, quick and fun to do.
According to the ancient Russian tradition, scissors, needles, and pins should not be used when making reels. Also, the doll cannot draw eyes, nose, lips. In ancient times, it was believed that a face could attract evil spirits.
The amulet can be made from straw, hay, dry grass, bast and even medicinal herbs. The latter will also give the talisman a pleasant aroma.
Motanka doll or stuffed animal: which one is burned?
For Maslenitsa, two talismans were always made - a large straw effigy and a small motanka doll. On the first day of Maslenitsa festivities, a scarecrow was made, which was burned on Sunday.
Useful information When is Maslenitsa celebrated in 2021 ?
They always did it with a face. Burning the effigy meant the complete victory of warm spring and sunshine over the harsh, cold winter. There is also a belief that all misfortunes, illnesses, hunger, troubles, and suffering are burned along with the effigy. The larger the stuffed animal, the more adversity and sorrow went with it.
The Maslenitsa doll, or as it is also called the “daughter of Maslenitsa,” is much smaller in size than a stuffed animal - no more than one elbow. It is a strong amulet not only for the home, but also for all household members.
It is made for each family member, as well as one common for the whole house. The doll protected the house for exactly a year, until the next Maslenitsa holiday, and then it was burned along with a large straw effigy. For every Maslenitsa, new reels were made.
Why do they burn a doll amulet on Maslenitsa?
It is believed that over the course of a year, a motanka doll accumulates and retains a lot of negative energy. And in order not to keep her in the house, they burn her along with the effigy. Fire consumes all failures and problems and, together with smoke, dispels them. This is a kind of cleansing from everything bad.
It is not at all necessary to buy an expensive motanka doll. You can do it yourself. If you doubt your abilities, then in the master class the whole process is described step by step.
Even an inexperienced craftswoman can make a talisman. The process of creating it is simple and will not take you much time, but for a whole year your home and your loved ones will be under reliable protection from all wickedness.
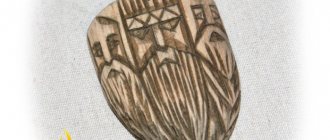
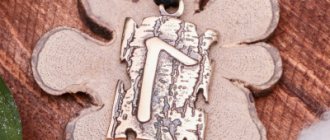
STRAW TOYS
Straws are an excellent material for crafts. Since ancient times, dolls, boxes, hats have been woven from it, and it is also widely used for inlay. Master Larisa Veniaminovna Smetanina, who was awarded a 1st degree diploma and audience award for creating highly artistic souvenir dolls in national traditions in the competition “Artisanal Rus'. Modern doll of Russia." This competition was organized by the Culture Pavilion of the All-Russian Exhibition Center and the Educational and Production Center for Folk Arts and Crafts and was held in Moscow from September 2000 to June 2001.
Straw dolls. Author's work.
Nanny at the cradle with a baby. Author's work.
Rice. 1. Tie the straws into a bundle with strong threads - you will get the frame of the doll.
Rice. 2. Wrap the short part of the bun with a light-colored cloth.
Rice. 3. Turn the bundle out so that the straws evenly cover the area covered with fabric.
Rice. 4. Pull the bundle tightly with threads.
Rice. 5. To make hands, tightly tie six straws of equal thickness to the wire and spread them from the center to the sides.
Rice. 6. In a circle, each time transfer the straw from under the working straw two straws away from you - you will get a pentagon.
Rice. 7. Connect the two sleeves together by twisting the wire. Wrap the joint with a strip of birch bark.
Rice. 8. Insert your hands from below into the torso bun, dividing it into two parts, place an additional bun under your arms.
Rice. 9. Weaving a 'troika' ribbon.
Rice. 10. Weaving a catfish ribbon. After completing positions 'a' - 'k', repeat from 'e' to 'k'.
‹
›
PREPARATION OF STRAWS
For various crafts, rye straws are most often used, since they have the longest stem length. Straws are harvested at the time of ripening of cereals, usually in late July - early August.
In dry, sunny weather, the stems are cut with a sickle or scissors and tied into sheaves. Wet straw in sheaves quickly turns black. Crumpled, tangled stems left on the field after harvesting are also not suitable for work.
At home, the stems are cut into pieces, cutting out the nodes (knuckles) with a knife and removing the outer leaves. The resulting tubes are sorted by length and thickness, tied into bundles and stored in this form.
Volumetric braids are made from the upper part of the stem, and flat ones from the middle. The thinner the stems, the better and more elegant the products are.
MAKING A DOLL
To make a straw doll, you will need thin and medium-thick straws without knees. First, the straws are soaked in warm water for 15-20 minutes. As soon as it becomes soft to the touch, start working.
The doll's frame is made from the softest light straws with a diameter of 2-4 millimeters. There should be 20-25 of them.
So, tie the straws into a bundle with strong threads (Fig. 1). Wrap the short part of the bun with light-colored fabric to give the head a more rounded shape (Fig. 2). Turn the bundle out so that the straws evenly cover the area covered with fabric (Fig. 3). Place the straws especially carefully where the doll's face will be.
Pull the bundle tightly with threads again. You will get a doll's head with a long tuft of a body (Fig. 4).
To make hands you will need copper wire and straws from the top of the stem (top). Tie six straws of equal thickness tightly with wire, which will act as an axis. Spread the straws from the center to the sides (Fig. 5). Hold the bun in your left hand. Weave from bottom to top. With your right hand, bend any of the six straws away from you to the right of the axis through the two straws on top. Rotate the weave 90 degrees counterclockwise. Take the straw from under the working straw with your right hand and place it again through two straws from you to the right of the axis, and so on in a circle. A pentagon is formed from six straws. There are always two straws at one of the corners, the lower of which is moved further in a circle through two straws (Fig. 6). When the lower straw leaves from under the upper one, the movement of the right hand resembles twisting two wires, while the force of the hand is evenly distributed over both straws. During work, it is important to ensure that the shape of the pentagon is not lost, and its dimensions to the middle of the sleeve increase with each turn; for this, the working straw needs to be slightly moved to the outside. After the middle of the sleeve, the dimensions of the pentagon should be reduced, moving the working straw slightly inward. The principle of weaving does not change.
As you work, carefully build up the straws, braiding their joints into the ribs of the braid. At the end of weaving the straw, tie it tightly with wire again.
Connect the two finished sleeves together by twisting the wire. Wrap the junction with a strip of birch bark, shaping the doll’s chest (Fig. 7).
Insert your hands from below into the torso bun, dividing it into two parts (Fig. 8). Place an additional bundle of 50-60 straws under your arms.
Connect the additional bun and the parts of the torso bun, tying them tightly along the waist line. Using scissors, trim the ends of the straws along the bottom of the skirt. The bottom of the skirt and waist can be decorated with flat braids of different thicknesses, for example, “three-piece” (Fig. 9) or “catfish” (Fig. 10) braiding. They also decorate a jacket and apron.
Make the doll's hairstyle also from natural materials: birch bark, bast, split straw.
A man's straw figure can easily be made like a woman's, forming legs instead of a skirt. To do this, divide the additional bundle in half, tie each half at the bottom in two places at a distance of 2-2.5 centimeters, bend it - you get feet.
Bast shoes can be made by wrapping your feet with flat braided fabric.
At the last stage of working on the dolls, cover all thread dressings with woven ribbons or smoothed straws, imitating elements of clothing.