How to sew a beautiful fabric doll: instructions for beginners
For beginning craftsmen, there is a short plan for making dolls:
- Prepare blanks for the future doll using templates.
- Transfer the marks onto the fabric with a pencil using a 1cm seam allowance.
- Attach the limbs to the body with thread.
- Connect the halves first with a basting, then with a machine. There is no stitching at the bottom.
- The torso and limbs are filled with rags and cotton wool.
- Sew up the open hole.
- Face and hair. They don't give the doll a face. Spirits enter through the eyes.
- Lastly, clothes.
DIY Grandmother doll made of fabric. Patterns. Master class with photos
Textile doll for a Russian folk tale. Patterns. Master class with step-by-step photos.
Once upon a time there were grandparents.
DIY dolls. Master class with step-by-step photos. Author: Pavlukhina Vera Aleksandrovna, teacher of additional education, MAOU DO Youth Center "Zvezdochka", Tomsk Goal: making a textile doll - toy Objectives: To introduce the technique of sewing textile toys To form technical skills To consolidate the skills of working on a sewing machine To master the seam "over the edge", “forward with a needle” Develop creative abilities Nurture personal qualities Description: The textile doll is intended for theatrical activities in the classroom or at home. This master class is intended for children over 13 years old (under the supervision of an adult), additional education teachers, and educators. It will arouse interest among people involved in textile creativity. Purpose: will serve as a wonderful gift for a child, can be used in classes with children. We live in a big, huge country, and we really have something to be truly proud of. All that remains is to teach our children to be proud, love and appreciate their people, their culture and language. To do this, it is necessary to work in this direction from preschool age. Russian culture is unthinkable without folk art. That is why it is important to involve oral folk art as much as possible in all types of child activities in order to achieve the desired result. Theatricalization of Russian folk tales helps the child not only develop speech, express certain emotions, and demonstrate their abilities, but most importantly, it introduces children to Russian folk culture. Puppet theaters are always loved by children and bring great joy and pleasure. The doll is familiar and close to the child, his perception, so the baby regards it as his friend. When such a toy comes to life, it reveals to the child such simple truths: it teaches goodness, honor, justice, and hard work. Safety precautions when working with a needle • Do not put the needle in your mouth • Do not stick the needle into clothing • The needle is always either in use or in the needle bar Safety precautions when working with scissors • Do not hold the scissors with the ends up • Do not leave the scissors open • When watch your work with the fingers of your left hand • Place the scissors on the table so that they do not hang over the edge of the table • Pass the scissors closed with rings towards a friend • Do not cut with scissors on the go, do not approach your friend when you are cutting with them. When using a sewing machine 1. Do not hold your fingers near the presser foot to avoid being punctured by the needle. 2. Always watch your posture, do not lean low towards the car. Today we will sew the main character of many Russian folk tales. This is the kind of grandma storyteller we'll get.
For work we will need: Double-thread fabric, colored chintz, lace, holofiber; Threads, needle, scissors, felting needle, wooden stick; Sewing machine; Beads No. 3, wool for felting
Granny pattern
1.Copy and cut out the pattern.
2. We transfer the parts of the torso, legs and arms to double-thread fabric, do not cut them out, fold the fabric in half and stitch it on a machine, not forgetting to leave holes on the torso and legs. Cut it out. 3. We make small cuts on the hands and carefully turn out all the parts.
4. We stuff the parts with holofiber and sew up the cuts on the arms.
5. Legs. We tuck the bottom of the body a little and sew the legs in with a seam “over the edge”
6. Sew the arms to the body.
Let's start with clothes. Pattern.
7. We will transfer the shirt detail onto colored chintz, without cutting it out. We fold the fabric in half and machine sew the shoulder and side seams.
8. Cut out and turn inside out.
9. We put on a shirt. We hem and tighten the top of the shirt.
10. We turn up the sleeves and sew on the lace with a “forward needle” seam.
11. Sundress. We cut out a rectangle from the fabric with sides of 14 and 20 cm. Fold it in half and sew along the length using a machine. Then we sew the bottom and top, turn it inside out. 12. We put on a sundress over the shirt and, seam forward with a needle, decorate the straps with lace. We decorate the neckline with trim.
13. Sew on beady eyes.
13.Hair. Using a felting needle, we roll the wool over the head and create a hairstyle.
14. Let's sew a scarf on a machine.
15.We shape the mouth and powder the face.
Grandma is ready!
Using the same pattern you can sew a grandfather.
Belt the shirt with a lace sash. Attach the beard with a felting needle. Sew shorts according to the pattern. Shorts. Pattern.
Have fun playing.
Thank you for your attention
We recommend watching:
How to sew a snowman from fleece Do-it-yourself toys from foam rubber Doll from nylon tights with your own hands. Master class DIY fleece mouse toy. Patterns. Master class with step-by-step photos
Similar articles:
DIY chicken toy
Tilda Hare. Master Class
Baba Yaga doll (rag)
Head and neck. Prepare a square of fabric. Fold diagonally. Put cotton wool in the middle, secure with threads, and make a nose. Attach a cotton ball to the skewers. Cover with fabric, connect with the previous part.
For the woman’s arms and torso, you need to wrap cotton wool around the skewers. Connect with thread. Make a skirt from polka dot fabric. Strengthen the figure with thread. Make an apron from gray rags and secure it with a sash. Vest made of the same fabric. Flax is necessary for hair; attach it to your head and straighten it. Tie a red scarf on your head. For a broom, you can take a branch, a pencil and glue burlap to it.
You might be interested in this About embroidering icons of the Mother of God using beads
Important! For the stupa, cover the jar or bucket with burlap. Fill with polystyrene foam, cotton wool and burlap. Baba Yaga should sit in a mortar.
Folk motanka doll in national costume
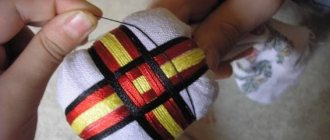
Making a reel should be step-by-step. They are created without piercing/cutting things. You can only prepare patterns using scissors. Parts of the body are connected with threads, wrapped several times. The threads used are naturally produced and mostly red in color. It protects against evil spirits and evil spirits. The head must be decorated with a scarf or any other headdress.
Photo of grandma
Place a pea-sized piece of cotton wool into a square of fabric and secure it. It turned out to be a nose.
Then we form the head in the same way.
The legs are made from rolling stock, secured in a spiral with thread, feet are formed, and tied together with thread in the shape of a figure eight.
A rectangle of fabric is taken onto the body, and cotton wool or rags are placed in the center. Fold the edges and insert the legs.
The head is inserted into the body from above and secured with a thread in a spiral.
From two squares of fabric, like a spout, we make a chest and secure it.
We sew pants.
The shirt is fastened under the neck in a reverse manner, the edges are folded, and the back can be secured with a seam.
For the handles, take a rectangle of fabric, fold it with an accordion on both sides, or with candy. We secure the ends with thread, a doll's loop.
Then we turn it inside out and secure the cams with a doll's loop.
The sleeves are attached inside out above the fists and turned inside out.
After this, the finished arms, together with the sleeve, are applied to the back and screwed with a thread through the neck and waist in a figure eight so that a cross is formed along the back, and the chest remains free.
We put on a skirt for grandma, you can turn it inside out, you can gather it with a needle. A scarf and a scarf over it.
We put on the shoes and attach the handles to the basket. If desired, you can embroider eyes, mouth, eyebrows. Grandma is ready!
Grandma was bored, now she has a good-natured grandfather.
I turned out to be a Nanny from a typical grandmother :)
Self-portrait based on the design of a characteristic headstock
Once I listened to Chernyaev’s lectures about how houses used to be built using ancient Russian measures - fathoms, spans, etc. He says that the fixed measure with which we measure now is dead and does not allow space to breathe. And that when building a house, the owner’s fathom was taken into account, because each person has his own. And having built a house taking into account the measurements of those living in this house, he had harmonious energy and could even heal. Chernyaev left this world, leaving us with a legacy of records and books of this new forgotten teaching. But I don’t build houses, although who knows how life will turn out, but now I often use measurements in spans and versks and other measures.
And a DSLR camera, which has been serving me for many years now, helps me photograph my dolls.
The doll required fabric for the head, body, arms and legs of a flesh-colored color approximately 50 cm. A piece of fabric for the shirt and pants 30-40 cm, for the skirt approximately 10 by 20, a scarf for the head 20 by 20, beads, raffia for the basket, wool for felting felt boots.
Place your palm on a piece of fabric intended for the body and cut out a square.
Place a rag about the size of a pea in the center, secure with thread to create a nose.
Insert more rags, form a head, distribute the folds of the fabric to create nasolabial folds and wrinkles towards the eyes. Secure with thread.
The legs are a piece of fabric equal to the width of the palm and the length of the palm from the little finger to the thumb and a little more. Roll it up, twist it with thread, form a foot by pulling the thread in a figure eight. Fold in half and tie with thread at the fold.
Wrap rags around the legs. Place a rag into a square piece of cloth the size of your palm.
Insert the legs and tie them with thread to form a loin.
We assemble the body. Place a head knot on the back.
Tie it around the neck with a thread.
Wrap the excess over the chest, wrap the thread again, moving towards the waist. Wrap the ends of the knot on the back upward, wrap everything again, without breaking the thread, set the doll aside.
Make two knots for the breasts from two square pieces of fabric 5 fingers wide and tie to the body. In the original, the breasts are not very large, but my maternal grandmother has size nine breasts and, keeping this in mind, I decided not to waste time on trifles.
I find out the volume of a piece for pantaloons this way: from the neck to the foot, the height, width of the fabric is the girth of the grandmother’s chest plus a little more.
Give a line to the middle of the height of the pants, cut off a corner of 1 cm at the bottom of the pants.
I sewed lace down the legs, take something that is not transparent, mine is almost invisible, place the seam in the center, cut out a triangle of crotch seams.
Give a line 3-4 mm away from the edge. Make a notch not reaching the line 1 mm. Turn out..
Put it on the headstock, secure it at the waist with a thread. Gather the bottom of the pants above the lace with a thread, raise it slightly and sew directly to the leg. Same with the second one.
A piece for a shirt - chest circumference plus a little more, length as desired, some like it taller, some like it longer. My grandmother's is knee-length and has lace around the edge. Gather the top with a thread.
Tighten it around the neck in a reverse manner and secure with thread. Put your shirt down.
Tie the thread around the waist, distributing the folds.
The skirt is a piece of fabric two spans long (from the index finger to the thumb) or more, with a height from the waist to the feet. Connect into a ring and sew the braid down. Gather the top with thread; in this photo I sewed on the apron right away, but in the final version I removed it because... The apron does not look good on a skirt that is not too voluminous.
Attach at the granny's waist in a reverse fashion.
We admire it.
For the handles, a piece of fabric 1.5 spans long and 3 fingers wide. Fold it like an accordion and tie it with thread at one end.
Turn it out and tighten it under the knot so that your palm has more volume and insert a rag. I applied it to the back and tried on the length of my arms, for me it was just right to make a palm on the other side.
For the sleeves, a piece of fabric equal to the length of the arms and a little more 3 fingers wide. Fasten in a reverse manner under the palm knot.
Repeat on the other side.
Fasten crosswise on the back.
Sew beads to the neck. Build a basket for the “business” from a raffia braid, and sew white egg beads or skeins of thread inside. Sew the basket to the palms. Place a white piece of rag on your head - a bottom scarf, with a red one on top - an elegant one. I recommend sewing the scarf to the head.
So that grandma doesn't freeze. ready. The grandfather is missing, but this is the topic of one of the following articles.
Ellen Jonois
Master class “Dolls of our grandmothers”
Master
— class for parents and children of the middle group
Topic: “ Dolls of our grandmothers
»
Today I want to introduce you to one wonderful toy: “Look who’s visiting us?”
Yes, these are dolls
, but they are not like her current friends.
When do you think the first doll
?
(answers)
It's hard to say exactly, but the doll
, as a children's toy appeared among the Slavs about a thousand years ago.
This is confirmed by excavations near Novgorod. And in other, earlier civilizations, much earlier. The British Museum houses a rag doll
that belonged to a little Roman who lived 300 BC.
The oldest doll
was found in an Egyptian tomb 4 thousand years ago.
Made from wooden planks, with “hair”
made from clay beads.
Since ancient times, a rag doll
was a traditional toy of the Russian people.
In Russian peasant families, playing with dolls
was not considered empty fun.
On the contrary, she was encouraged in every possible way. The peasants believed that the more and harder a child plays, the greater the wealth in the family and the more prosperous life. And if you treat dolls poorly
, play carelessly and sloppily, then troubles will inevitably arise.
Doll
is the most famous toy in the world that accompanies us all our lives.
She teaches, educates, with dolls
children can feel like adults, and she gives adults the opportunity to return to the world of childhood again.
In Rus' and all Slavic peoples there was a wide variety of dolls. They were made for different purposes:
Some were amulets, protecting the family from troubles and illnesses;
Others were made for holidays and were obligatory gifts;
And there were just dolls and toys
, with which you could play or fall asleep sweetly in the crib.
In ancient times, a doll
was a person’s protection from diseases, misfortunes, and evil spirits.
The doll took care of a person
, that’s what they called it: amulet or bereginya.
As a rule, the most protective dolls
made without needles and scissors.
When making dolls, they tried not to cut the fabric, but to tear it (sometimes the dolls were called “torn”)
.
Traditional rag doll faceless
.
The face, as a rule, was not marked and remained white. A doll
without a face was considered an inanimate object, inaccessible to the instillation of evil, unkind forces into it, and therefore harmless to the child. She was supposed to bring him prosperity, health, joy.
The Russian people had dolls
, in which people saw their helpers and considered them a talisman.
Such dolls were made throughout life, starting from early childhood. They were made from old clothes worn by their father or mother. And the dolls lived in houses
, becoming not just a toy, but a part of the world and a member of the family. That’s why they turned to them in difficult moments of life, talked, shared sorrows, and did not forget in joy.
I propose to consider several dolls - amulets:
“Kubishka the herbalist”
is
do-it-yourself fabric
doll It was believed that if someone from the family got sick, then you should walk around the house with this doll
, kneading the herbs with your fingers, thereby making the air healthier.
After which, the doll
was placed in the bed of the patient.
Such a doll
will not only be an excellent decoration for the home, but will also protect the house from misfortunes.
After 2 years, the grass in the pupa must be changed. our ancestors
did .
“Kubishka the Herbalist”
is still making sure that the disease does not enter the house. Warmth emanates from her, like from a caring housewife. She is both a protector from the evil spirits of illness and a kind comforter.
“Porridge”
doll is the image of a seven-year-old girl.
At the age of seven, the girl began cooking porridge for the whole family. A doll in the form of a bag
was made to serve as her assistant .
This doll was a measuring stick
.
The cereal was poured down to the legs, water was poured up to the waist up to the neck - it turned out to be porridge. The doll
is made of linen fabric.
The height of the doll is about the size of a saucepan
where porridge is cooked.
The doll is filled with cereal
. The meaning of cereals: rice - wealth, buckwheat, pearl barley - satiety, oats - strength.
“Bell”
doll is a doll of good news. The birthplace of the doll is Valdai. That's where the Valdai bells came from. The ringing of the bell protected people from terrible diseases. The bell rang under the arc at all the festive troikas. The bell is dome-shaped and resembles a sun on top. The doll has three skirts. Man also has three kingdoms. Copper, silver, gold.
And happiness also consists of three parts. If the body feels good, the soul is happy, the spirit is calm, then the person is quite happy. This doll is cheerful, perky, and brings joy and fun to the house. Amulet of good mood. By giving a Bell, a person wishes his friend to receive only good news and maintains a joyful and cheerful mood in him.
Doll
"Krupenichka"
.
It is based on a canvas bag with buckwheat, decorated with threads and fabrics. (In those places where there were problems with buckwheat, it was replaced with peas and other cereals, and these dolls
differently - Zernovushka, Pea).
Such a doll
lured wealth into the house, promised a good future harvest and an addition to the family.
Doll
"Pelenashka
"
After the birth of a child, a special doll was placed in his crib. As you understand, such doll
could not be bought.
Just do it yourself. It was made from a piece of worn homespun clothing. Such clothes carried the warmth of a person, and this warmth was transferred to the doll
, along with a piece of the person’s vitality.
This doll
also served as a talisman against the evil eye.
The guests looked at the child and the doll and said
, turning to
the doll
,
“Oh, how
good the doll is !”
so as not to jinx the child. “Pelenashka”
could not be
made
with a needle or scissors - this could “hurt
the doll
” and damage it, but such
a doll
was invested with maternal love and care.
At first, such a toy was placed in an empty cradle so that it would settle down there. And then they laid her down next to the baby, saying, “Sleepy, insomniac, don’t play with my baby, but play with this doll!”
.
And today hand-made folk dolls
can become children's favorite toys. And making dolls is a fun activity for family leisure. We invite you to make a cheerful doll - a bell, so that there will always be joy, happiness and love in your home.
For making a doll
- we will need a bell: three circles cut from three different colored fabrics (the diameter of the circles is 25 cm, 20 cm and 17 cm - we will use them to make the
doll’s
; a 20x20 square of white fabric - it is intended for
the doll’s
; rags (cotton wool or synthetic padding, threads, a bell, scissors; a 4x15cm strip of colored fabric - this will make a warrior for the
doll’s
; a triangle of colored
(can be plain)
fabric 16x26x16cm - will serve as a scarf.
The procedure for making a rag doll with your own hands
.
In the center of the largest circle we place a bell along with padding polyester (rags)
. We tie the resulting ball with threads, trying to make the ends of the skirt even in length on all sides. Then we also put on
we tie a circle of slightly smaller diameter. We do the same with the third circle. We have a three-layer skirt. a doll's face from a white square
: bend two opposite corners towards the center.
the resulting “figure”
on the
doll’s head so
that its sides are slightly lower than the neck
(at least 1 cm)
.
Carefully tie the threads around the neck. From the pieces of fabric sticking out on the sides we form the arms of a rag doll-amulet
: we bend the ends slightly inside the arms and tie them, stepping back from the edges about 5 mm.
a warrior on the doll’s head
: bend both sides of the strip towards its center, then in half - you get a narrow strip.
We put it on the doll's
and fasten it to the neck with threads.
We put on a scarf on top and tie it at the back, putting it in a cross under the doll’s
. The finished rag doll-amulet can be hung on a braid and placed on the wall of the house. You can also use this amulet as a gift to loved ones.
Look at the different dolls you made.
, but in one thing they are similar, they are made with love and in joint creativity.
Publications on the topic:
Summary of the conversation “Dolls of our grandmothers” followed by making a doll Goal: to introduce children to Russian folk dolls, to teach children how to make a doll from fabric. Demonstration material: dolls or pictures.
Physical education “Traditions of our grandmothers” Objectives: - continue to introduce children to the Easter holiday; — develop the ability to perform exercises with gymnastic sticks; - secure.
My children and I prepared very seriously for the holiday on March 8th. The children learned songs, dances, and memorized poems. The guys accepted.
Goal: involving parents in educational activities. Objectives: 1. acquaintance of master class participants with traditional folk dolls;
Today you can find a variety of toys on sale, however, dolls made by yourself are especially popular. To do this, you don’t need to have any special skills; just take old nylon tights or stockings, a needle and thread. In this article you will learn how to sew dolls from tights
, using step-by-step instructions. Even beginners can easily master these master classes and be able to sew a granny doll or a funny baby doll.
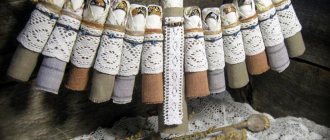
Arkhangelskaya Column - a traditional folk doll
The Arkhangelskaya Stolbushka is a Russian folk doll with a pigtail. Similar ones were made in the Arkhangelsk province.
The process is quite easy. A twist of dense fabric was prepared. They pulled out a certain number of threads. The longer the thread, the longer the braid. They tried on a shirt on the finished post and tied it with threads, leaving a cut near the neck. We wore a skirt and decorated it with ruffles. A long braid was woven from threads and tied with a ribbon. Instead of a headdress, a bandage is on the head.
Pre-wedding Arkhangelsk column
Ten-handed folk rag doll
The ten-handed doll is a Belarusian traditional autumn doll. It is made in October. Lots of handles to help the housewife with household chores.
- For the body of the doll, take a rectangle of fabric. Fold in half. Place a twist from a piece of cotton wool and tie it with thread, making a head. Make a roll of fabric around the cotton wool. The threads are not cut.
- Five pieces of fabric are needed. They are rolled into rollers and secured with threads on both sides. They also make a cross on the body.
- The next step is a blouse for the doll. A hole is cut in the square and put on a ten-handle. Secure with a belt. Skirt. You can make an apron.
You might be interested in Description of cross stitch: explanations for beginners
Autumn ten-handed helper in household chores
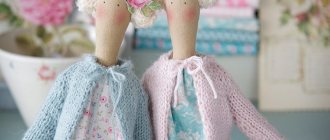
In this master class we will tell you how to make folk dolls of grandfather and grandmother for the mini museum “Russian Izba”. We will make these dolls on a base with movable arms and legs. They will be able to sit or lie on the stove, the grandmother can give knitting needles in her hands, and the grandfather can plan a spoon. You can give these dolls other poses - the wire that underlies these dolls allows this. They can be bent slightly on the back and you get an old man's pose. For grandparents, it is better to choose fabrics with a dark pattern for clothes. In the same master class we will tell you how to make bast shoes.
In other master classes we describe in detail how to make boy dolls and girl dolls for the mini museum “Russian Izba”. There are also master classes describing the tower, the inside of the hut, furniture and yard.
All dolls with your sizes can be ordered from us. Our store advertisement is located on the right side of the website.
Features of making the base for the grandfather and grandmother for the mini museum “Russian Izba” with your own hands.
We make grandfather and grandmother dolls on a base with movable arms and legs before this stage. Grandfather can wear pants.
We will add a nose to the dolls' faces and as a result wrinkles will appear on the face.
For the head, we also take a square of white fabric and mark the middle on it.
Slightly below the intended middle we make the nose. To do this, we put a very small piece of cotton wool in this place, wrap it around with bobbin white threads and tie a knot.
We apply a square of fabric to the doll's head and secure it with thread around the doll's neck.
We make the handles in the same way as for the other figures. We don’t make breasts for the folk doll Grandma.
Do-it-yourself folk doll Grandfather for the mini museum “Russian Izba”.
We make bast shoes for our dolls. We wrap a rectangle of suitable fabric around the foot, the edges of the fabric are at the top.
We bend the pipe upward, thereby covering the open edges of the fabric, and tie it with thread around the ankle.
We make onuchi from a narrow strip of white fabric. Fold one of the long edges of the strip. The folded edge will lie underneath.
Wrap a strip of fabric around the shin. At the end of the wrap, fold another small piece of strip on the top side. We fix the shin with the ankles with ties (threads of a suitable color).
We are sewing a shirt for grandfather.
Fold a rectangle of suitable fabric in half along the shoulder line, cut out the excess and sew along the sides.
We turn the shirt inside out.
We put the shirt on grandfather. We turn the sleeve a little on the wrong side and tie it with a thread around the doll’s wrist.
We gird the shirt with a belt.
Making a vest for a grandfather doll.
Cut a rectangle of suitable fabric along the neck line and in the front center.
Sew the side edges of the vest, leaving a hole for the grandfather doll’s arms.
Place the vest on the grandfather figurine.
Make the hair, mustache and beard the same way as for the man doll. You just need to use threads for your grandfather’s hair in light shades that imitate gray hair.
The grandfather doll, made based on a folk doll, is ready.
Do-it-yourself folk doll Babka for the mini museum “Russian Izba”.
For the Babka doll we make a shirt from a square of fabric. The diagonal of the square should be slightly larger than the doll's spread arms.
We make a cross-shaped cut in the center of the square.
We put the fabric on the doll's head.
We place the ends of the central cut on the wrong side and secure it with a thread under the throat.
We turn up the sleeves of the shirt, wrap the thread around the wrist and make a knot.
We also fix it with thread from below under the chest.
For the skirt, take a rectangle of fabric. We sew the fabric along the edges and put the skirt on Grandma using the reverse method.
We put on the apron inside out and tie it with a belt. We put a scarf on the head of the Babka doll. We make bast shoes for Grandma in the same way as for Grandfather’s doll.
The folk doll Babka for the mini museum is ready.
Now our Grandfather and Grandmother doll figures can be given any pose.
Ritual doll “Bird of Joy”
Make a tight twist of fabric. It is tied with threads in 3 places. Wrap it in a white piece, tie it with red thread, dividing it in half. Fold the limb flap diagonally and tie it to the neck. For the breast, roll up a tube and place it under clothing. The shirt is put on the doll, tightened with a belt from below. Wear a skirt and apron. Then they make a headdress. The long side faces upward and is used to make a beak.
Bright poultry joy brings happiness
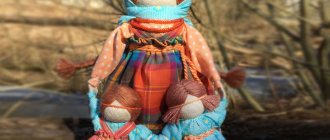
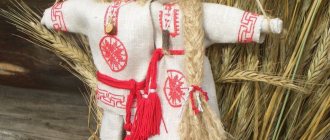
We create a gift folk doll “Granny Character”
This is a Vyatka doll, it is not protective or playful, it is a gift.
Babka was given to a young woman who had recently gotten married, with the words: “A woman does not sit idle!” She always has something to do in her hands - needlework. Grandma was passed down as a symbol of wisdom and life experience. Her upturned nose is important and characteristic, demanding, but at the same time kind and funny. She knows a lot, grumbles with or without reason! But she remains such a dear and wise granny, whose hands are always busy with what she loves!
The doll was made by me using folk technique - motanka - without sewing. But the doll is not protective, so sewing during the winding process is also allowed.
I usually eyeball my dolls, measuring everything per doll. But in the photo I put a ruler for the approximate size.
Manufacturing rules:
- good mood,
- calm state,
- the desire to create as the soul desires!
- and remember - this is your creation, and it’s up to you to do it right

You need to start by preparing materials:
1. The main plain fabric is the doll’s body.
2. Multi-colored fabrics for a skirt, pantaloons, jacket and scarf. If desired, you can decorate the doll's clothes with lace or braid.
3. Vata.
4. Strong threads.
5. Knitted socks or felt boots for a doll.
6. handicrafts in the hands of the grandmother (embroidery, knitting, weaving, baskets, and so on).
Take a rectangle of the main fabric.
Visually divide it into three parts. The bottom part will be the doll's face.
Roll a small ball of cotton wool to create the doll's nose. Wrap it in fabric and tie it with thread, as in the photo.
Then you need to form a head from a third of the fabric so that the nose is slightly above the center and tie it. I make a ball from the remnants of bast, or from cotton wool, padding polyester, or remnants of threads and fabrics.
Now we need to work on the legs.
1. Make a twist of fabric - future legs.
2. Tie the fabric inside out (wrong side up) on your leg, closer to your future foot.
3. Turn the fabric inside out and tie the middle of the twist, folding it at a 90-degree angle.
Take the doll's head and body. Fold the rest (tail) of the fabric in half, and insert the legs into the middle of the “pocket”, securing them with thread, so that you get the following:
Make breasts for your grandmother. Take two squares, approximately 7*7 cm, roll cotton wool into balls and wrap them in squares of fabric. Tie the resulting blank and wrap it around the doll’s body.
Now we can create a “prominent place” for our granny! It’s convenient for me to make a soft place from a large circle of fabric, in which I put a large ball of bast and secured it all with thread, like a diaper :) The size of the ball can be much larger, the doll will look even more impressive!
Now you can make or sew pantaloons for your granny. Wrap a rectangle of fabric around the doll's butt and carefully shape the edges around the legs so that the lower fabric does not peek out from the pantaloons.
It's time to start working on outerwear. First the hands are made.
1. Make fists similar to the principle of creating breasts, only much smaller.
2. Using a reverse method, wrap them with a rectangle of fabric - sleeves.
3. Turn the fabric inside out.
Secure your hands under the doll's head, as in the photo.
Using the same reverse method, wrap a rectangle of fabric covering grandma’s chest. This method of winding is good because all the uneven edges remain hidden from view and it gives the impression that the fabric is trimmed and sewn to the doll. It looks neat and is easy to wrap.
Turn the fabric inside out and secure it to the waistband, turning the bottom slightly inward.
Make the grandmother's skirt in the same way. about half a meter of fabric in length. I sew the sides before I attach the skirt to the doll, leave it turned inside out so that it lies on the doll's face, secure it to the belt with thread or ribbon and lower the skirt right side down.
Tie a scarf on your head. You can first secure your hair like I did. Wind a bunch of threads around your hand (I have acrylic ones with glitter), tie the middle, place it on the doll’s head, and secure it around the neck with thread. If your hair is long, you can braid it; if it’s short, then hide it under a scarf.
Our granny is old, so she has a bottom scarf (a small rectangle of fabric).
All that remains is to insulate the old lady’s legs, decorate her with beads (if you want) and give her her favorite handicraft.
Grandma Character Ready!
The master class was prepared by Irina Mandryka “IRIYA”. Create and believe in your strength! Be happy and loved.
Spiridon-solstice doll
Filling is placed on the fabric. Bend in half and make a ball with thread. They form arms and legs. The flap is folded on both sides and rolled into a tube.
Then the body is filled. You need to wear it from below. The fabric is placed under the doll and the trouser leg is wrapped up. Then they put on the shirt and secure it. They make a hairstyle out of flax and pull on a hat. You just need to wrap it around your head. And tie the wheel to the handles.
Spiridon male doll, improving business
Lovebirds - folk wedding doll
Wrap the stick in white cloth and secure it with thread at the edges.
A twisted piece of fabric for a girl is folded over a stick. Secure it to a stick with threads. Then the head and body are formed with a thread. All that remains is to decorate.
Male doll. The flap is rolled into a tube and secured to a stick in the form of legs. Boots and pants are worn on the legs. Then a shirt and a hat.
Lovebirds for newlyweds
Children's amulet "Bunnies"
This is a Russian folk doll made by hand from fabric worn by a child. The fabric is placed in patterns towards the master's face. Place a corner inward from the left edge. For the ears, the edge is gathered into a bun and tied with thread. To form the head, take cotton wool and secure it in the same way. The opposite end is twisted for the paws. They are tied to the neck to put the toy on the finger.
Amulet “Bunny” for kids
Beautiful doll made from nylon stockings with your own hands
If you wish, you can shape the butt and tummy of your baby doll if you tighten it with threads. Glue the hair to the top of the head or sew it into the head. Don't forget to draw or embroider eyes and a mouth. You can wrap the baby doll in a sock diaper or sew him other clothes.
Sewn dolls are beautiful, durable and environmentally friendly. Even small children can play with them, so realize your talents.
Doll Krupenichka and Rich Man
- Cereal is poured into the center of the shred, forming a head;
- The head must be covered with a scarf;
- The skirt is made in waves;
- Make a tube for the hands;
- Attach a skirt and an apron, first pouring cereal onto the body;
- Decorated with ruffles;
- Fasten the parts.
The man looks like a sack of grains, with straight arms.
Krupenichka and Bogach bring wealth
Bast doll and other crafts for Maslenitsa
A white piece of fabric is filled with rags and the head is secured to the stick with threads. A body is formed from the bast - it is tied to the neck. All extra threads are hidden. Arms and legs are also made from bast, securing them at both edges. The hands are tied to the body with the help of red threads, so they protect the owner from negativity. It is best to make a cross on your chest, which will repel strangers. In ancient times they were often sold at fairs.
Bask amulets dolls
How to sew a granny doll from tights
First cut off the bottom of the plastic bottle and leave the bottom and neck intact. Take the padding polyester and wrap it around the bottle, securing it well with threads. Form a ball of padding polyester to make a face, and then gradually fill it up to form the cheeks.
The indentations in the face are made using thread and needle. If you want your grandmother’s face to look like the real one, you’ll have to work hard or look for a step-by-step tutorial.
Hands are made of wire. Separately make the elbow and forearm out of thick wire so that the limbs do not fall from the weight of the blouse. Twist your palm, wrap it with padding polyester and pull the stocking on top. Using thread, form the doll's fingers. The arms are sewn to the body with a hidden seam.
If desired, you can make legs for the doll from padding polyester and a nylon sock. Hair is easily made from thread; needlewomen often use old wigs. All that remains is to dress the doll and grandma is ready. Using a similar principle, it is easy to make other dolls from tights.
Doll Bell
Since ancient times, it has been believed that the ringing of small bells brought good news. Travelers and postmen took the Bell Doll with them on trips. The bell was wrapped in shreds and formed into a small doll, which attracted good news to the house. She also symbolized the brownie’s wife, who kept the hearth and maintained comfort.
Bell doll bringing good news
Successful doll
Successful is a doll from the amulet class that helped its master achieve his goal. This doll helped both women and men. If you slip her a coin, it will help with financial problems; sweetness - will bring new strength to the owner to achieve the goal; ribbon, doll decorations will help in all minor failures; button to protect yourself from the envious eyes of others.
Successful woman with flowers and beads for comfort and small victories