Needlework
07/19/2018 Anastasia Prozheva
From generation to generation, our ancestors passed on folk traditions. People believed that they carried a strong energy flow. They composed legends, songs, and created conspiracies against diseases. All this enriches the culture and heritage of history. In this article, we would like to talk to you about creating folk dolls with your own hands, show detailed master classes and tell you why small dolls are needed.
Strong amulet
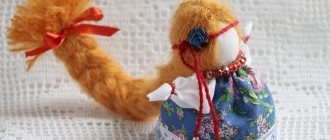
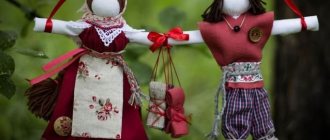
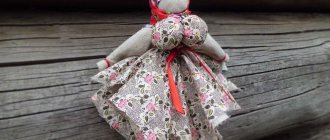
Most often, dolls were created in the form of a talisman and, perhaps, the most famous one is a toy for good luck.
For our lesson we will need:
- scissors;
- threads;
- needle;
- linen fabric (light shade);
- flax tow;
- cotton wool
When you have prepared everything you need, you can get to work. From linen fabric, cut a rectangle for the legs, a square for the head and two small rectangles for the shoes. A large square must be stuffed with cotton wool and tied with red thread. Now fold the corner and tuck the edges towards the center, tie with red thread, the handles are ready. Take large rectangles and roll them into a sausage, then bend them in half, tie them with thread, the legs are ready.
Place small rectangles with a bent corner on your legs. Take colored fabric and sew a triangular sundress for the doll and use a thread to make straps in that dress. The sundress should not cover the doll's shoes. Now let's prepare the braid, take the flax tow, comb it and divide it into two parts. Sew one part onto the doll’s forehead and pull the other back. Gently style your hair and braid it. Our doll is ready.
This doll can be given as a gift for health and pregnancy, and dormouse will also serve as a toy for children.
Doll made of tow (linen)
In the old days, fabrics were made from flax, which they grew themselves.
This was a lot of work, so play dolls were made from worn out fabric that had served its purpose; it was easily torn and therefore there was no need to use scissors. It was believed that worn clothes preserved the spirit of the one who wore them: a newborn boy was wrapped in his father's shirt, and a girl in her mother's shirt. They also made dolls from new fabrics, for weddings or gifts. Wool and linen are native Russian textile materials, from which the housewife could make everything she needed. In Slavic legends there are many references to linen fabrics, also called linens, rovnins, novins and crosses.
Linen is an amazing material: it is not cold in winter, and not hot in summer.
Stonefly pupa
Another famous “lady” is the stonefly pupa.
As a rule, it was made for Easter and hung by a thread on a finger. The doll was created from brightly colored fabric and burned after a day.
To complete this you will need:
- colored fabric;
- cotton wool;
- scissors;
- threads and needles.
Related article: Growing peonies - the secrets of experienced gardeners
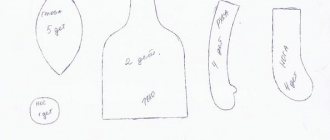
Make blanks from colored fabric. Rectangle to create the body. A long strip for twisting the head and a small colored square for the arms.
First, make a head by stuffing it with cotton wool and bandaging it. Place it 2 cm below the main triangle (from which we will make the body). Fold the edges on both sides and fold in half. Tie the finished head. Make handles and fold the edges to prevent the fabric from fraying. Tie the ends with red thread. To make a sundress, take a colored rectangle and fold it in half.
On the second fold, make cuts that will serve as armholes. They are inserted under the handles, and the sundress gathers into folds; tie everything up with thread. You definitely need to make a scarf on your head. It's very easy to do. Cut out a triangle from bright fabric. Tie over the head and tie with thread. Sew a neat loop onto the top of the head. The doll is ready.
From seed to linen
Flax was planted after plowing and harrowing the ground. At the beginning of summer, women, girls and children weeded the flax to remove weeds. Flax ripened by the end of August. Then it had to be pulled out - pulled out of the ground along with the roots and tied into sheaves. The sheaves were knitted in a special way so that the flax could stand and the flaxseed could ripen. Before the seed ripened, the sheaves were left in the field in dry weather.
Next, the flax was freed from the seed - threshed. To do this, it was taken out from the field and dried overnight. In the morning they threw them onto the wooden floor of the threshing floor and beat them with mallets; teenagers loved to do this.
The threshed sheaves were again taken out to the field and spread out. By Ilyin's day the nights become so long that the horse gets enough to eat, and the Cossack gets enough sleep. On nights like these, large, clean and not yet very cold poca falls onto the mown meadows. Lying on a mown meadow, brown flax takes on a steel-gray color. From the daily change of warmth and freshness, dryness and dampness, the flax fiber melts away from the hard unnecessary stem, which turns from flexible to brittle.
Having finished spreading it, they said: Lie down, little one, then get up and look in the mirror, if you don’t lie down, then lie down and lie down some more, just end up white and soft.
They began crushing flax when work in the fields and gardens was completed, when the first snow fell. Flax was crushed using a wooden mill. At the same time, the hard, rough part of the stem - the brome - fell down, leaving a handful of fibers in the hands.
After this, the flax was ruffled - the remains of the fire were knocked out of the fibers using a wooden tweezer. Then they combed it, spread it out on the table, sprinkled it with water and carefully rolled it into a tow. For a teenage girl they made smaller ones, for a child they made very small, toy ones.
Next, it was necessary to spin thread from the tows. They spun in their free time - mostly in the evenings at get-togethers. They spun a lot so that the blackness and stiffness of the linen threads disappeared.
The girls gathered in a common hut for gatherings, and each came with her own spinning wheel and a “lesson” of tow - the norm, which they were instructed to spin in a day. They spun until spring: “before Masdelka, the whole bundle must be spun, not left.”
Girls who knew how to spin finely were respected, those who were incompetent were condemned. Spinning took place during most of the winter; Both adult women and girls spun, starting from a very young age.
In the spring, in March, they began to weave. To do this, the yarn was first warped on a warping machine - the threads were measured according to the count for threading into the mill.
The fabric was dyed with natural dyes from various plant materials - tree bark, plant stems and roots, and berries. To increase the durability of the paint, salt, barley flour starter, and rosin were used. All dyes made from bark, and the raw material for paint itself, were called “oak.” The dried bark of bushes and small trees was crushed, boiled in an oven, and yarn, canvas or a finished item was immersed in this decoction.
Alder bark was used to dye fabrics to obtain a black color. Using alder sap, shades from sandy to velvety dark brown were obtained. Staining with birch bark gives a burgundy color, with willow bark - red or brown. Wild berries were used to dye the material blue or light blue.
The coloring properties of oak bark are known. The bark was poured with hot water, and gradually the dye from the bark went into solution. This solution was used to dye wool yarn and fabric olive-yellow or black. The saturation of the color depended on the mordant in which the fabric and threads were previously kept.
An aqueous extract from St. John's wort flowers was used to dye fabric yellow and green, and the same infusion, but acidified and hot, was used to dye fabric red and pink.
The yarn was also dyed in different colors (mostly blue, red and black) in order to make patterned fabrics on the loom. When weaving, depending on the alternation of threads in the warp and weft, the fabric was striped, checkered, or with patterns (circles, zigzags, diamonds). This fabric was called motley, motley, striped, shabby. Clothes and other things were made from it, for example, towels, ubros (patterned towels and scarves), tablecloths: colorful shirts, for example, were elegant clothes.
For the lower dress, they used motley and poskon - fabrics made from hemp (hemp) threads. Plain and motley wool made very durable clothing that served a person for many years.
Women's clothing, men's shirts were made from linen, and linen was made from new linen, which was bleached on snow crusts at the end of winter. Women's clothing was mainly made from thin fabrics, only wedding shirts were made from it for men, and coarser fabric was used for everyday men's clothing.
This is how flax traveled a long way from seed to canvas. A lot of time and effort is put into making the fabric. Therefore, the fabric was taken care of. Worn areas on clothing were replaced with new ones, leaving, for example, the sleeves and the top of the shirt the same.
The girls were not given new fabric for dolls - only scraps from used clothes.
They made clothes not only from flax, but also from wool, hemp, cotton, and nettle. But the most common were linen and woolen clothing.
Flax also has medicinal properties: the patient was wrapped in wet linen cloth for some illnesses.
Darekha for Maslenitsa
What family doesn't like to celebrate Maslenitsa? Everyone bakes pancakes and visits each other. There are various festivities on the square. In this section we will show you how to make a Darekha doll that you can give to your guests for Maslenitsa.
To make this product, we will need:
- multi-colored fabric (white for the head, colored for the skirt, yellow for the pancake);
- slingshot.
Use a white scrap to make a head, and a colored piece to make a chest (stuff it well with cotton wool). Wrap the ends of the slingshot with white cloth, then carefully make handles in a spiral with a different color. Attach the head and chest on top of the slingshot, bandage all the elements. Sew a fluffy skirt from a large circle and put it on the doll. Cut a scarf from colored fabric and tie it on your head. Place an apron over your skirt. Cut a circle out of thick cardboard and cover it with yellow fabric. Sew this circle to your hands.
Article on the topic: Openwork cardigans with knitting needles: patterns with descriptions and photos
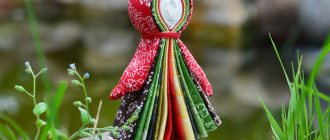
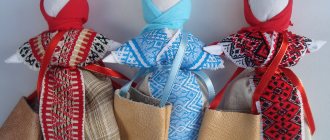
Success doll
Such a success, as in the photo below, is made with a bell and is an excellent amulet. Her homeland is Valdai. Since ancient times, there has been a belief that the ringing of a bell protects people from the plague and bad news. When a person gives a bell, he wishes his friend abundance, prosperity and health.
To make this product we will need:
- three circles of colored fabric (diameters - 25, 20, 15 cm);
- a small piece of beautiful braid;
- multi-colored fabric triangle;
- threads;
- needles;
- cotton wool for filling;
- bell.
Take cotton wool and tie it to the bell, cover everything with a large multi-colored circle of fabric. Tie with thread. Fold the remaining circles together, put them on the head and tie them. Use white squares folded diagonally to make handles. Then sew small cuffs to the handle. Be sure to ensure that the handles are the same size. Tie the braid around your neck and secure it at the back. Align all the details and sew buttons on the garment. The successful doll is ready!
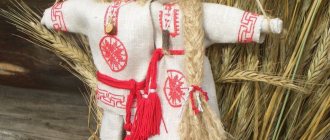
Making a folk doll Bereginya
“Keeper of the hearth” - this expression can often be heard in modern life. And the beautiful and “warm” word bereginya is undeservedly forgotten. There is an opinion that this was the name of the goddess among the Eastern Slavs, who was a collective image of female power aimed at protecting the Family. Since ancient times, people have made sacred objects associated with one or another deity. Our ancestors believed that such talismans and amulets were a conductor between man and God. The twisted rag doll is a clear confirmation of this. There was a doll associated with the goddess Bereginya. The doll of the same name was considered a very strong amulet - a protector of the home and family from any evil. Bereginya was made by the eldest woman in the family, a big woman. They made a doll based on a post (twisted into a roll of dense fabric) or birch bark. They tried to make the clothes bright and festive. Bereginya was placed in the front (red) corner.
My master class will help you master making such a pillar doll. The main thing is to have a desire for it, to be in good health and in a good mood.
For a doll 23 cm tall we will need:
1. Thick fabric for the base 20 x 55 cm (I have two threads).
2. Linen or cotton fabric for the face and hands 30 x 30 cm.
3. Fabric for the petticoat (chintz, calico, sewing, wide lace) 14 x 36 cm.
4. Colored fabric for the upper skirt 15 x 38 cm.
5. Two squares of fabric as for the overskirt, 9 x 9 cm.
6. Satin ribbon 1.5 - 2 cm wide and narrow lace for the nightstand. Length 12 cm.
7. Two narrow satin ribbons for the straps of a 13 cm sundress. You don’t have to make straps.
8. A piece of fabric for an apron 7 x 14 cm.
9. Natural red threads.
10. Triangle of fabric for a headscarf, long side 23 cm, height 10 cm.
11. Cotton wool for head volume.
We take the fabric for the base and twist it into a tight roll along the short side. When finishing twisting, do not forget to bend the edge inward. We tie the resulting column with thread in three places.
We wind cotton wool onto one end, thus forming the volume of the head.
We place the blank on a square of fabric for the head and arms so that the head is in the center and the other end lies on the corner. And we bend the fabric diagonally, covering the base post.
We lower the free ends of the square down and bandage it just below the head, simultaneously straightening the wrinkles and removing them from the face. If your face turns out flat, add cotton wool to your face before bandaging it.
Straighten the loose ends of the fabric to the sides. We tuck the tips of the corners and cuts inward (about 1.5 cm).
We form the palms of the doll. Stepping back 1.5-2 cm from the edge of the corner, tie it with thread. Hands are ready.
We tie the base along the chest line (exactly under the arms) and along the body with two crosses. Next we will put an underskirt on the doll. We take the fabric (I use sewing), put it face up, in the center, put the doll face down. The bottom edge of the fabric is 1.5 cm below the chest line.
We wrap the fabric around the doll, raising the arms up. We place the edges of the fabric on top of each other. We wrap the fabric along the chest line to the body.
We straighten the skirt down.
Let's start making the chest. We take two squares of fabric, place them wrong side up, and place tightly rolled lumps of cotton wool in the center. We collect the fabric into a pinch and tie it tightly with thread. Leave the ends of the threads 5 centimeters long.
We tie the breasts together. We attach straps from a narrow satin ribbon. along the waist line.
Let's tie the chest to the body. We wrap it along the chest line under the arms, on the chest and back with a cross. We will put a sundress on the doll in the same way as the petticoat.
Let's straighten the skirt down and tie on the apron. If you want to sew a ribbon or lace to the apron, do it in advance, before you start making the doll. Place a piece of fabric for the apron on the doll's face, wrong side up, and tie the apron under the chest. straighten the fabric down.
Let's put a night dress on Bereginyushka's head. First, we place the lace along the line of the forehead, with a ribbon on top, so that the edge of the lace peeks out. We wrap it around the head and tie it in a knot at the back of the head.
We tie a scarf around the doll's head and tie a knot at the back.
So the Bereginya doll is ready - the keeper of the hearth.
Recommendations:
If you are making not just a piece of furniture, but a talisman, try to follow certain rules.
- The doll is made in privacy and for one time only.
- Ask your ancestors for forgiveness for considering yourself better than them (if this is the case).
- Thank your Family for having it.
- It is better to take material for the doll that is not new. It would be ideal if the doll received a piece of clothing from each family member. It is clear that the fabric should not be very worn and clean.
- Instead of a fabric column, you can use twisted birch bark for the base. The birch was considered the Beregini tree.
- My Bereginyushka turned out to be 23 cm tall. It would be nice if you made a larger doll because you made Bereginyushki tall.
I hope everything worked out for you!?
Creative success and inspiration!